


How do I compress MMD renders? How do I convert video to use as a Background AVI in MMD? Unified solution for video handling? How to convert mp3 to wav? Convert to AVI, Convert to MP4, Better video compression?
FFMPEG: The deity, the god of media files
(Hey psst… This article uses words encased in %percentages%, and it means “Insert whatever it says here”. Example given: Team Fortress 2 used to bug out and show %killername% instead of the name of whoever got you.)
(Also, the format of this article is: Text first, then an image after re-stating the same thing, if there is an image.)
Handbrake, Cloud converters, AviUtl…
For years, MMDers have been using a myriad of different tools to compress, convert and modify their videos to fit their needs.
But they were all obsolete since the year 2000. Before MMD was but a mere thought, in the early stages of vocaloids development, the god of video/audio handling was born.
FFMPEG.
That who reigns above all, the peak, the ultimate royalty, the final frontier.
There are no words. Only power.
…
I… Am really hyping this up. But it’s for a good reason.
Hello, it’s been a while, I’ve been busy doing and not doing things.
But I finally, after some days of trying to figure it out, have finally found the last puzzle piece to make every other article about compressing and converting files on this site completely and utterly obsolete, and it all starts with finding God.
Not God as in any religion, but God as in the best utility for handling video and audio files there is.
It. Has. E V E R Y T H I N G.
Converting old, ancient video files to newer standards and back, allowing for the creation of some ridiculously specific video files, and even basic editing, if I could only bring 10 pieces of software to only use for the rest of my life, FFMPEG would be one of them.
It comes in three pieces:
ffmpeg – Handles conversion, editing, compressing, muxing, anything to do with editing files.
ffplay – Plays any file ffmpeg can handle. Handles Sega Dreamcast .ADX audio files, why not?
ffprobe – Probes your files for useful information. Allows you to take a peek at some things, should you need to copy that file’s aspects.


Yep, it’s even a media player. Why not? And to think, this ultra-powerful toolset is less than a gigabyte large once compiled…
My copy is ~305 megabytes large, being without the documentation. Could most likely stick it on a 700MB CD with documentation.
So let’s get down to business already.
The actual explanation, and not me hyping up my new techno-religion
FFMPEG was first released in the year 2000, and is meant to handle every single multimedia file created by man or machine. AVI? MP3? DIVX? OGG? PNG? ADX? A broken MKV file? No issue.
It’s been used in Blender, NASA projects, VLC, YouTube, Chrome and the Linux version of Firefox, amongst other things, proving to be a very versatile and powerful tool, carrying much of modern conveniences upon its shoulders.
And that power is yours for the low low price of absolutely nothing more than a tiny piece of bandwidth, time and storage space! At least in this modern era.
To harness its power, you need to speak directly to it, using the command-line. I can’t hear or see you, but if you start sighing and muttering something about not liking the command-line, know that I have some very choice words for you… That I can’t say. Not my website.

Let’s get into it, shall we?
Download and Installation
We will be using Windows 10 for this example. However, FFMPEG runs on damn near everything made after the year 2000, so you’ll be able to find installation instructions for Linux and Mac as well, and if you have a unique system using MIPS or something… I don’t know how you stumbled in here, you’re on your own. But it runs on MIPS.
To get FFMPEG fully working, you need to consider how you will be using FFMPEG. If you have all your video files you will be working with in one or two folders, you can just have the FFMPEG “binaries” in that folder. But if you have video files everywhere, in all sorts of folders, you will want to install it.
I truly believe you should install FFMPEG anyway, because that allows you to use it no matter where in your computer the files are.
To “install” FFMPEG and have it be usable everywhere, you need to add it to system environment variables. This requires administrator permission, so if you need to explain what you are doing to your parents or other guardians computer, pull up the Wikipedia page for it and shove their face onto it.
First, obtain God from https://ffmpeg.org/download.html

Since this is a tutorial for Windows, select the Windows logo. If not on Windows, follow another tutorial.
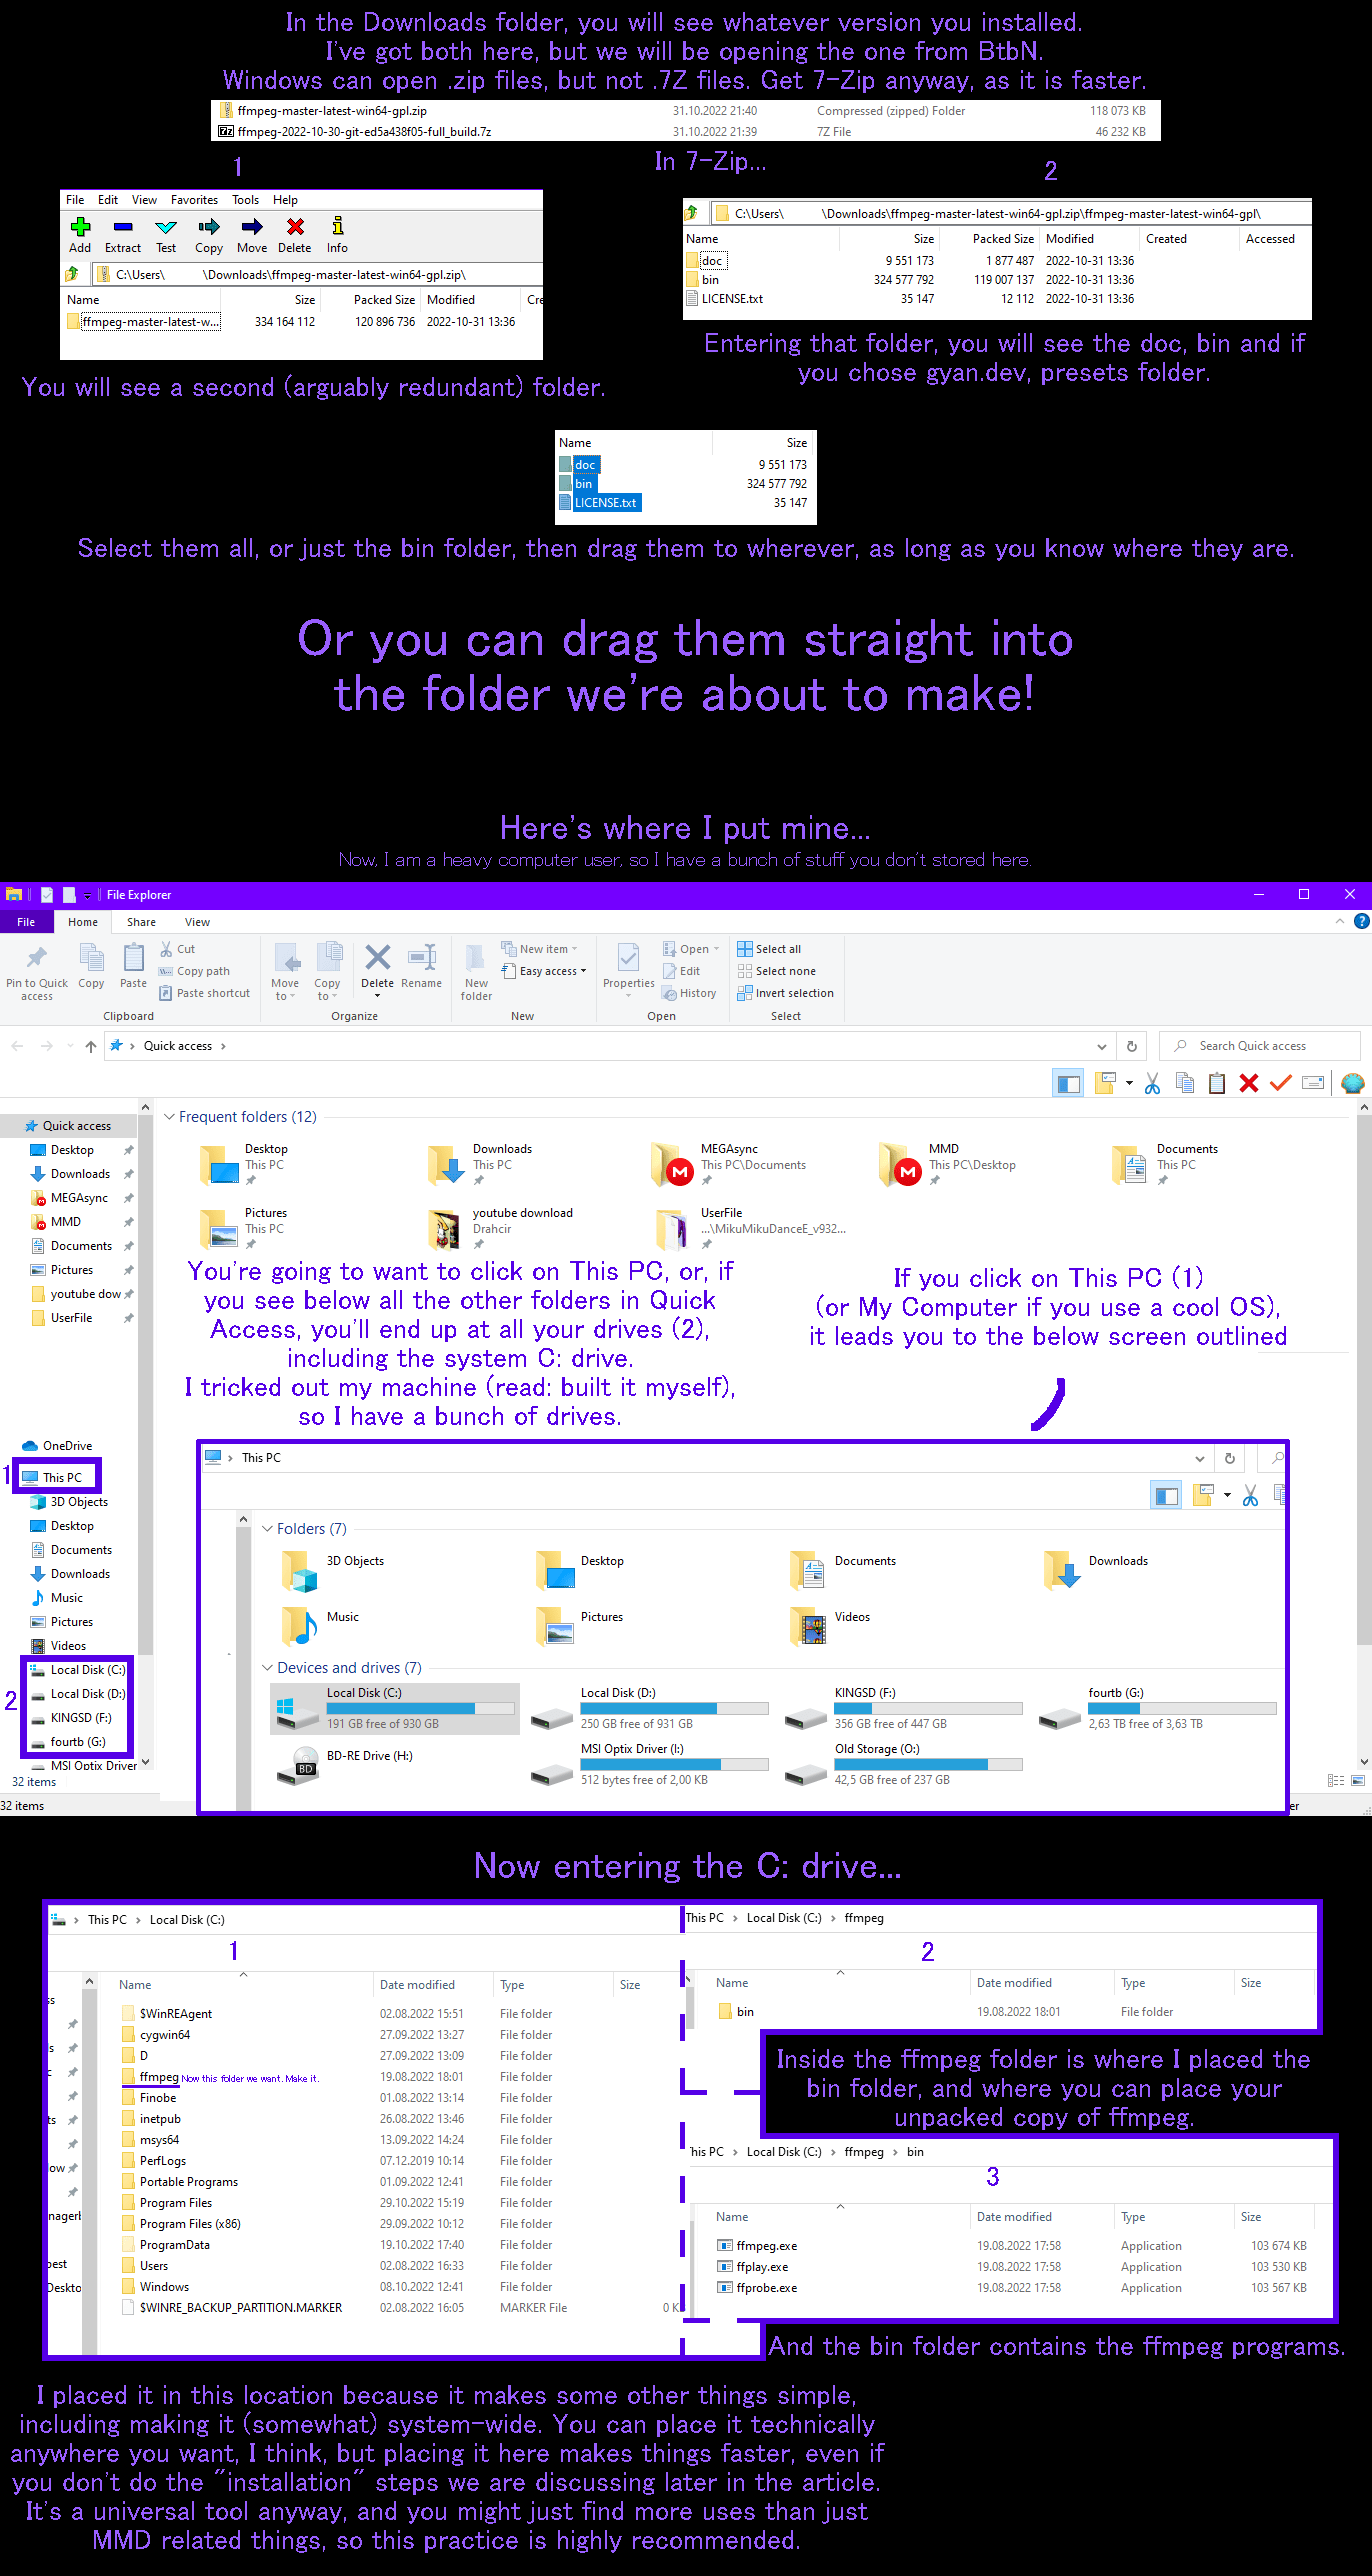
You will see two links. Both builds are functionally identical, from Gyandev you want the full one, and from BtbN it links to a Github page with a bunch of versions, find the one ending with ’Win64-gpl.zip’ in the name, and then download. Gyandev delivers in .7Z files, so if you can’t open these with Win-Zip or BandiZip, either get 7Zip or get it from BtbN.

Both of these are 64-bit builds. If you’re using 32-bit windows, you’re a bit on your own there, but you should be able to find what you need with a bit of googling, and BtbNs FFMPEG github page has tutorials on how to build it yourself. If you do find something recent that works, or you built it yourself, do tell so in the comments, and I’ll add it in.
Assuming you’re not running 32-bit and got it from either of the two…
Second, you will need to get FFMPEG out of its packaging.
Within the zip files, you will find a folder called ’bin’, short for “binaries”. There’s the executables. Get the bin folder out of there. You can also grab the doc and presets folders if you feel like it, but they’re not necessary.
It’s sensible to keep ffmpeg, ffplay and ffprobe in the same folder.
Now that you have ffmpeg out and decompressed, now you need to put it somewhere in the file system that’s easy to get to.
I put mine close to the root of the system drive, known as the C: drive. I have not yet experimented with putting it in other drives, so if you did, share the results in the comments.
To follow my path, navigate to the C: drive, easily found by clicking This PC, or under that where it says Local Disk (C:) or its equivalent in your language.
I made a folder there called ffmpeg, then put the bin folder inside that, so that the complete path reads ’C:\ffmpeg\bin’ in my case.
There’s a reason I put it this high (or is it low?), and that is to make it easier later on.
If you don’t mind lengthy invocations, you can skip the following fourth step, just remember afterwards to input the full path to ffmpeg instead of just typing ffmpeg during usage.
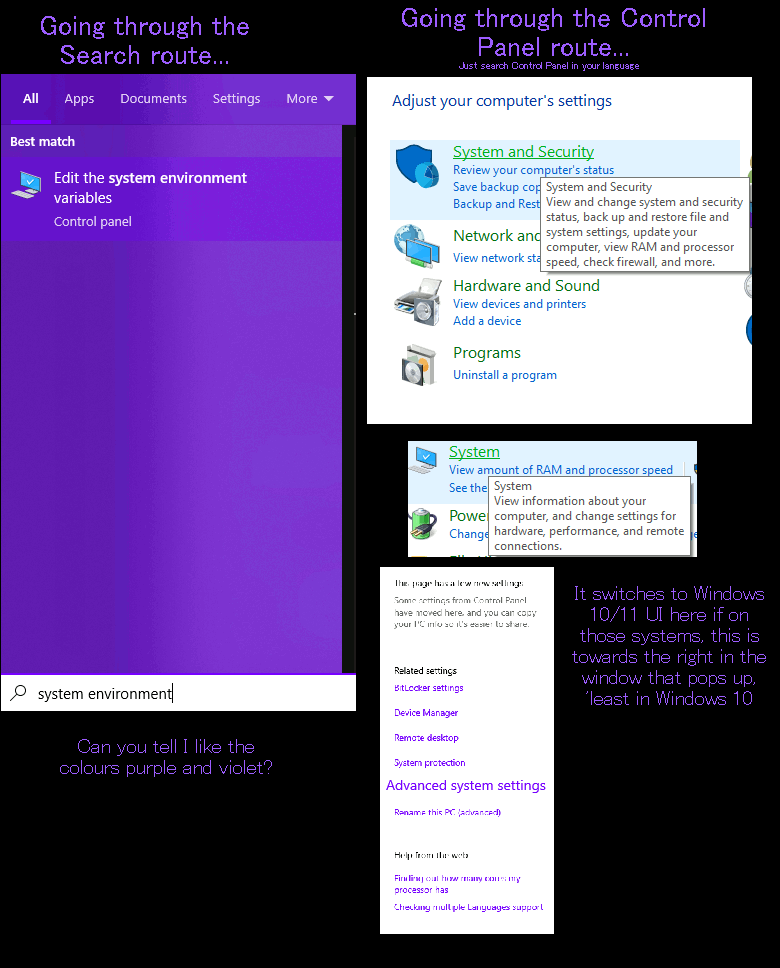
Now it’s ready for the fourth step. When editing anything advanced in the settings, there are several ways to go about it.
You can search System Environment or its equal in your language, then you’ll find “Edit the system environment variables” popping up. Alternately, you can go through Control Panel, going into System and Security, into System, and then find the Advanced System Settings. There should be an ‘Advanced’ tab.
In the window that pops up, or the tab if you went the other route, click the ’Environment Variables…’ button.
We’re going in deep, but stay with me. Under ’User variables for %username%, find the Path variable, select it, and click Edit.
In the new window that pops up, click New, and type in the file path to the folder that has the FFMPEG executables. THE EXACT FOLDER, I must add. In my case, it would be ’C:\ffmpeg\bin’, but if you put it somewhere else, you will have to find the path. An easy way is with the File Explorer, navigate to where you put your ffmpeg files, then click the top “address bar” to show the full path, then you can copy that and put it in.
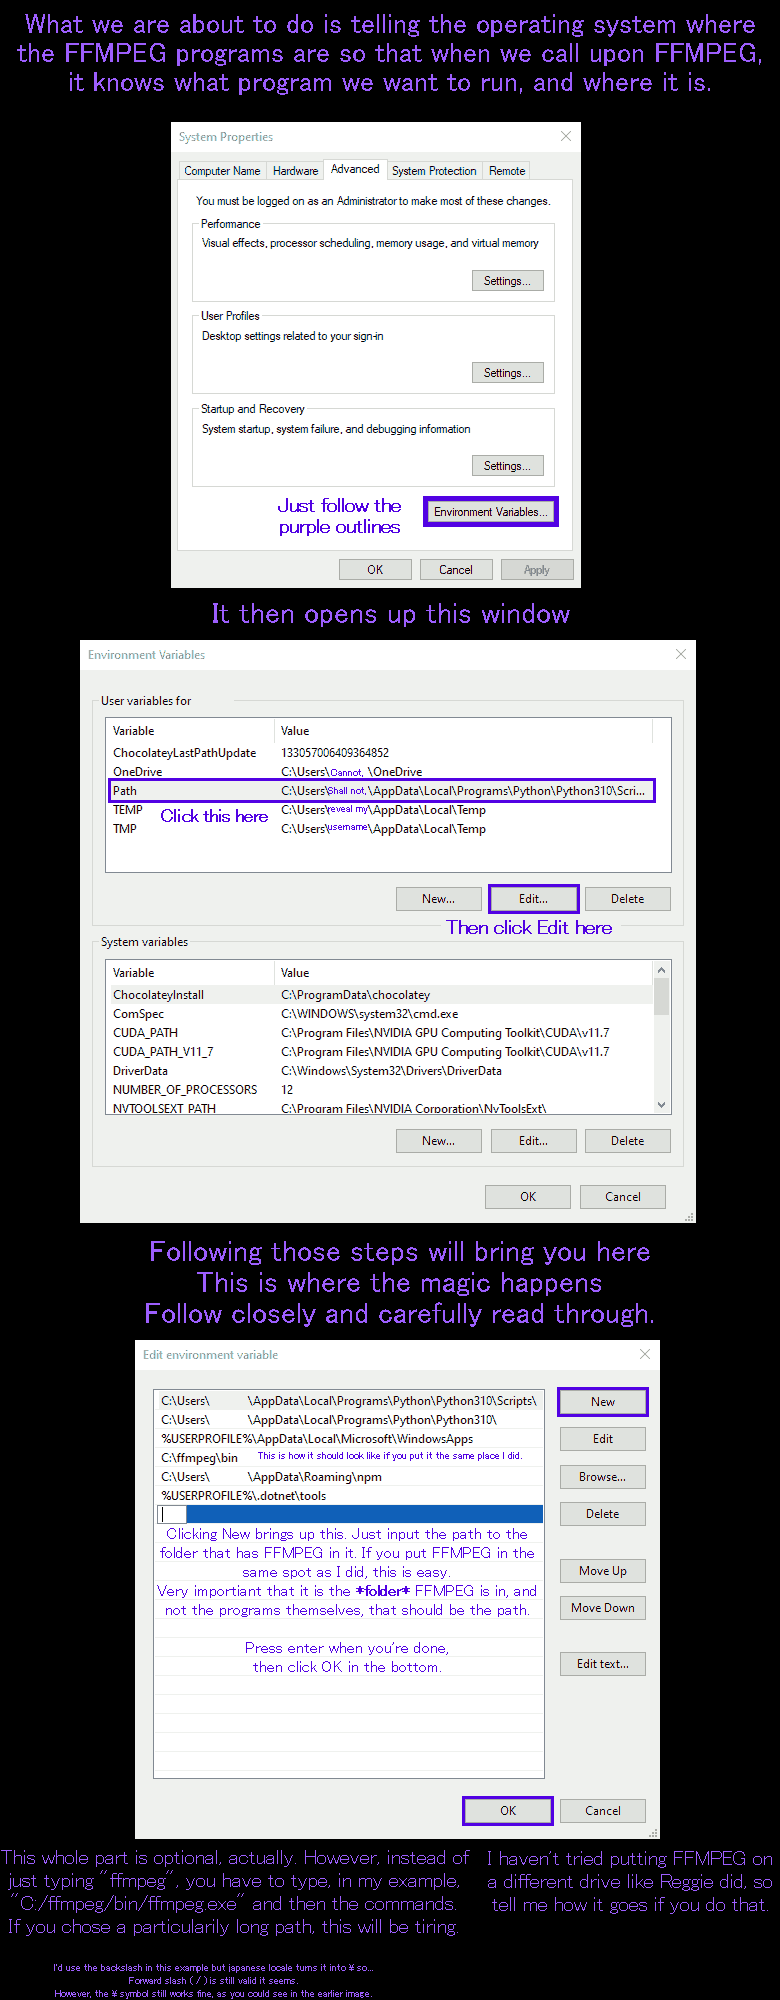
You can now click OK on that window, and the Environment Variables window, but you may want to leave the System Properties window up in the case something goes wrong.
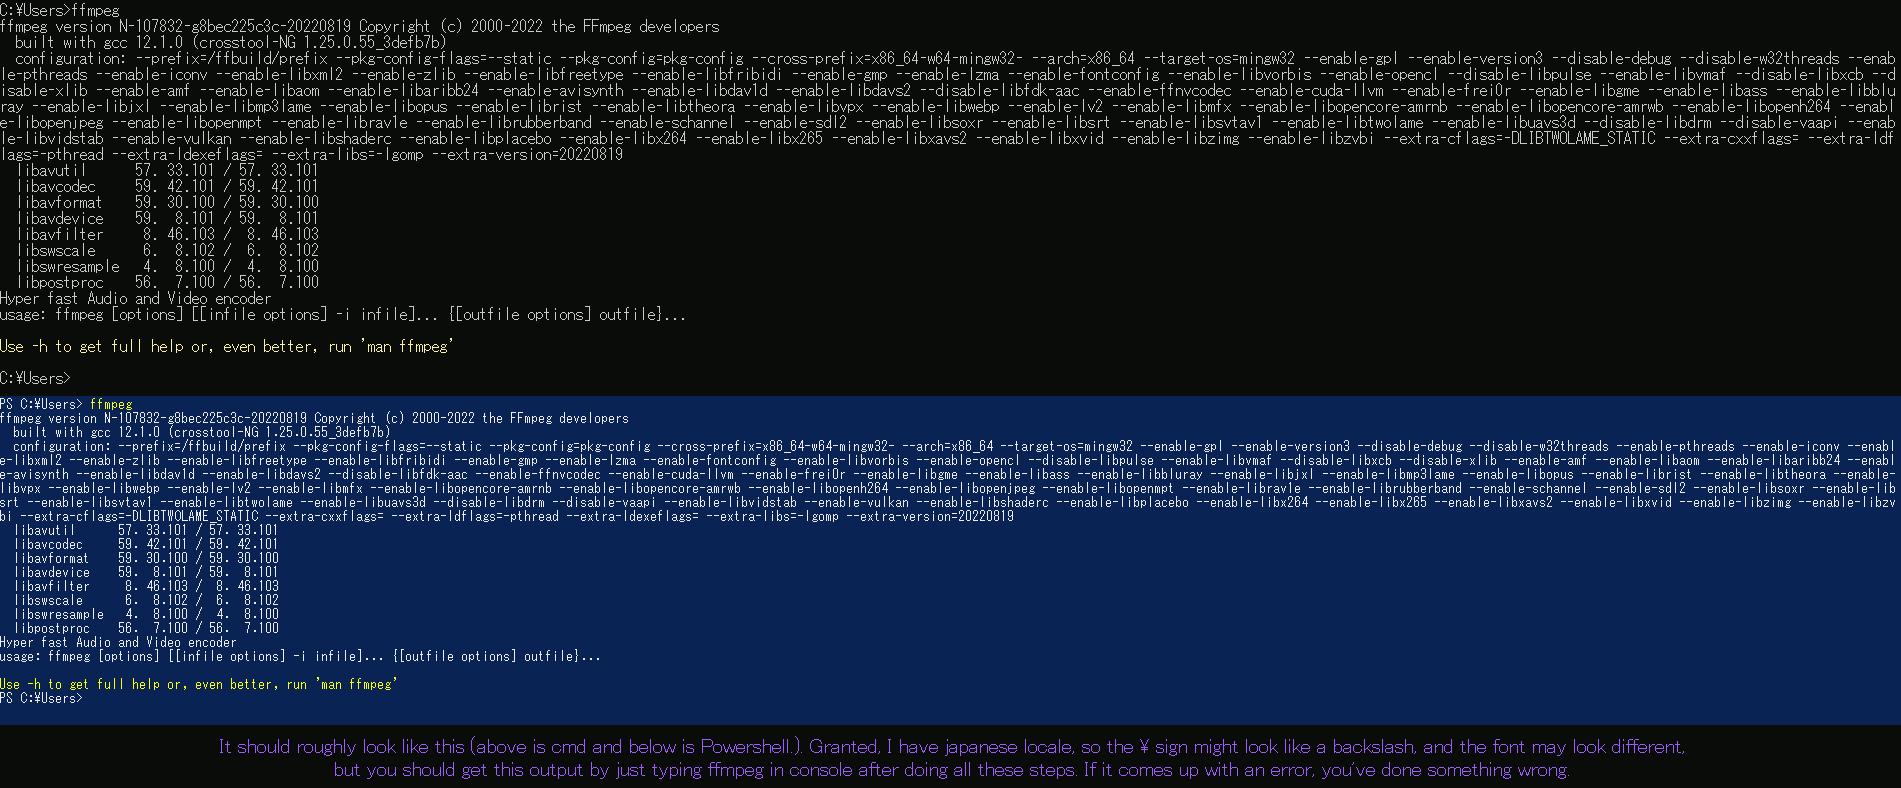
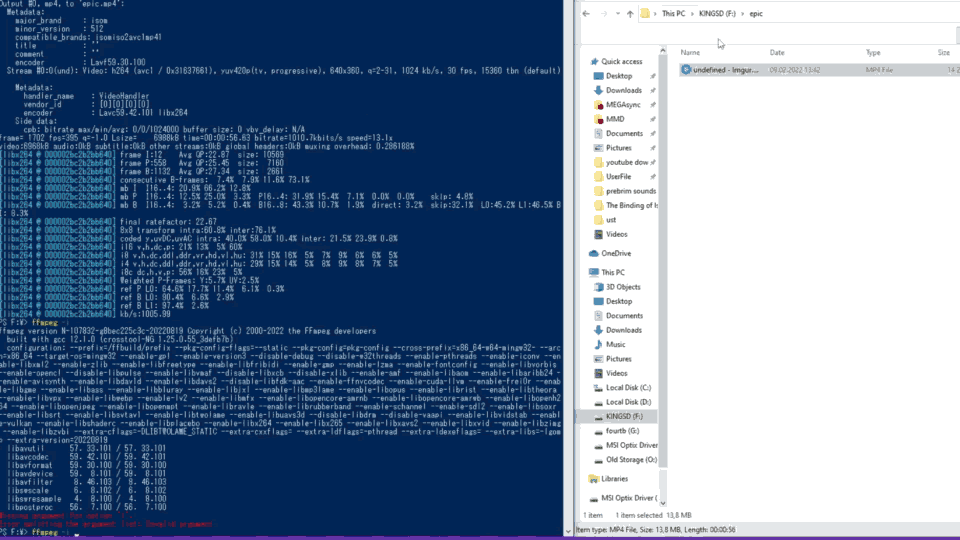
Now, open up CMD or Powershell, both work, and type ’ffmpeg’ or ’ffmpeg -h’ for the help function to see if it’s installed. You will know when it works, because you’ll see a bunch of stuff about codecs and flags and whatnot.
Usage
To harness the power of God, you must speak its language.
You must call its name, offer an input file, pray for the changes you want, all in its language. Only then shall it grant your wish, and its power to you.
Why, yes, I went back to presenting it as a deity, thanks for noticing.
Learning the language takes time, and knowledge of the creations FFMPEG can help you with. However, I’ll start you off with the basics and what is relevant to MMD.
Let’s start with the most likely case you’ll be using it for, and that is compressing the MMD rendered files that takes up gigabytes of space.
First, you’ll need to open CMD or Powershell (We will be referring to them both as Terminal from now on) to where you have the video files. There are a gazilligullion ways to make Windows do it, from manually navigating to it in the Terminal, hitting File in the top left of the File Explorer, Shift + F10 to open up the Extended Context Menu (Shift + right click does that too) in the folder you have them in, etc etc.

I just hit Shift + Right Click and select the ’Open PowerShell window here’, but in your case it might be called command window, or it won’t appear. If that happens, search up tutorials relevant to your operating system or manually navigate to it within the Terminal.
Either way, once you have the Terminal directed to the folder you have the uncompressed video files in, there are once another gazilligullidollion ways to compress and change your video files.
Reggie found out a method that allows you to address a file from anywhere, then I found out that you can just drag the file from the desktop or whatever folder into the Terminal window
The structure of an FFMPEG prayer goes like this:
ffmpeg -i %input.file% %-option1 option% %-option2 option% %output.file%
Let’s go over how this works.
You call ’ffmpeg’ and you offer it an ’-i input.file’, and you add in your prayers your ’-option option’ and then end it with ’output.file’.
I should mention the options, should I not? FFMPEG is massively flexible, it’s not just some simple video converter. We’ll go over this.
For now, let’s start with a simple compression prayer, taking a massive 1080p .avi file named ren.avi and turning it into a compatible 720p ren.mp4 while making it significantly smaller in file-size.
ffmpeg -i ren.avi -c:v libx264 -b:v 1024k -s 1280×720 ren.mp4

Let’s explain what you just said and why it’s not summoning a demon. And enough with the religious speak, now.
First, you call the command to run ffmpeg, but running it by itself without any options just brings up the version check and telling you to use the help command.
So you give it these options:
’-i ren.avi’ which tells it to use ren.avi as an input file,
’-c:v libx264’ telling it to run it through the libx264 encoder, resulting in a H.264 file,
’-b:v 1024k’ which tells it to compress with a bitrate of 1024 kbps,
’-s 1280×720’ telling it to resize the video to 720p (which is 1280 by 720 pixels)
’ren.mp4’ finishing the command, telling it what to name the output file and its container.
And that’s the most basic of compressions. Most, if not all, modern devices and programs support H.264, which makes it good for sharing.
But let’s say you don’t want this “low” quality. There’s several ways to do so. This command that I showed off is actually somewhat specific for the purpose of demonstration, and not really the best quality/storage space ratio.
If you don’t want to decrease the resolution, you can omit the ’-s’ size command, which doesn’t tell FFMPEG to do anything with resolution, thus defaulting to just keeping it as-is.
If the video looks a bit “low resolution”, even after letting the resolution be, that would be me setting a n unusually low bitrate on the ’-b:v’ example command. To get quality equal to YouTube’s 1080p, you want 6144k in a VP9 webm file (or did they switch to AV1 now? We’ll get to that later). Essentially, the more bitrate, the higher quality (Especially when there is a lot of moving things on screen).
However, if you’re intending to just store the videos without sharing them with the world, or you’re uploading to a site that re-encodes them anyway (Oh hey, there’s YouTube!), then you might want to choose a different, more modern and efficient codec to save on space.
Say… H.265. It’s also sometimes called HEVC. It’s as simple as replacing libx264 with libx265, but there’s something else you should note, and that is that the bitrate selection won’t work as well with H.265.
(Note: H.265 is actually a bit old at this point. But if you’re dead-set on having “mp4” files…)
Replace the -b:v command (INCLUDING the bitrate number) with ’-crf %any number between 0 and 51%’, lower numbers being higher quality and larger file sizes. Sane values go from 17 to 28, as most people won’t particularly notice the difference between a quality 17 and a quality 0 (lossless) file. You can do this with H.264 as well if you’re not targeting a specific file size.
If you are, well… Uh… I’m not good enough at targeting file sizes with FFMPEG and its two-pass encoding, and this article is large enough.
At the bottom, I’ll have a list of different codecs, links and settings that should be relevant.
I shall recite some prayers to you that should be of good use. But this is not the extent of FFMPEGs power, and you should find out more.
Storage compression (neat quality):
ffmpeg -i %filename% -c:v libx265 -preset slow -crf 21 %output filename%
It’s what I used together with a batch script to mass compress all my gaming clips, save for libx265 being hevc_nvenc instead to make use of my nvidia GPU. The -preset slow tells FFMPEG to take its time, and results in better quality and file size for the sacrifice of taking extra time to produce the file.
Quick, dirty, simple:
ffmpeg -i %filename% -c:v libx264 -preset fast -b:v 1024k -s 640×360 %output filename%
Creates a 360p video with low bitrate and not giving the computer too much time to think about it. You can make it go faster, but the fast option is good enough.
You know, there’s one thing that this entire article has been… Stalling. And it’s why I praise this as a deity. I give to you, the prayer to turn any video into an MMD-supported AVI. It took me a good while to figure this out, but I finally did.
*Suspenseful drums*
ffmpeg -i %filename% -c:v rawvideo -pix_fmt yuv420p -f avi -s %any resolution where the resolution values are divisible by 8% -an %filename%.avi
This. This is the final piece.
This sets the “codec” to raw video, it being what MMD supports, sets the colourspace format to yuv420p, then sets the format to avi, more specifically AVI 1.0, then modify the resolution to what you need, removes audio (-an) and finally set the target filename.avi.
So.
MMD, as far as I know, can only accept rawvideo (and some esoteric forms AviUtl makes), which is also what it makes when rendering Raw AVI. But it also needs to be three more things, after further experimentation:
The resolution needs to be divisible by 8, meaning that both the horizontal and vertical resolution needs to be divisible by 8. Or you can ignore that rule, and end up with stuff like this:

Here’s a list of 16:9 resolutions, any of the ones highlighted will make the video show up correctly
Here’s a wikipedia page showing all the other common resolutions, in case you have a different aspect ratio in mind: https://en.wikipedia.org/wiki/List_of_common_display_resolutions
Just divide both the numbers by 8 individually and see if you get a whole number… Now, where were we?
The colourspace (or pixel format?) needs to be yuv420p
The resulting file must be less than 1 gigabyte
In Reggie’s AviUtl video, he simply referred to a low resolution as the thing that works, but in reality it can be any resolution as long as it’s under 1GB in size.
Not that it helps if you’re going to use a long video as a background AVI, but at least you can push resolution as far as you can.
Bitrate settings doesn’t seem to help due to the rawvideo codec being, well, raw video, so the only way you can make the file-size smaller is by dropping the resolution. At least, for now.
But that is not the fault of FFMPEG.
… I wonder if some mad whiz is going to make an MMD plugin that inserts FFMPEG to process background video files instead of MMD’s default? Same with the rendering process.
Summary
FFMPEG is an advanced command-line and API tool used to handle several kinds of multimedia files, most notably audio and video.
Used by NASA to compress images and videos before sending back to Earth, used by YouTube to handle the gudollions of videos being uploaded, and even used by Handbrake and multiple video players and editors as its backend, there is no truer tool and friend than FFMPEG.
It grants you granular control of everything, should you learn its language and functions, and will prove an utmost valuable tool for any MMDer, even if they’re not aware that they’re simply using an inferior front-end with 1/64th of the features available.
This is the final frontier for serious video processing, at least if you’re not engineering something like this yourself.
So, here’s some relevant links and options, coming right up, before I sign off.
Links:
ffmpeg main site – ffmpeg download – ffmpeg documentation
ffmpeg options:
-c:v %codec% – Sets codec, or more specifically, encoding engine. If you know your GPUs you may use them instead of your CPU to compress, giving better performance or speed. For the sake of being fair, I’ll only include the basic ones because I don’t have an AMD card.
libx264 (h264), libx265 (h265), libvpx (VP8), libvpx-vp9 (YouTube either uses or used VP9 for the longest time) (VP8 and VP9 needs to have .webm instead of .mp4)
libaom-av1 (Original reference encoder for a new format called AV1.)
libsvtav1 (Current AV1 encoding engine made by big names)
(AV1 uses .webm as the main container)
AV1, being a new codec, promises EVEN MORE efficiency, and is worth experimenting with going forwards as the method to store video files. Read up on how to use it. If you’re a strange fella with an Intel ARC card like I am now, those support hardware AV1, though I don’t know about FFMPEG’s support of those.
-s %WxH% – sets resolution of video. Make sure that it’s just a normal x as in the letter, and not the mathematical × unicode multiplication sign. (Reggie made that mistake)
-crf %0-51% – Sets quality setting on compression. Sane values 17-28, lower number means higher quality and file-size.
-b:v %bitrate% – Best used in H.264, sets bitrate.
(There’s also two-pass encoding which I cannot wrap my head around)
-f %format% – Forces a specific format. Only relevant here when making MMD-compatible AVI files.
-an – Removes audio. Relevant in MMD.
-preset %speed% – Gives FFMPEG a certain speed to work at. Slower = Better quality/filesize ratio, at the sacrifice of conversion and encoding speed.
There’s a bunch of audio commands that I never use when dealing with audio within video files, too.
As for audio files alone, you can simply convert audio to WAV, FLAC or MP3 or what have you by simply doing what we’ve been doing with videos. Lastly, when changing the bitrate of audio, you have to put -b:a instead of -b:v (same with -c:v becoming -c:a) and audio bitrates are notably different than video bitrates. 128k is plenty fine for most.
(Example to simply convert to wav: ffmpeg -i stalker_scream.mp3 stalker_scream.wav)
Opus is great for webm files, -c:a libopus -b:a 64k is as low as you can go while it still sounds decent. However, just let FFMPEG handle the defaults. Some people with very sharp ears and very expensive audio equipment may notice, so if you ask me, it’s not worth compressing audio unless you’re REALLY pining for compression.
Again, I don’t really experiment with this, so share your findings in the comments.
NordGeit, signing off.
Easter egg: The hex code is part of MMD, found by opening the exe file in HxD with some stuff to make it look all green and cool
– SEE BELOW for MORE MMD TUTORIALS…
— — —
– _ — –
![]()
