

MikuMikuDance How can I change the color of my models? How can I edit my models in MMD? Is there a tutorial for PMD Editor PMDE available in English?

Make Your Own MMD Models – PMD Editor Basics
Ever wanted a model of a certain character, but haven’t been able to find it? Or the only one you can find doesn’t look right? Or maybe you have a great idea for a model, but can’t make it.

Well, today we’re going to learn how to fix this problem, or at least start learning how! My name is Stella, and I am an ambitious (Sometimes a bit too ambitious) MMD modeler, with experience in all aspects of PMD Editor. I’m going to teach you the basics, starting with the interface. I’ll even teach you how to make your very first model – and use it! Sound fun to you? Then keep reading. ;D
Download PMX / PMD Editor!
This article was written in 2012 and was about using the older 039 version by ibozo, available from his dA page. Though not perfect, it worked and was easy to use. Please click the link in the following box to get the latest translated version of PMXE:
Editor’s Note:Please use the latest translated version of PMDE/PMXE.
|
LearnMMD has many articles about using PMDE/PMXE!

Be a good MMDer, “Keep the Faith-MMD”.
When you first open PMD Editor, you’ll no doubt see something like this.
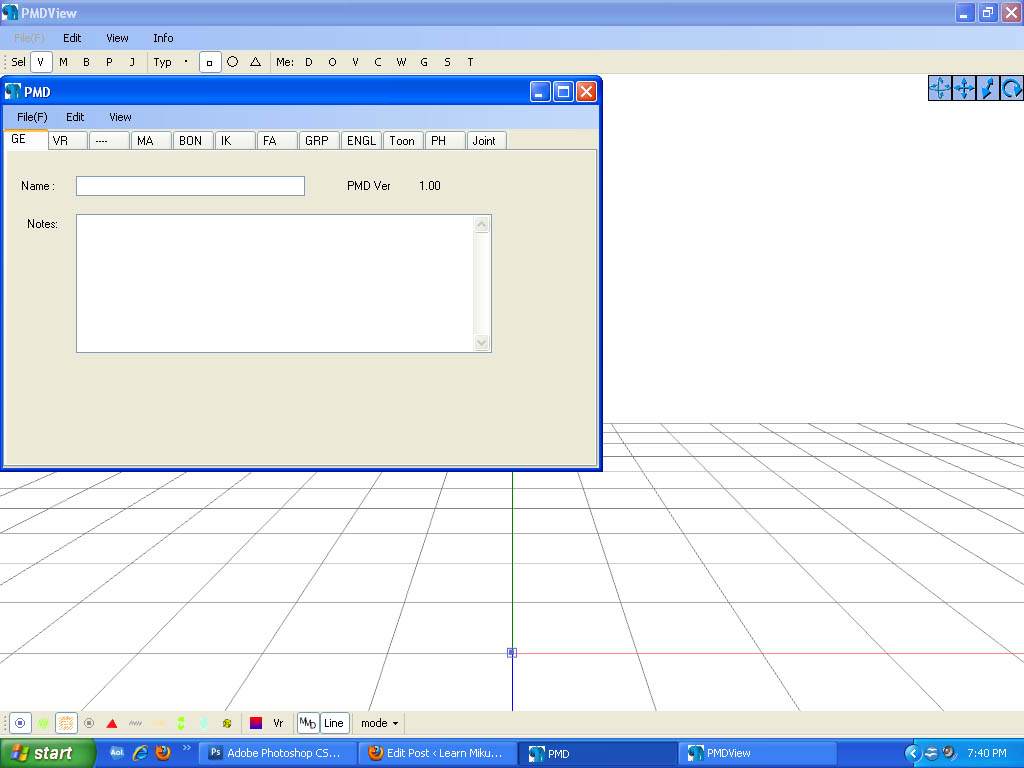
This may seem a bit confusing and intimidating to a newbie. Sure, there are a lot of things that are just like MMD. There is a bone in the middle (Which is always there for some reason), and our good friend, the coordinate axis. There’s also the camera control buttons in the upper right corner, just like in MMD.
But WAIT! What’s this? A whole separate window, with just text?! Blasphemy! O:
Yes, it will probably come as a shock to most of you used to MMD, where everything is all in one window. However, PMD Editor has so many things to do and so many features that
ADVERTISEMENT
it couldn’t possibly all fit! So the creative geniuses (Whoever they may be; I wish I knew…) behind PMDE came up with a unique solution: The tabs.
If you look at the smaller window, you will notice that it has several tabs, much like most internet browsers – Likely including the one you’re reading this post in! These are the editing tabs. Each tab pertains to a specific aspect of a model, be it bones, materials, physics, or whatever.

Recoloring an MMD model …
For this project, all we will need is the materials tab. We will be recoloring a model, the most basic of all edits. Now, I won’t lie to you; If you’re like me, someday you’ll look at this model and cringe in horror. “Oh god! Why would I make such a horrible edit? Only noobs do that! My latest models are sooo much better!” Well, don’t get discouraged! I started out doing recolors too, much as I may hate to admit it. ^_^’ Even if they’re not as fancy as Gijinshi-san or Nanami-san’s models, you’re not going to get anywhere if you don’t learn, and the first step of learning is recoloring. If you do this, you’ll have started on your way to becoming a great modeler. Someday you’ll be amazing. Don’t give up!

EDITOR’S NOTE: While it is easy to make changes to your model, the creator of your model may have requested restrictions on the copying, modifying, and redistribution of his artistic creation. See the READ ME document included with most models to see if the author has asked for you to respect him in these ways. If you modify a model for your amusement, you may use it in a video, but do not share it or make the link available online unless you know, for certain, that you have the permission to do so.
See this link for the MMD Rules of Etiquette.
So, the first thing you’ll want to do is load up the model you want to recolor. I’ll be using Animasa Miku. Next, switch to the materials tab, or MA. This is what you should see:
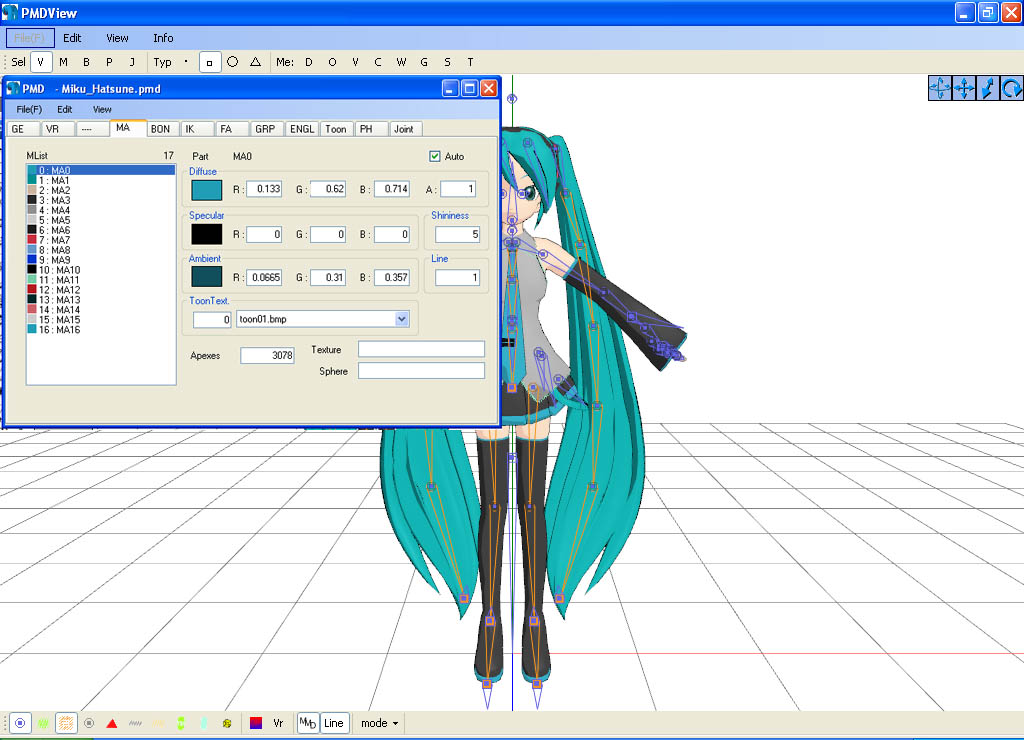
It’s hard to see here … so click on that picture to see the enlarged view. There’s a list of materials, named MA with a number: MA0, MA1, MA2, and so on, all the way through MA16. These are the materials; Basically different parts of the model. (More on that later.) Each material has its own specific color. The color and

Specular is basically the color light reflects as. This is generally set to some shade of black. It won’t make much of a noticeable difference in PMDE, but if you change it, you’ll be able to see it in MMD.
If you look, you’ll also notice fields with numbers next to each color type. These affect different qualities of the material. Next to the diffuse is A, or alpha. This changes the transparency. This can be anywhere between 0 and 1. Next to the specular is shininess, which is rather self-explanitory. The higher the number, the higher

That’s pretty much everything you need to know to make your very first model, a simple recolor. ^_^ Play around with these settings, and see what you can do! And remember, don’t be afraid to experiment on your own. Explore the rest of PMDE! See all of the MikuMikuDance tutorials available on LearnMMD.com. See the List of MMD Tutorials on the LearnMMD homepage. Learn more! There’s no limit to what you can do.
– SEE BELOW for MORE MMD TUTORIALS…
— — —
– _ — –
![]()
