


These lights can be really important/helpful for re-creating many real world lighting situations. However, as with real lights, they

Plus no one else seems to have made a tutorial on using these lights so, you will be in for a real treat. You should be able to end up with results similar to what is demonstrated in the video below if you follow along with the discussion in this article.
RAY-MMD:
Spruce up your videos with Dynamic Lighting!
This tutorial will use certain assets to illustrate the process. We recommend that you follow along using these same assets but do feel free to substitute with your own model selections. Do note, however, that RAY-MMD has multiple options to allow it to address different lighting situations, so if you do use a different selection of models, some of what is written here may become inapplicable.
RESOURCES
Anyway, here are the assets we will be using:
ONE by Mqdl – this is IA’s sister and a relatively simple model but one that works well with RAY-MMD. I chose her because she works well with the song in the motion that I am using for this project. She is really easy to shade and honestly, I am so sick and tired of the seemingly endless numbers of TDA style models being shaded with this effect.
ONE can be downloaded here if you do not have her already. The version here is cosmetically the same as the model as issued but with some labeling enhancements.
The motion by Ureshiiiiii can be downloaded here. I just chose this one as I like the song and the performance isn’t all over the place in terms of the stage area used. Plus it is short which makes it a good candidate for a demo.
The stage used is one that I made specifically to test stage lighting in MMD: MMD Simplex Stage. It is really simple but it does the job fine plus it has built in spot lights. We will really be using those here to provide illumination!
You will also need a copy of MMD 9.31 and RAY-MMD 1.5.0. The lights we will be using are not that resource intensive so should be easily handled on most contemporary PCs and laptops with at least a decent graphics card.
Did you watch the demo video?
If you didn’t please do because what may not be obvious is that, that video would not look the way it does without the use of the extra lights. Plus it has other neat but subtle tricks that we will also be discussing below.
What we want you to see, specifically, is how the lighting works on illuminating ONE. It is dynamic; it changes depending on where she is and what she is doing as well as the camera angle. In other words, it works like a real world lighting system. All of this is done with only the assets that comes with RAY-MMD by default as no other effect were used (or needed) in this production.
Create a Lighting Strategy/Plan/Analysis
Whenever you start a project that aims to duplicate a real world lighting schema you need to have a plan. In this project the plan was as follows:
- A night performance
- So we needed to determine the primary light source. In this case the moon. Moonlight has certain characteristics and so we developed criteria to capture these.
- Secondary light/illumination sources. Moonlight is directional and does not provide a high level of illumination so artificial light sources has to be added to raise the level of illumination falling on the performer.
- We also factored in side effects that would result in using all the different light sources. Such as moonlight having a blue bias and spotlights creating an opportunity to introduce BLOOM (and glare) into the equation.
RAY-MMD can accommodate all of these factors and then some. To keep things easy to understand in this article we took a KISS approach so we will be taking some short cuts (and cheating a little) but the results will still be credible.
Set up the scene.
First load the stage and ONE model into MMD. At this point you want to figure out EXACTLY where the spot lights need to be placed. You can either use the actual spotlight models (PointLight.pmx) or the dummy bones for this. If you use the spotlight models, you will have to remove them before loading the main RAY-MMD components or you could cause those to malfunction.
What you want to do (with paper and pencil) is to note down the exact coords of where every single spot light needs to be added. Since we are only using 4 spot lights (as the stage only has 4 stage light models), plus these are arranged in a convenient pattern; this should be a simple exercise and I will also give you the coords used below.
The principle here is to place them as close to the front of the lamps as possible. RAY-MMD comes with a variety of add on lights but for our purposes we will be using only PointLight.pmx; four of them specifically.
We are using these types of lights as they are the easiest to set up. These are not 100% accurate as they are omni-directional but they work fine for our purposes with the added benefit of not having to go through the pain of aiming them. Some of the lights that comes with RAY-MMD actually do have a directional bias which is great, but we want to keep things simple here.
Anyway here’s how the PointLight model should be located against each light:
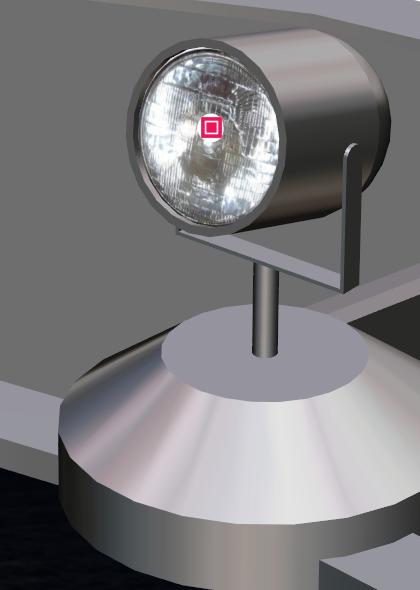
Close enough will generally be good enough so don’t sweat having to be 100% accurate.
If you are using this stage the light positions are as follows:
- 14.15, 6.40, 14.15
- 14.15, 6.40, -14.15
- -14.15, 6.40, 14.15
- -14.15, 6.40, -14.15
If you are trying to position lights in MMD from scratch, my tip is to turn off the perspective view and use the preset front/side/top views to get things precisely positioned.
Add the RAY-MMD components.
Next add the RAY-MMD components, preferably in this order:
- Sky with box.pmx from the Sky Night folder.
- ray_controller.pmx
- ray.x
Remember to REMOVE any PointLight modules that you might have added BEFORE adding these components. MMD does not like it if you add the PointLights (or any of the other lighting modules) until after these are loaded first.
Incidentally, all the RAY-MMD lighting modules are in the Lighting folder if you do not know where they are.
For now, leave the PointLights unloaded as we want to do the initial lighting set up first.
Setting up the primary light source (and shaders)
Under the Main MME tab add main.fx to ONE and the stage model.
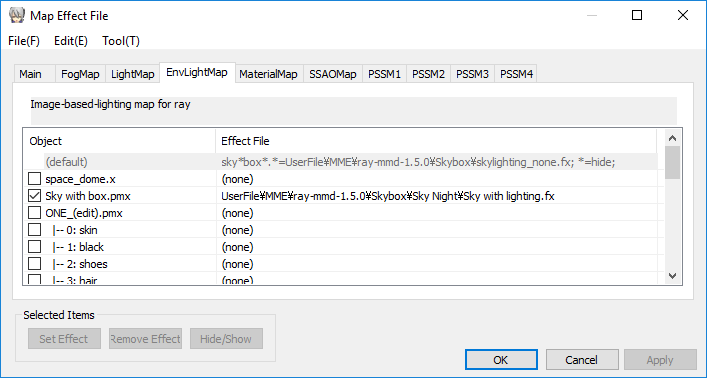
Next add Sky with lighting.fx to the sky box under the EnvLightMap tab. Make sure you use the same version of this file as the one in the same folder as the sky box (Sky Night).
Skip over to the MaterialMap tab and add material_2.0.fx to the stage model or you won’t be able to see it. You can then expand the materials and do whatever you like to spice up the models. What we did is shown below.
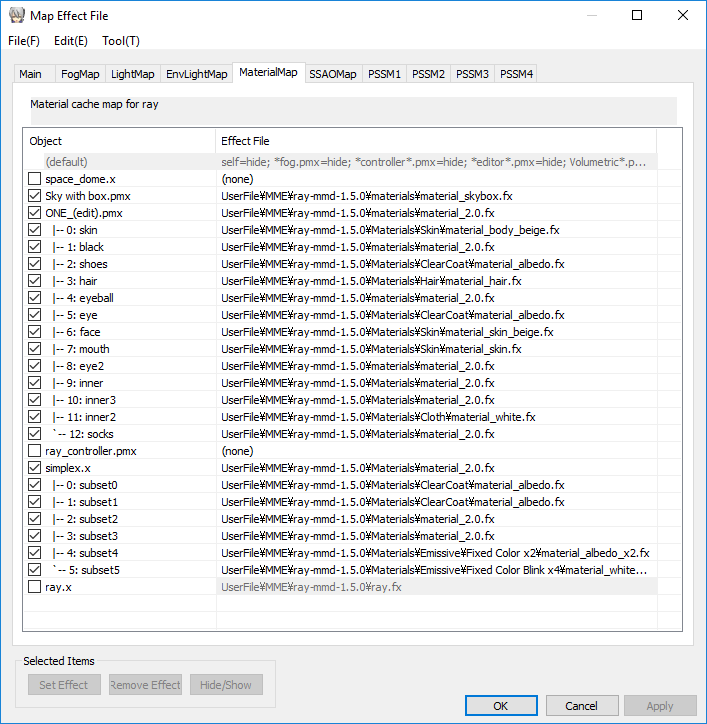
Please note that I relabeled the materials on my copy of the ONE model so it probably won’t look the same as on your copy. With your performing model, do as you like. The only special thing I did was to add material_albedo.fx to parts of her model that I really wanted to look shiny. Notably her boots but especially her pupils.
As for the stage note that I added to material subset4, Materials>Emissive>Fixed Color x2>materials_albedo_x2.fx. This “lights” up the lens part of the spot lights.
For material subset5, Materials>Emissive>Fixed Color Blink x4>materials_white_pink_x4.fx. This causes the stage accent lights to blink in these colors. I just chose this option as it complements ONE’s color scheme. But you can (and should) experiment with the other options.
Note that the x# at the end of the effect file name just indicates the degree of glow around the light. From x1 having next to none and x4 having the most. Also, any “albedo” effect uses the base color of the materials to which it is applied. Useful if you do not want effects to overwrite the characteristics of the original underlying materials.
Hey there really is a moon – a virtual one that actually gives out light!
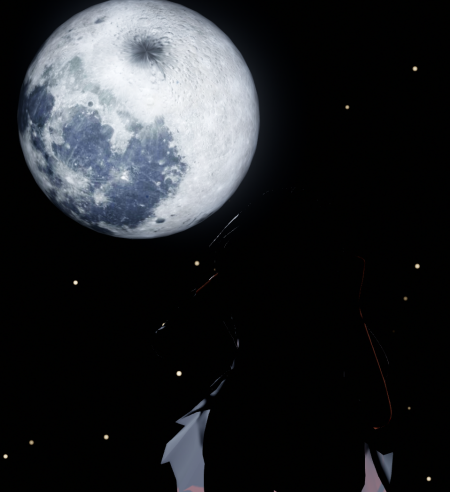
You may have to swivel your screen around to see it, but there really is a moon that comes with this sky box and it is configurable. And you DO want to configure it as it is de facto the primary light source (at least calculations wise). The view above shows that the moon is located directly above and to the front of ONE.
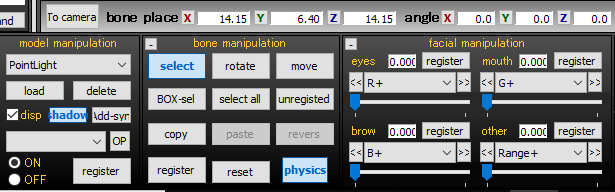
You set the moon’s position using MMD’s lighting controls. Our settings are as shown below:
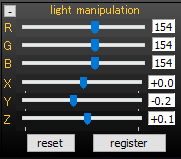
Notice that I ignored the RGB controls, we used the ray-controller widget to set these instead. But the light manipulation controls were used to set the direction of the primary light source (the moon). The moon in the sky box is actually dynamic. Look at it for awhile to see what it does, but even though it looks like it is giving out light, it isn’t; that’s done by RAY-MMD and MMD’s lighting engine. This means we need to fine tune it to make moonlight look like moonlight. But where the moon model is does give you an exact idea as to where the primary light source is being calculated as coming from.
These were the settings we used with the ray-controller widget to reproduce moonlight; don’t regard these values as set in stone. These were just the values I chose to best interpret what I wanted the moonlight to do in this video:
- sunlight- : 0.35
- contrast- : 0.15
- BalanceR- : 0.15
- BalanceB+ : 0.30
This is the end result of all these settings:
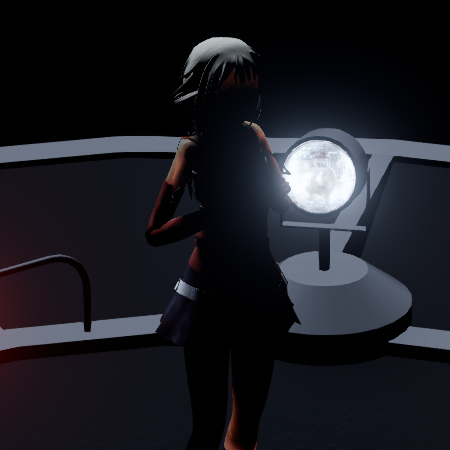
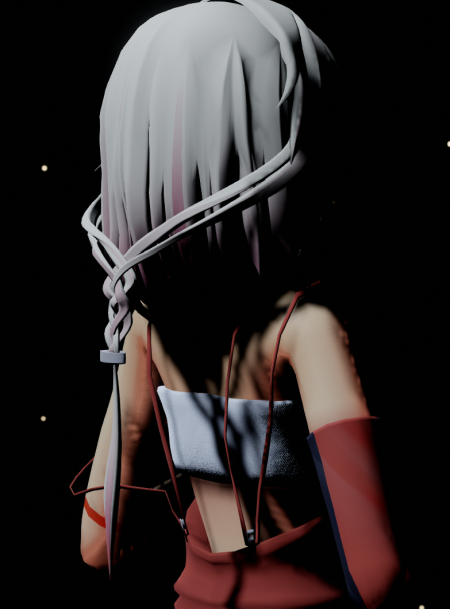
But this set up is no good for a video, especially if both ONE and the camera are spinning around. This is where the PointLights come in; and they will make a world of difference!
If you have not done so, add the motion to ONE but don’t add the camera motion yet.
Lights, Camera, Action!
Add the four point lights back. We are using PointLight.pmx. Like we said, we are cheating a bit as this type of light is omni-directional. I chose to use this type as they are the easiest to set up. Apart from anything else, they do not have to be aimed. But the following inaccuracies will be present.
- the areas immediately around the PointLights will receive the most illumination. Not really accurate if we wanted to be totally honest in representing a supposed directional light source.
- we have not accounted for the blinking accent lights. In real life these would have an effect on ONE and the surrounding stage areas but it’s too much of a pain to have to account for 8 other light sources.
- do note that if you wanted to, using RAY-MMD, you can account accurately for the moon, all 4 stage lights and the 8 accent lights.
Setting up the PointLights
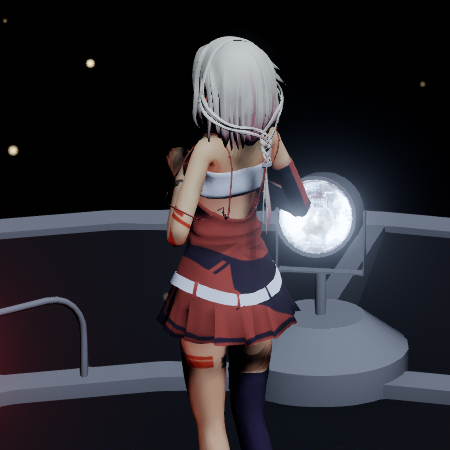
Use the settings/coords above to position the 4 PointLights. When first loaded, the lights are OFF (actually they are just giving out a black light). To turn them ON do the following:

Set the R+, G+ and B+ value to the max. This causes the PointLights to give out white light. Not totally accurate if you want to be picky, but good enough for our purposes. Then set the other values as follows to tone them down a bit otherwise the lighting will be too harsh. We are using basic settings and these are fine as the lights are relatively close to ONE and we don’t really have to account for atmospherics.
- Range- : 0.5
- Intensity- : 0.5
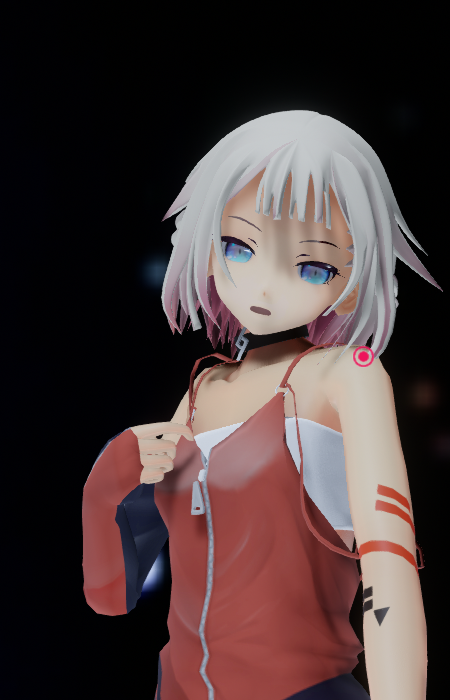
All four lights share the same settings. So go ahead and do that. You should notice the difference they make immediately.
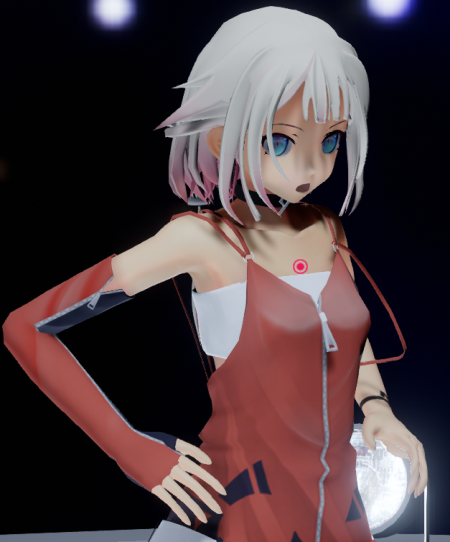
Just compare the screen capture of her immediately above with her shown above with only moonlighting. If you look carefully, both types of lighting are actually in effect on her model. This is the sort of quality that makes RAY-MMD the “go to” effect to replicate real world lighting conditions. It really is remarkable and extremely effective.
As a finishing touch, since we have 4 sources for glare, let’s set up the BLOOM effect which is one of the hallmark effects of RAY-MMD. The settings are simple in this scenario and the ray-controller widget is used to set this up:
- BloomThresHold: 0.75
- BloomRadius+ : 0.65
- BloomColorAllV- : 0.50
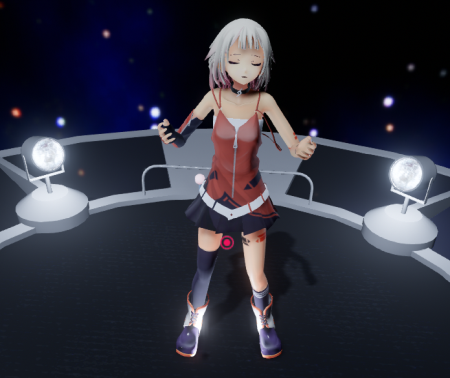
Due to the type of staging we have (predominantly dark) the BLOOM effect will be most noticeable only around the light sources themselves as well as the lower parts of ONE. Especially since I gave some shine to her boots. This is accurate as the lights are low. But see how in the screen capture above, the light gets reflected off her boots and back up to her knee socks? That is just so cool!
You can add the camera motion and music at this point and give your work a “play” and admire the results.
What happened to the sky dome?
Well as it turns out, we only need the RAY-MMD sky box for lighting calculations. You can add another (appropriate for the scene) sky box over it instead. Just make sure it is drawn after the RAY-MMD sky box. In our project we just used the sky dome that comes with the LearnMMD stage.
Simply add a sky dome of your choosing and add no effects to it. It will work fine. Note that any model that is not specified to work with RAY-MMD will be ignored by the effect. To trigger RAY-MMD to work with a model (or just a material within it), add main.fx (or the appropriate variant) to it and it will work with the effect. Don’t forget to specify a materialmap for it or it will not look right. So if you want a different sky dome, like we choose to do here, just add that. It is illuminated only by the MMD light engine so looks fine, but it is ignored entirely by RAY-MMD. Beware of this relationship and this will give you a lot of flexibility with your own scene set ups.
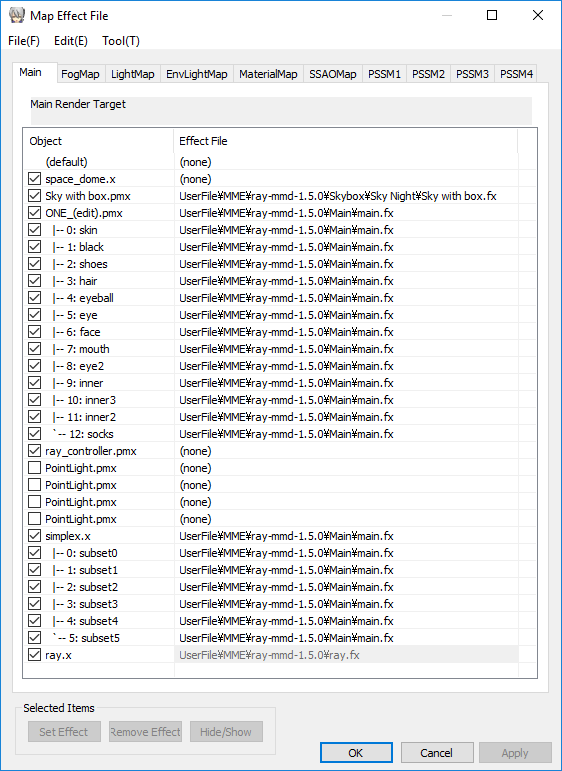
Incidentally, this was the draw order we used for this entire set up including the extra skydome:
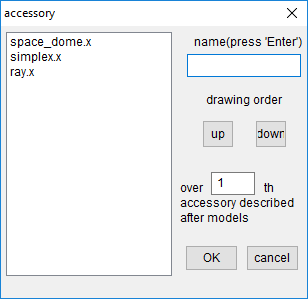

As for the PointLights, their models are still showing. To not display these models, which are really only made visible for ease of positioning purposes, do the following: uncheck the boxes next to the PointLight entries in both the Main and the MaterialMap tabs in the MME window. Do not try to hide them via the main MMD interface as that method also turns off their lights.
Last Words
Sorry for the long read. It was actually a lot easier to make the video than write this but as you can see, RAY-MMD makes doing things like this a lot easier than it used to be for arguably better results (or at least equivalent). To do this sort of thing before, the fall back effect was the Half-Lambert suite which is still very good, but it lacks the flexibility and the ability to easily fine tune the results that RAY-MMD offers and that makes a world of difference.
Thanks for reading and I will leave it to ONE to have the last say…
CREDITS:
- ONE model by Mqdl
- ONE (C) The 1st Place Co., Ltd.
- RAY-MMD
- MMD 9.31
- IrfanView
- Poses/motion by Ureshiiiiii
Full video credits are on the YouTube video page.
– SEE BELOW for MORE MMD TUTORIALS…
— — —
– _ — –
![]()
