


However, the two have rather different applications and it really helps to choose the right one for your scene. Specifically, in this article, we will discuss only the Time of Night sky box as that is what our questioner wanted to know about; but in the interest of inclusiveness, we will briefly explain the differences, in the broadest terms, of when to use which one.
SKY NIGHT sky box usage:
- Use this one for general purpose night scenes especially if you are planning on using another sky dome on top of it, like one of the excellent ++skies sky domes.
TIME OF NIGHT sky box usage:
- This one is more specialized, especially since it is dynamic in nature. This makes it an excellent choice for videos where you want an animated night time sky.
- It is also the best sky box to use for urban outdoor night time scenes; in fact, we will demonstrate how to use this sky box for just this purpose in this tutorial.
CHARACTERISTICS OF THE TIME OF NIGHT SKY BOX
In the image shown below we have loaded only the sky box and an MMD model. What should be immediately obvious is the nature of the sky box itself and you can see this most evidently if we swivel the screen to see where the light is primarily calculated from as can be seen in the image below.

What you can see is the moon, the milky way, stars and meteors falling. Also what should be most evident from the standard view is a brighter horizon. All of these things can be manipulated to create a plethora of useful night time effects to create credible night scenes and we will show you how as you read along.
SETTING UP A NIGHT TIME URBAN SCENE
The first thing you will need for a night time urban scene is a city stage specifically created for night time scenes. We are using the NSORA stage, this is the night version of the SORARIO stage; however it is provided only in .x format and it works best for our purposes to convert this into a PMX model. This conversion is easy to do; just load the stage into the PMXe and save it in PMX format.

Load the stage and other models into MMD and make sure the draw order is as follows:
- Time of Night sky box
- The town model (NSORA.pmx)
- MMD model (Azuki Kiso in our example)
Do note that in some situations, because this particular town model has transparencies, you may need to have this drawn last.
Work along with the tutorial!
If you are doing this tutorial as you read along, which we encourage, one thing will be immediately evident as you view and manipulate the scene. Specifically, the horizon area is brighter. If you look at any sky line photo of a city at night you will see this effect; the collective illumination from multiple light sources from the urban environment. It is only in really remote rural areas where the night is pitch black. Knowing these things, you should now realize why I advise using a night time version of a city model because if you used a day time model, you will never be able to account for all the lights coming out of windows, street signage and the likes and without these, your urban scene will not be credible.
SETTING UP THE SCENE
The image above shows our initial set up without any of the RAY-MMD components added other than the sky box. It looks pretty good already; it will look considerably better once the effect is added and properly configured.
One thing to note about this set up is that instead of rotating the stage, it is the camera’s POV that has been rotated. This affects the direction of the primary light source which in the above image is still at the default location. But regardless, it does not matter as when you set up your scene, you will have to adjust the lighting direction for best results.
In case it is not obvious, the sky box assumes that the primary light source is the moon. The city lighting is fake, being only texture images and gives out no illumination so we will have to make adjustments to factor these in when we set up our lighting configurations.
THE INITIAL SET UP
Before anything else, do note that on my version of RAY-MMD, I have enabled the Depth of Fields (DOF) tools so some of what is shown hereafter may be a little different from what you may see on your screen. I will not be discussing the set up for these tools in this article as it will make this too long a read. However, if you want to enable this tool just change the last line in this section of your ray.conf file to read as “#define BOKEH_QUALITY 1”:
// Bokeh Depth Of Field
// MeasureMode can supports the following options:
// When MeasureMode at (0.00 ~ 0.24) : Test circle
// When MeasureMode at (0.25 ~ 0.49) : Test circle + Bone from ray.x
// When MeasureMode at (0.50 ~ 0.98) : FocalDistance Only
// When MeasureMode at (0.99 ~ 1.00) : FocalDistance + Bone from ray.x
// 0 : None
// 1 : Enable
#define BOKEH_QUALITY 1
Load ray-controller.pmx and ray.x. Your screen should now look really funky but that’s normal. We will sort this all out in the next steps. But before that, under the MMD view(V) tab turn off the following functions:
- display ground shadow(S) – OFF
- anti-aliasing(H) – OFF
Next open up your MME panel and add the main.fx to your model under the Main tab; this should sort her out or rather, lay the foundations for her shading. At this point you can also apply material shaders to your model.
The TIME OF NIGHT sky box comes with four .fx files. These are used as followed:
- Time of lighting.fx – apply this one to the sky box under the EnvLightMap tab.
- Time of night.fx or Time of night without milkway.fx – apply either of these to the sky box under the Main tab. Note that the latter effect removes the milky way from the sky; that is the only difference.
- Time of fog.fx – apply this to the FogMap tab if you want fog in your scene; we will not be using this effect in this article; but it is really neat, so by all means, experiment with it on your own.
- Under the materials tab, make sure that material_skybox.fx is applied to the sky box.
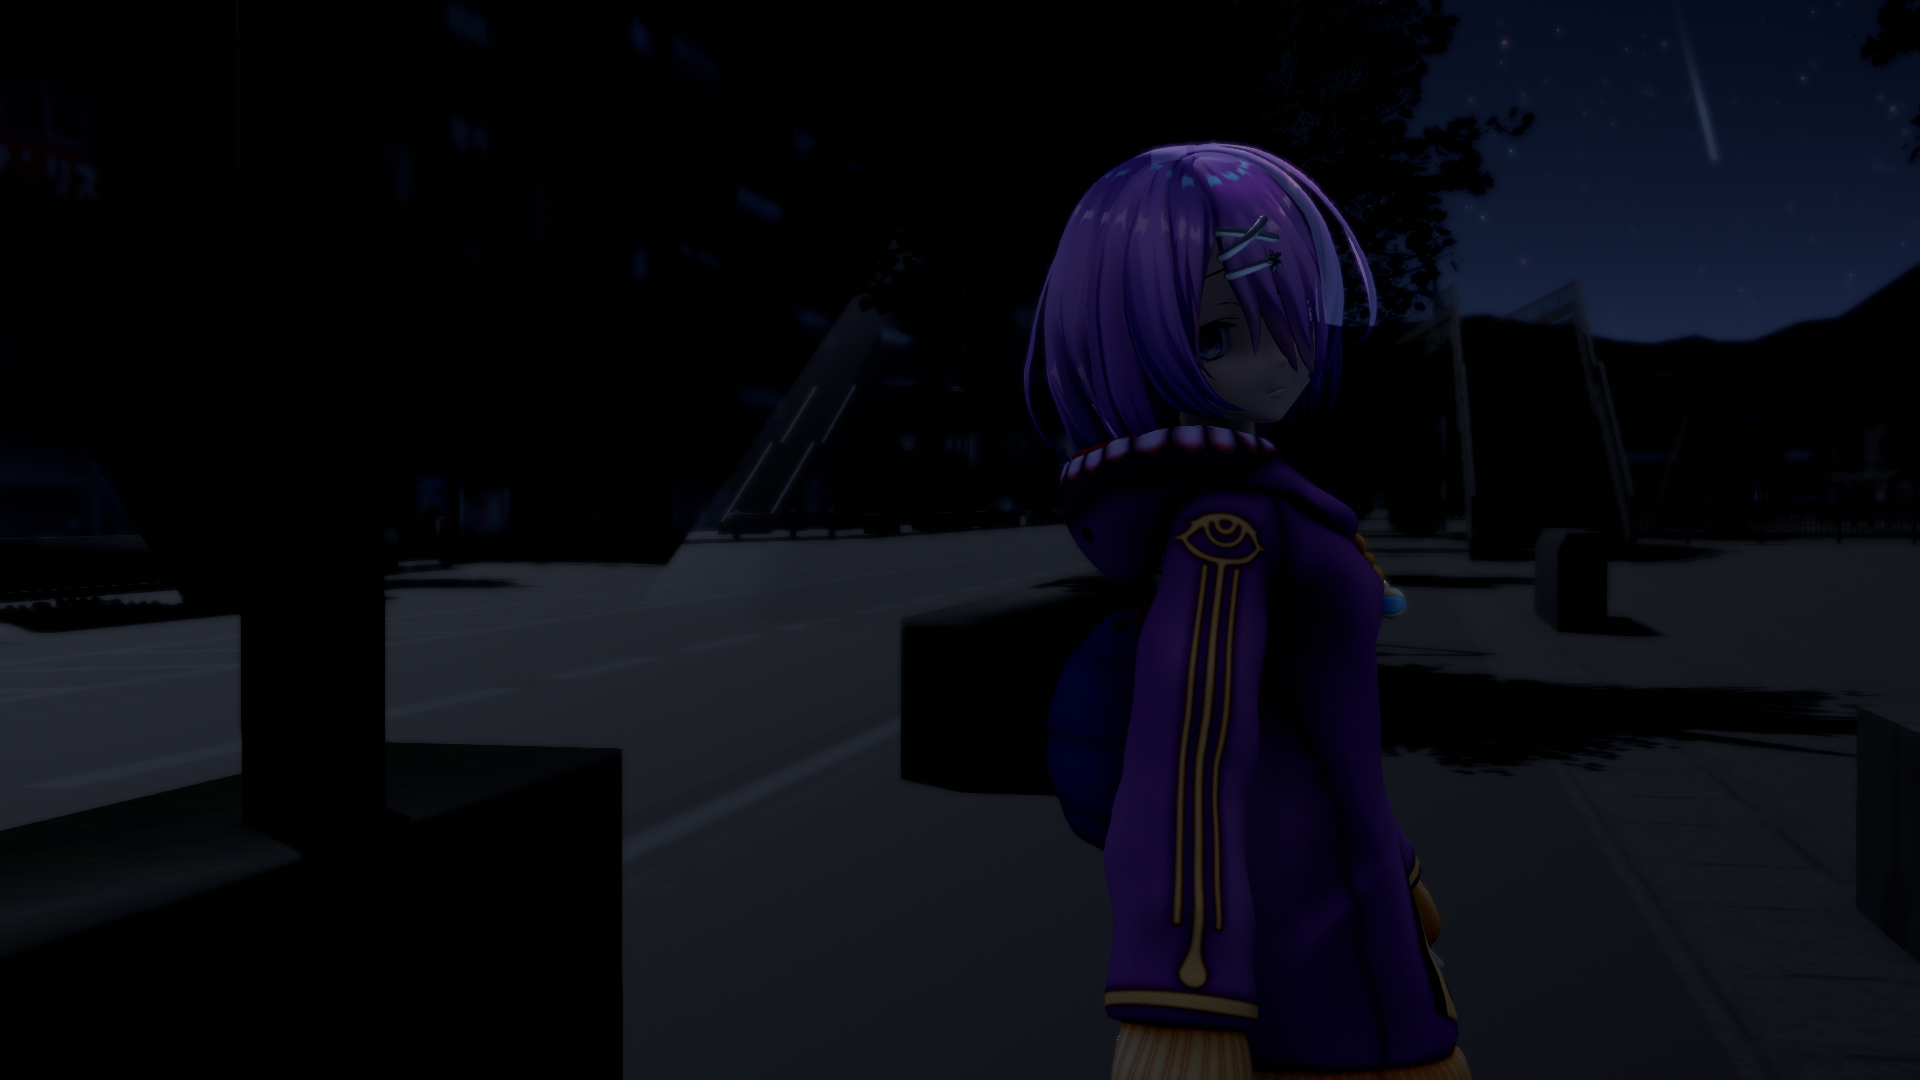
Your scene should look something like the image below once the base effects have been added. As you can see there’s not much to look; it looks as if the city has been affected by a blackout. So, as you can see, if you really wanted to, you can set up some really dark scenes with this sky box; especially the more so because this set up at the moment is back-lit. We’re going to have to call the City Power Company to turn the lights back on!
TURNING THE LIGHTS BACK ON
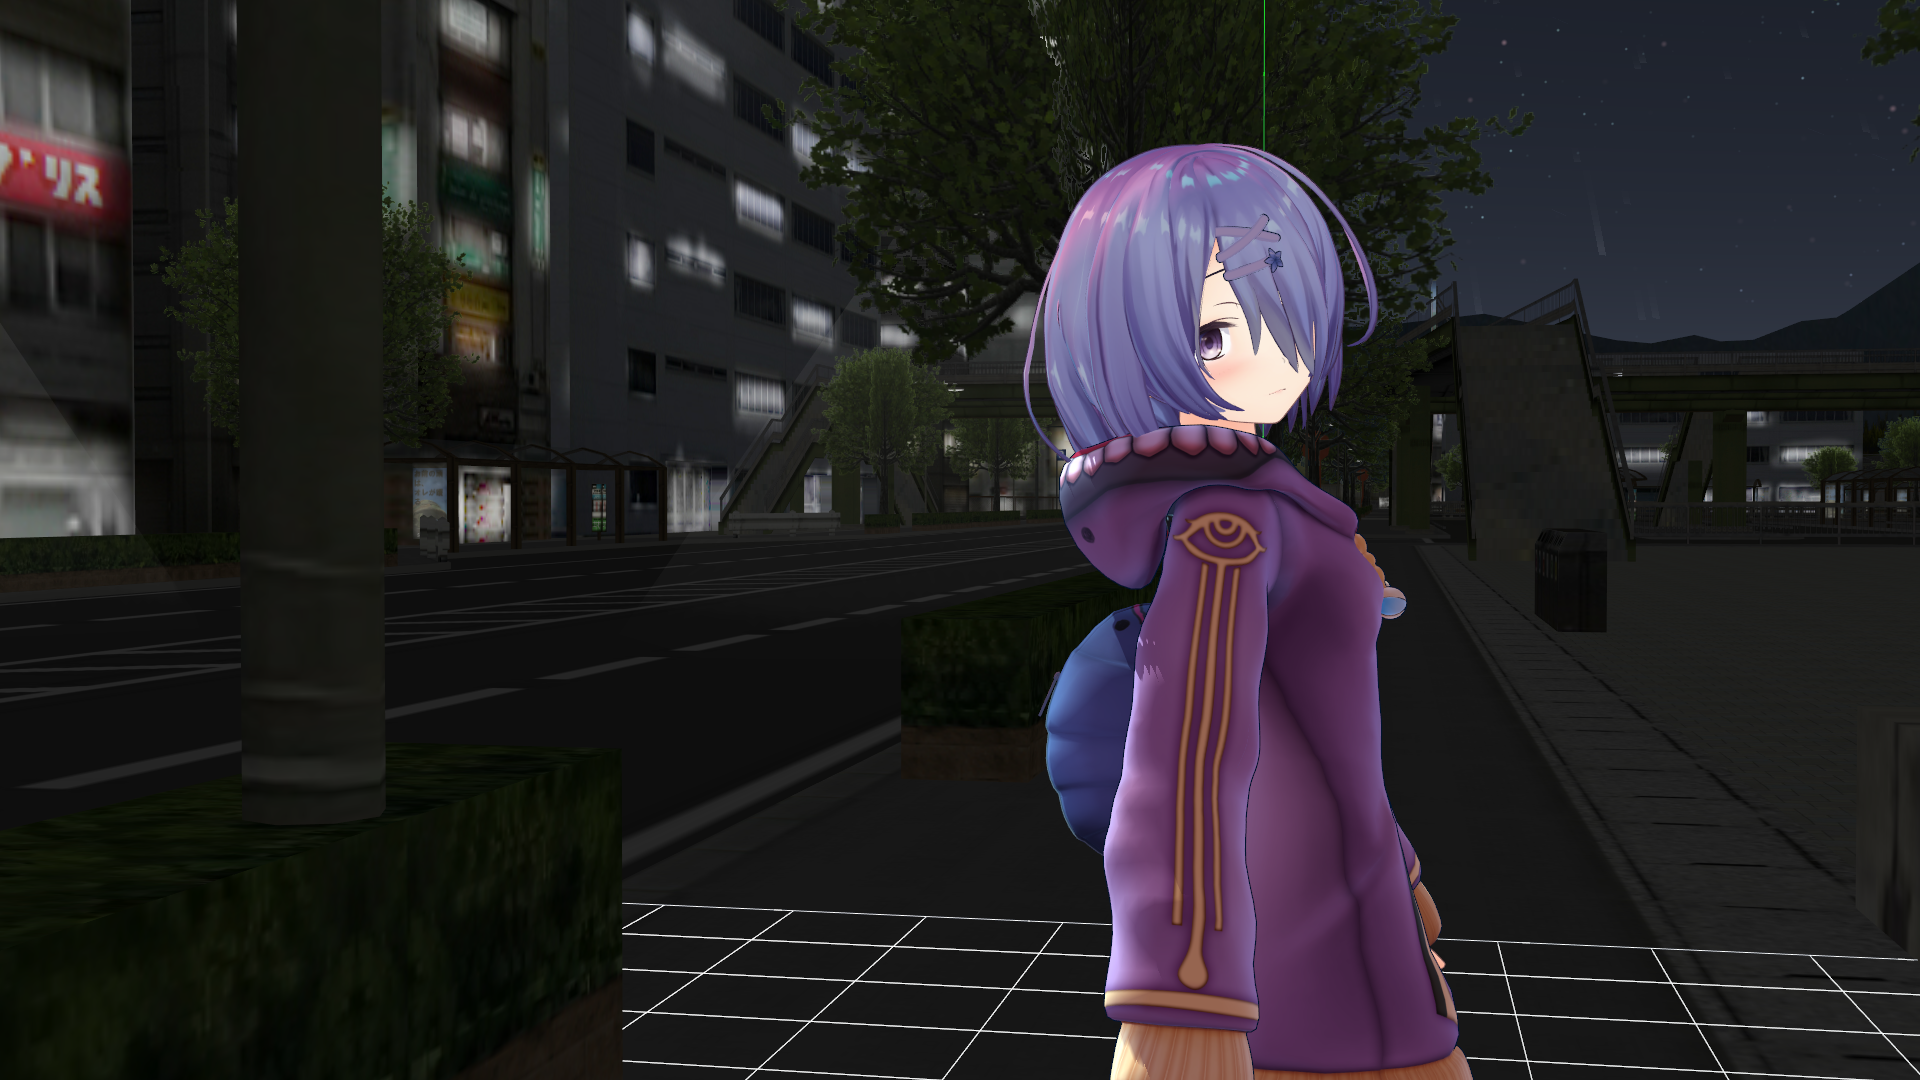
Now, honestly, the rest of this article is “subjective” in the sense that there are literally multiple solutions on how to illuminate the scene. So please regard the following as merely a guideline. We will only tell you what we have done and show our settings; by all means, experiment as that is the best way to gain a full understanding of how to configure night scenes to suit your specific project. The next image shows our end result which was done for illustrative purposes only and should not be regarded as a definitive solution.
OUR STRATEGY
To get the building lights to come back on, we simply rotated the main lighting to throw light on to the building surfaces; the lights from the window are merely the imagery from the texture maps for the model; this was why we said to use a night version of the city model.
Also note how the horizon behind the hills are bright along the ridge line of the surrounding hills; this is a quality of this sky box and really helps enforce the illusion that there is a much bigger world beyond the main scene. Additionally, we have turned off the meteor shower as that does not suit the needs of our scene.
As for our model, Azuki Kiso, she gets her lighting from the moon as well as (simulated) ambient light from the city model.
OUR SETTINGS
These were the settings used to set up the lighting direction (position of the moon); it is important to note that in my scene, the camera’s POV was rotated almost 180 degrees from the default view. But the basic idea here was to throw some light on to the building walls on the left side of the street.

Here are all the settings explained with the values used in creating this image.
TIME OF NIGHT SETTINGS
These were used to set up the primary illumination level.
- The settings below were used to allocate the amount of available lighting and its characteristics.
- sun radiance + : 0.35
- sun radiance – : 0.15
- RayleighHeight+ : 0.10
- RayleighHeight- : 0.40
- RayleighColor+ : 0.50
- RayleighColor- : 0.35
- The settings below were used to determine the behavior of the light allocated to the scene.
- EnvDiffLight+ : 0.65
- EnvDiffLight- : 0.50
- EnvSpecLight+ : 0.20
- EnvSSSLight- : 0.45
- The following setting just serves to turn off the meteor shower.
- Meteor- : 1.0
RAY_CONTROLLER SETTINGS
- The following setting helps balance out the available light and is the master setting used to adjust the overall lighting level.
- Sunlight- : 0.30
- The following settings were used to manipulate the quality of the scene render.
- Contrast- : 0.30
- Gamma- : 0.15
- Temperature- : 0.15
So as you can see, the set up is actually quite simple; the general principle was to use the settings to:
- Set up the correct global light direction.
- Allocate the amount of light available and its qualities.
- Determine how the available light behaves in the scene.
- Fine tune for rendering/viewing.
As mentioned above, in our set up we enabled the camera’s DOF functionality; this is a powerful tool in helping compose the scene. By far, RAY-MMD’s DOF tool is one of the best of the type available for MMD as it allows for easy and precise control over the behavior of the camera’s lens.
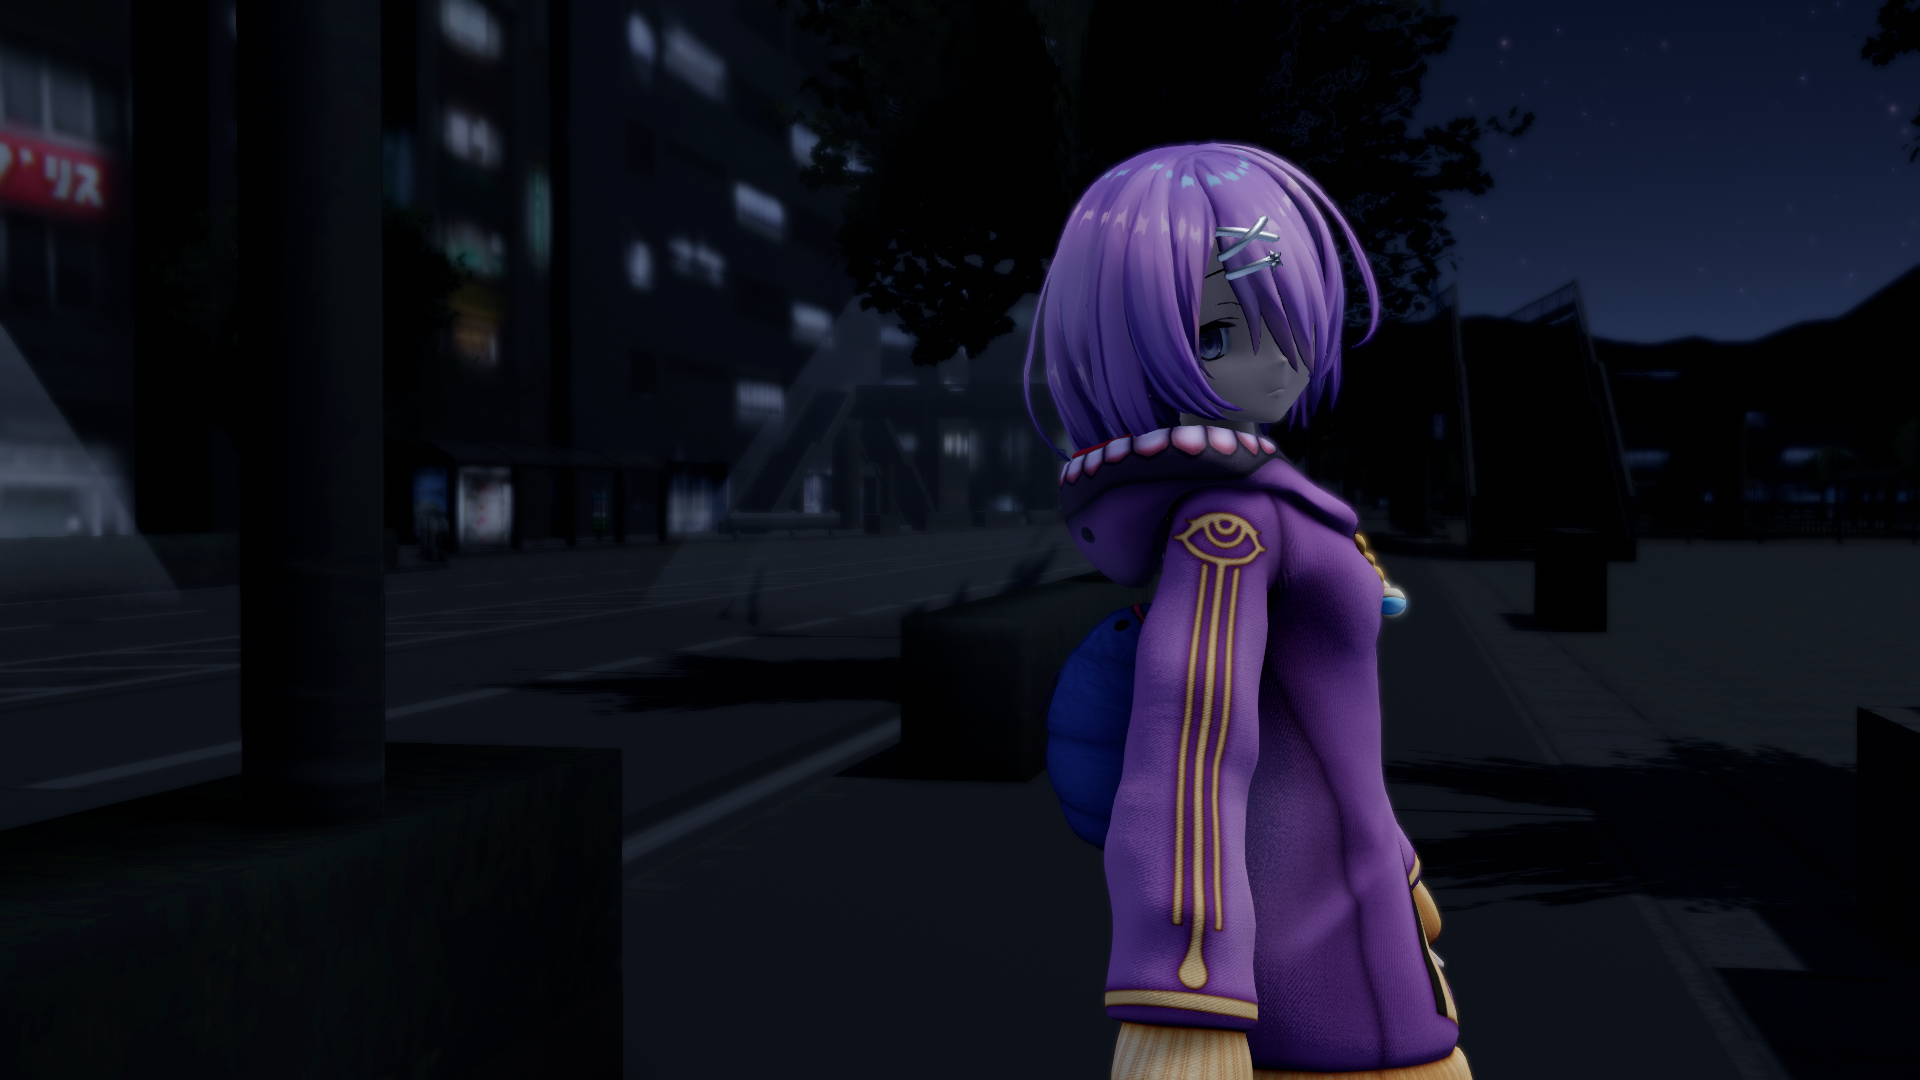
A FINAL LOOK
We will close this article with a closer look at Azuki from the same scene to reinforce how effective this sky box with a decent set of configuration can help to create credible night renders and still retain a good level of detail.
Thanks for reading and if you have any questions, please feel free to post these in the comments section below.

CREDITS
- Azuki Kiso – (C)Appland, Inc.
- NSORA – SkyblueP
- Hiratabashi Station – Ejima8
- MMD 9.31
- RAY-MMD 1.5.0
– SEE BELOW for MORE MMD TUTORIALS…
— — —
– _ — –
![]()
