


Beginner’s Guide to Using Ray-MMD ver 1.5.0
This article will give you the basic steps on how to set up the effect and get it working. We will not discuss the theories nor technologies underlying the effect, except for the basics. You really need to know a little bit about what the effect is suppose to do and how it works. There are good articles on this site on how to use the effect at a more advance level, but if you have never used the effect before, it is best to start here.
What is Ray-MMD?
Unlike most MME packages, Ray-MMD is an environmental lighting system. Because it is a system rather than merely an effect, it gives the user a lot of latitude and freedom. Unlike other MMEs that were written essentially to do one thing, Ray-MMD can do many things. Also, the package was written with the expectation that the user has at least some background knowledge on computer lighting, shading and rendering techniques. This is the primary reason why it is difficult to set up and adjust. However, once you have managed the basics, it isn’t all that hard to use. It is just very fiddly and a lot of tweaking will be needed to get really good results.
But as mentioned above, this article will only introduce the basics, so without further ado, let’s get to it.
What you will need.
You will only need three things for this tutorial:
- Any TDA style model with gear that lights up. We will be using the Tda Neru Append edit by VK.
- An outdoor stage model. This must be either a pmd or preferably, a pmx model. Maybe search DeviantArt.com for MMD outdoor stage to find one you like. Remember to keep track of your sources so that you can give credits for the elements you downloads.
- Ray-MMD version 1.5.0. This is the latest release version and differs slightly from older versions.
Below are the steps needed to get Ray-MMD up and running successfully on your system.
Step 1: Load the models and effect files.
First of all turn off MMD’s ground shadow display: view(V)>display ground shadow(S)
Load the models in this order:
- Ray-mmd-1.5.0>sky box>Time of day.pmx
- Your stage model (pmd or pmx)
- Your Tda Append model (add a pose if you like)
- ray_controller.pmx
- ray.x (added using the accessory panel)
Your screen should look something like this:

Step 2: Adding the main effect files.
Open up your MME panel and add main>main.fx to the stage and Tda model. Note that these are added to the models under the Main tab.

The screen image is going to look a little freaky at this point, but that’s normal. It will be fixed in the next step.
Step 3: add the environmental lighting specification file.
Open up the MME panel again and go to the EnvLightMap tab. Select the sky box model and add this file to it: ray-mmd-1.5.0>Skybox>Time of day>Time of Lighting.fx

The scene should now be normal. There might be a bit of a blue bias in the colors, but that’s normal with this sky box. This can easily be corrected.
Step 4: adding material specifications to your model.
There is a lot of latitude with what you can do in terms of material specifications. But basically, you add a shading specification to make material look like a real world material. In any case, material specifications are under the materials tab of the MME control panel. Our materials are shown in the table below. But note the following:
- “albedo” materials are materials that do not alter the underlying colors. Useful if you don’t want to change the colors, but just want to add an effect or texture to the selection.
- “Emissive” materials emit light. These were used to make Neru’s accessories glow.
- “ClearCoat” materials are shiny, this was used on her Append gear housing to make these items glossy.
- Item 24, 25 and 26 are materials on the model that I chose not to display. Simply uncheck the box next to the name of the material under this tab, and they will be hidden.

The end result at this stage looks like this:
Step 5: Fine tuning the sky box.
Each of the sky boxes provided with Ray-MMD is intended to fulfill a specific function so their controls will differ. The Time of day sky box is used primarily for day time scenes, so comes configured with controls to set up that type of environment. Some controls might do nothing because a dependency or condition is either missing or not satisfied; these are beyond the scope of this article and will not be discussed. Do play with the other controls as most will work and just see what they do.
What we really want to do is to correct the blue hue and how this is done is described below.
To work the controls dynamically so that you can see changes as you make them, ensure that you do the following:
- Make sure “select” is NOT selected.
- Make sure “track” IS selected.

To correct the colors just do the following:
- RaleighHeight+ : set this to 0.850 or higher.
- EnvSpecLight+ : set this to around 0.150.
You should get results similar to those in the next image:
Step 6: Fine tuning the lighting environment.
The lighting environment is controlled using the ray_controller widget. As above, to use this dynamically, turn off “select” and turn on “tracking” before manipulating the sliders.

To get the results shown below, the following settings were used:
- SunLight+ : 0.250
- SunLight- : 0.750
- SSAO- : 1.000 (this helps with the white of the eyes since this is a recessed space with Tda models).
- BloomThreshold : 0.650 (helps the accessory lights glow brighter)
- Exposure- : 0.200
- Contrast+ : 0.300
- Saturation+ : 0.150
- Gamma+ : 0.100
- Temperature+ : 0.200
With these settings your scene should look like the following:
Step 7: Adjusting the global lighting direction.
This step could have been done first (and usually should be done first). We use MMD’s own controls to adjust the direction that the primary light source is coming from; this is the direction from which sun light is coming down on to the scene. Since this is an outdoor scene, to get a better play with the shadows set the self_shadows to mode 2 with a range of 9000. This step is optional but can help with a set up like we have here.
You can do whatever you like with the light direction but we just used the values as shown in the image below:
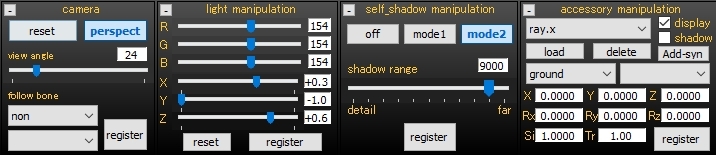
Note that we also adjusted the camera view angle; but this is also optional.
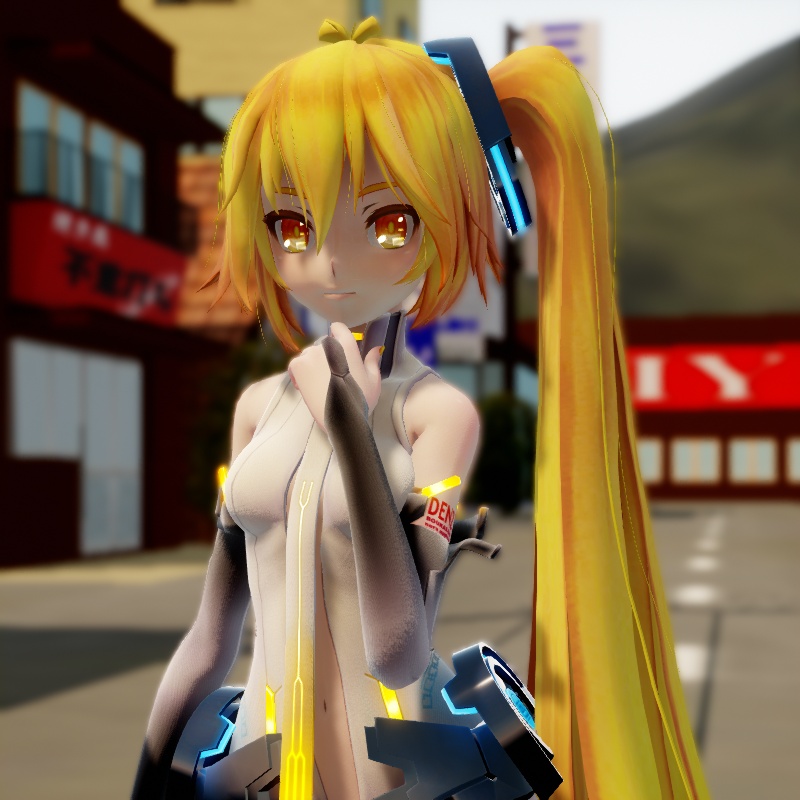
The background behind Neru is slightly blurred in our images. This is because we have enabled Ray-MMD’s depth of field controls. By default, these controls are disabled. Instructions on how to enable these controls are covered in other articles on this site on how to use Ray-MMD so they won’t be discussed here. Anyway, our final image looks as shown below (and these are essentially the same settings as used in the header image at the top of this article):
Hopefully, that the information in this article will help you get up and running with this fantastic effect. If you have questions, please feel free to post these in the comments section below. We also encourage you to read the more advanced articles about how to get the most out of this effect in other tutorials on this site.
CREDITS:
Tda Append Neru – Tda/Vk [ download her here ] / [ password ]
Akita Neru (C) Smith-Hioka
Norendai Town – 銀匙P
There’s an entire series of these basic town sets; look for them on VPVP wiki. They are rather old and simplistic, but still very usable and are extremely light weight resource-wise.
MMD 9.31
Ray-MMD 1.5.0
IrfanView 64
– SEE BELOW for MORE MMD TUTORIALS…
— — —
– _ — –
![]()
