


How to rig a model in PMD Editor…
Adding and Weighting bones with PMDE

By way of explaining what we’re about to do, I am first gonna tell you a little bit about the country called Tibet…
First, a little bit of theory. Every model in MikuMikuDance consists of three main components – textures, vertices, and bones (there are, of course, more, but first things first). The texture – or, in case of stock models, simply a colored surface, but the principle is the same – is enshrouded around vertices, each of which is a set of X-Y-Z coordinates, and each vertex is assigned to one or another bone. When a bone is “turned” in MMD, each vertex assigned to that bone is instructed to spin an arc around the common center.

Launch PMDE and load any model. In the BON tab (“Bone” in the recently discovered newer version), you will find the list of bones with their parameters: most important, of course, the trio of X-Y-Z coordinates, which is self-explanatory. Other than that, pay attention to “Parent” and “Child” fields.
Bones in MMD are organized in chains. Each bone refers (by their numbers) to bones that lie higher and lower in the chain using these fields. When a bone is turned, all subsequent bones get the order to move respectively. Although several bones can refer to the same bone as their “parent”, like finger bones deriving from a wrist bone, only the one that is explicitly described as “child” defines bone’s visible “direction” – it’s what you see as the bone connected to the end of the current one.


In a well-developed model, each chain of bones can be traced back to the “mother bone” (“master parent”, “all parents” etc.). It allows a model to be moved arbitrarily on the scene. If some chain does not start at the same point as others – that is, if the model does not contain one bone to rule them all – dragging the model by the highest bone in the list does not pass the order down by the chain of command to that separated part of the model.
A little lab exercise. Load into PMDE any of stock models – strangely, even though they are created by supposedly experienced MMDers, they do *not* contain mother bones (yes, even the newest Luka Megurine). In PMDView window, select “View->Test model” command (dubbed “Confirmation of deformation model” in the new version) that invokes a separate TransformView window, allowing you to explore your model in motion straight in PMDE. Select the center bone #0 from the list and drag it by colored X-Y-Z buttons. What happens? Well, you’ve probably seen it before – feet won’t move with the rest of the body. Now come back to the main window and look at the bones list. Every bone refers to some other bone as its parent, and by hopping up from one bone to another, you always can reach the bone #0 – the “center” – except for feet IK bones. Those have “-1” in their Parent field, just like the center bone. These bones are actually not connected to the main body. Now, replace their “-1” with “0”, adopting them to the center bone and making the graph connected. Try the center bone again. Feet are moving along with the body now! By joining unconnected nodes to the main network you effectively forced the center bone to act like a mother bone!
Now, I don’t urge you to transform all your center bones into motherbones like this, of course. There’s a reason to have their functions separated, and there’s an easier way to do it anyway. But now you have a better idea *why* motherbones are important. Next time you can say “It’s because bones in your model do not comprise a connected graph” and impress the opponent with your sophistication. ;)
The last important field in Bones tab is bone’s type. Since this tutorial covers neither physics nor IK bones, most bones that you’ll have to deal with will be of default type “0 : Ro” (the newer 139/219 versions of PMDE do not have that field’s drop-down list translated into English, so learn to recognize them by number and color). Mother and center bones will be of type “1 : RoMov” – which means that for them both rotating and shifting commands are available in MMD. Apart from those, though, you will need invisible “7 : Hid” bones (you can actually make them visible in PMDView by selecting the fourth button in the lower toolbar – the gray bone-like circle). Every bone that looks to be the last in the chain on your screen, actually is not – it targets an invisible bone which is a *real* chain-stopper. Also, if in your particular model you want some part of the model not to look connected by bones, yet to move together as a chain, do not hesitate to wedge an invisible bone between the place a previous bone ought to end for aesthetic reasons, and where another bone should start (in some models, for example, eye bones are connected not to the visible “Head” bone but to an invisible bone that Head targets).
Time for practice
Load the model that you want to rig with bones. Go to the BON tab, right-click on the mostly empty bone list, and select Add->At Bottom. A new bone entry will appear (rename it to something sensible). By default, it’ coordinates will be 0:0:0 (unless you use other commands of the Add group that duplicate the position of an existing bone you copy). How to place where you need it? First of all, you may alter its X, Y, or Z coordinate to some random value, simply to separate the new bone from others that may take the same place. Then you press the “B” button in the upper left toolbar of the PMDView window to make bones selectable (and unpress others to avoid confusion). If you can’t see bones yet, the ʘ button in the lower left toolbar will reveal them. Now simply select the necessary bone with the mouse and drag it by colored arrows or a central diamond of an appearing “astrolabe” tool to wherever you want.
On the other hand, there might be cases when manual positioning isn’t precise enough for your goals. Well, there’s a trick that can give you necessary coordinates exact to the last digit. With humanoid models, it produces reasonably good results… but if you happen to animate some sort of mechanical device, it is really THE secret to perfection.


In PMDView window, switch “on” the second button in the lower toolbar (a cloud of green dots) that turns all vertices in the model visible, and explore the model a bit (rotate mousewheel – zoom; press’n’drag mousewheel – shift; press’n’drag right button – rotate). You will soon realize that there’s a system in the way vertices are placed. Pick a pair of vertices so that the bone must reside exactly in the middle between them. In the main window, select VR (Vertex) tab, and in the PMDView window, select one of those two vertices (an “astrolabe” tool must appear around it). You will notice that the respective vertex will be selected in the main list automatically. Copypaste its coordinates. Do the same for another vertex. If you have MS Excel, OpenOffice Calc, or Google Docs at hand, just use the spreadsheet, if no… well, calculations aren’t difficult, it’ll just take more taps on the keyboard. What you need is a simple equation:

Simply copypaste resulting numbers back into PMDE, and lo, your bone is placed with laser precision! Now, add some more bones and then connect them into chains by “Parent” and “Child” fields. Make sure that no bone is left orphaned!
(EDIT: see also for a more elegant way to do the same thing in comments)
Before you go to the weighting…

There’s one more important thing you must do to your bones. The GRP tab (aka “Display pane”) defines how bones are organized in groups. It does not affect the way the bones move, only how they are seen in MMD’s Frame Manipulation Panel. If a bone isn’t included in some group, you still can select it directly in screen and manipulate it with respective controls, and when played, it will perform as if nothing wrong happened. You won’t see it and its Diamonds in FMP, though, so once you lose the focus of a registered motion, you can’t regain control of it anymore. To be able to see your bones in FMP, you must make them visible. Right-click on the “Bone” list, select “New”, and then rename the new group into something to recognize by. Then select a bone that must belong to that group in a drop-down selector to the right and hit “Add” (if you added a bone mistakenly and want to relocate it, simply select it in the list and hit “DL” – it won’t harm the bone itself, just un-group it). Do that for every bone you want in that group, then create and fill other groups the same way. Again, no orphaned bones in that panel either! As long as you see at least one bone in that selector, you still have work to do.
Sometimes model-makers neglect this step, or don’t perform it thoroughly, so you’d do good to check other models you plan to use. It may happen that some if not all bones are not assigned into groups – if so happens, go and fix them. You can’t redistribute edited models, but there’s nothing wrong about using repaired ones.
Other checkboxes and the facial expressions list also present in that tab don’t seem to do anything useful, so you can ignore them.
Now go grow some meat on these bones

So far, your bones can make each other move, but don’t affect the model itself. To make them really work, you have to distribute vertices among them. Every vertex must be assigned to this or that bone which it will be following in its movements. This process is called “weighting”. In her article about attaching an accessory to a model in PMDE Noko gave us a brief taste of what is involved, but actually doing a model from the beginning to the end is a much more painstaking work… fortunately, you have many more useful tools in PMDE, and you’d do good to learn them all.
First of all, this time you *really* need to upgrade your PMDE to the newer 129 release (EDIT: the article is a couple of years old; what I *really* really recommend you now is to upgrade your model to .pmx format, if it’s not yet, and hence use a newer PMXE). Not only it has translated those parts you will be using, but it also has some additional abilities specifically useful for weighting. (From now on, I won’t be providing controls’ names for both old and new PMDE, even when they are available in the former)
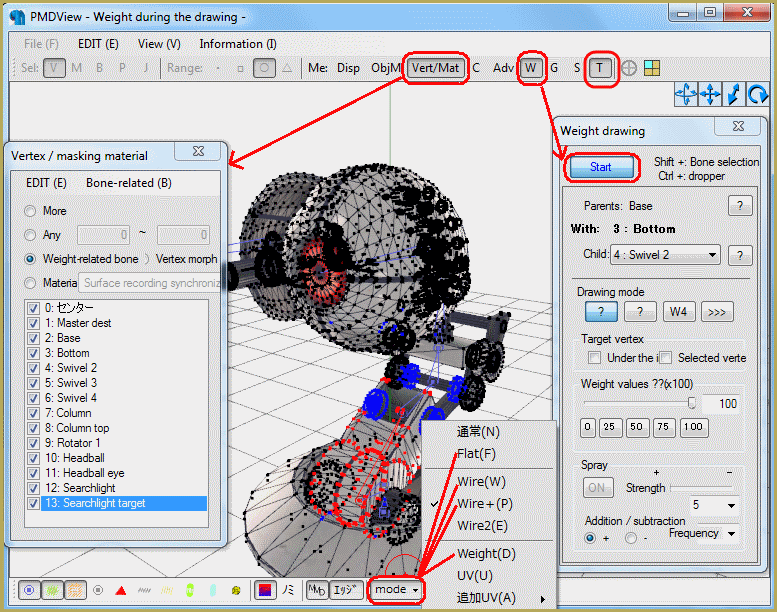
Go to PMDView window, click on the “green cloud” button in the lower toolbar to make all vertices visible, and then click on “W” in the upper toolbar. In the newly opened panel click “Start”. All vertices will turn black or blue (the reason for this distinction will be explained later; so far it is enough to know that for our purposes there’s no functional differences between them. I will further refer to all of them as “black”). The cursor will turn into a red circle, acting towards vertices similarly to a paintbrush in a graphic editor – while you’re pressing the mouse button, every vertex under the circle will be turning red, which means they are now assigned to a currently selected bone. Select another bone in the main window’s “Bone” tab and all vertices will turn black again, which means that *this* bone does not have vertices assigned yet. By pressing the mouse button again, you will be assigning vertices to it too, and if you brush some vertices that were already mapped, they will get re-assigned.
So, basically, what you have to do is select every bone, one by one, hover the mouse cursor around each one while pressing the left mouse button, assigning surrounding vertices to it… and keep doing that until all vertices are assigned. When you’re done, click on “T” in PMDView’s upper toolbar to open “TransformView” window, and try to manipulate your model’s bones in it. Do you like what you see?

…Didn’t think so. The difficulty about weighting is that *every* vertex must be assigned to a correct bone. Even a single dot connected to the wrong bone will distort your lovingly drawn model when that bone is turned. Scrupulous separating the sheep from the goats is what takes the most part of work, making the process of weighting this draggy. There will be lots of times when you painstakingly switch from one bone to another, trying to get that elusive rogue vertex that rips pieces of your texture in a completely wrong direction unless assigned properly. Let’s see what tools in PMDE can make it easier.
First, the size of the red circle that your mouse cursor manipulates can be adjusted. Click on “ObjM” in PMDView’s upper toolbar, and in the newly opened panel change the value of “Range” combobox. Thus you can both grab vertices in broad brushes, and surgically select them one by one, when necessary.


Second, explore various display modes in PMDView. The “Mode” button in the lower toolbar switches the view from classic to “Wire”, where you see only a network of lines, connecting vertices into “materials” – solid blocks representing parts of the model; “Wire2”, that is similar to the former, except that it shows all parts of the model equally, while regular Wire dims on obscured sides; “Wire+”, combining wired view with classic one, which is often extremely useful; and “Weight”, that color-codes not just vertices but whole surfaces, making it easy to notice where mis-weighted dots go the wrong way. Except the basic Wire, all those other modes are added in the newer PMDE version, so upgrade is a must.
Keep the TransfomView window constantly open – you will need it quite often (if you’re one of rare owners of dual-monitor rigs, it’s high time to say your Thanksgivings). By testing bones’ movements you can figure what areas of the model need additional attention. Just switch on “green cloud” and “red/blue gradient” buttons in its lower toolbar and it you will be able to manipulate model’s bones while in the same display mode as the main PMDView window. The “Unrestrict” button in the accompanying panel temporarily turns a currently selected bone into “1 : RoMov” type, allowing to separate their parts from the main body and find perpetrators more efficiently. The “Reset” button resets current (not all of them) bone’s position to default.
Click “Vert/Mat” button in PMDView’s upper toolbar. This opens one more important panel, allowing to keep only part of vertices visible. The mode called “More” is default, viewing all vertices present in the model. In “Any” mode you can enter a numerical range of vertices to display – not quite useful, unless you know a number of a particular vertex to access. The “Weight-related bone” mode, though, is much more relevant: it allows to choose which bones’ vertices are visible and which are not. This way you can exclude already processed bones from examination, not cluttering the view and not risking to brush some other bone’s vertex by mistake. The “Materials” mode similarly allows you to limit visible vertices to certain materials only (the “Surface recording synchronization” button toggles between obscuring vertices alone and removing unselected parts completely). The “Vertex morph” setting limits visible vertices to those involved in certain facial expression only, which is not that useful for weighting, but may be needed in some other activities.
Why is it called weighting, again?
So far we only used a single component from the whole “Weight drawing” panel – the “Start” button that turns the weighting mode on and off. But there’s a whole lot of other settings in it. Do they ever have a purpose?
Well, in fact, they do. I haven’t found much use for this information, working mostly with mechanical models, but there’s advanced weight-fu that you must be aware of if you’re planning to work with models more sophisticated.

Truth is, vertices’ allegiance to this or that bone *isn’t* necessarily an univocal matter. By using additional tools you can assign to selected vertices some fractional weight. That is, if you set “Weight values” slider to some intermediate number (or just use one of buttons below that assign preset values to this slider), the color of affected vertices will be not red but some weight-dependent shade of violet, and their movement will be respectively diminished. For example, if the slider is set to 50% and the bone is turned to 90°, thus affected vertices will only move to 45°. More than that, by assigning fractional weights you can have vertices that react to two bones at once (technically, nothing stops you from dividing vertices’ allegiance between any number of bones, but the result will probably be a mess). This is usually done to make joints between bone sections fluid rather than sharp.
Now it becomes understandable why some vertices have blue color instead of black. Various degrees of violet represent respective degrees of weight assigned to vertices, red end of the scale standing for 100%, and the blue meaning that the vertice “belongs to a bone at 0% value”. Funcionally, for all purposes that matter, it means the same thing as if this vertice didn’t belong to that bone at all, but the designation is different. If you single out a bone that has some blue vertices in “Vert/Mat” panel, those blue vertices will be still visible, even though they won’t follow this bone as it moves.
Remaining controls in the “Weight drawing” panel provide various ways that fractional weights can be delivered. The first “question mark” button in the “Drawing mode” group sets up the mode we’ve been using so far. The second one works as a gratient tool, full red in the circle’s center and blue at its edges. The “W4” button allows to divide vertices’ allegiance between given bones in some complex way (which I haven’t completely figured myself), and the “>>>” mode allows for a whole wave of vertices to be gradiented. Just try all those modes for yourself to get the feel of it.
Well, this will be all for today. Hopefully, it will help you to enhance your models in ways you didn’t dare to attempt before.
See also – Divide and Conquer: Weight more efficiently by decomposing models’ materials first!
Models used for illustrations: Kaito (modified) and Luka Megurine, Chell by MahoAshley, Portal’s rocket turret model (unrigged) by SKaa3w, Fedora Hat by Electricswing
– SEE BELOW for MORE MMD TUTORIALS…
— — —
– _ — –
![]()
