


Make a Portal: Step-by-Step Instructions!

This article explains some of techniques used in making my Portal/MMD fan video. For those not familiar with the setting, the clip is based on Valve‘s Portal video game. The gameplay is revolving around the idea of portals – “intra-dimensional gates that have proven to be completely safe” that the player can set up and use in order to navigate through various puzzle levels. The protagonist, Chell, is a “test subject” in a research facility under control of a rather characterful AI GLaDOS, and her task is, well, to test – using the portal device in various situations against various obstacles (that was a spoiler-free version). The video, among game-based themes, characters, and environments, makes use of that portal gimmick as well. While game creators had to create quite an advanced physics engine to implement their ideas, it turns out that MMD has its own means to deliver a believable effect. This article will unscramble all components necessary to make your own version of Portal in MMD world. And even if you don’t plan any such thing, it still may shed some lights on working with MMD, MME, and PMDE, hopefully helping you achieve your own goals.
So… what does it take to turn MMD into Portal?
| Author’s note 5/11/2017: This article is obsolete! While techniques used in my first video felt like breakthrough when I did it, now they went the way of steam engines, Morse code telegrams, and mechanical typewriters. To whoever wants to make a Portal-themed video nowadays, I highly recommend the Portal MME effect by bandages (aka vasilnatalie on dA). It’s *much* easier to use and allows for much more versatile visuals than the “fake space” method described here. |

Hole in the wall


Unlike the game, where said physics engine allows to set portals practically anywhere, in MMD you have to plan carefully where you intend to open a portal. And to make it, first of all you need a model or a stage with a suitable opening – a magician’s prop wall. Model- and stage-makers don’t usually produce those on a regular basis, so you’ll have to take care of this part yourself.
In my video, the stage was actually assembled from .pmd “bricks” – models ripped from the real game. The similar process can be done with .x type of stage, but for now, let’s just work with .pmd models.
Load a wall that you will be opening your portal on. Save a copy of it. On Materials tab, find the texture name that is used for this wall. Now load that texture in a graphic editor and cut an oval-shaped hole in the texture. Under it, the background must turn checkered – if not, you need to add transparency to the picture – for example, in GIMP it’s done by Layer/Transparency/Add Alpha Channel command. You must save the new texture in .png format, otherwise the transparency won’t “stick”. Now replace the texture name in PMDE with a new one. A wall with a hole must appear. Save your new wall. Step one is complete.
Technically the same trick can be done with .x stages as well. Since .x files are basically plain text, you don’t even need any special editor for this kind of tinkering. Simply open the file in a simple text editor, find a necessary texture, replace its name with a new one, and edit the appropriate texture as described. You will end up with two identical stages, one original and one portal-ready. If your video is going to have more than one portal, though, you’ll have to make many copies of the same stage in order to cover every possible combination of openings. You’ll have to switch the whole stage for a fake one, of course (or a whole part of it, if your stage is a multi-file one). When preparing a backstage, though (as will be described later), you must be sure that parts of it won’t stick out in wrong places, which is not a given if you’re working with ready-made stages instead of ones of your own making. For these reasons, I find the “brick”-oriented approach more convenient.
Shape it, baby!
Now that we have an opening that will work in our portal, we have to adorn it. In the game, an unlinked portal looks like an oval of blue or orange fire on the wall, and when both portals are created, a “window” to each portal’s counterpart is surrounded by a frame of respectively blue or orange fire as well. To visualize that fire, we’ll need a couple of invisible dummy models with transparent texture serving as a carcass for modified Beamman’s SelfBurning effect: one solid oval and another an empty one. How do we do that? Use the PMDE, Luke!
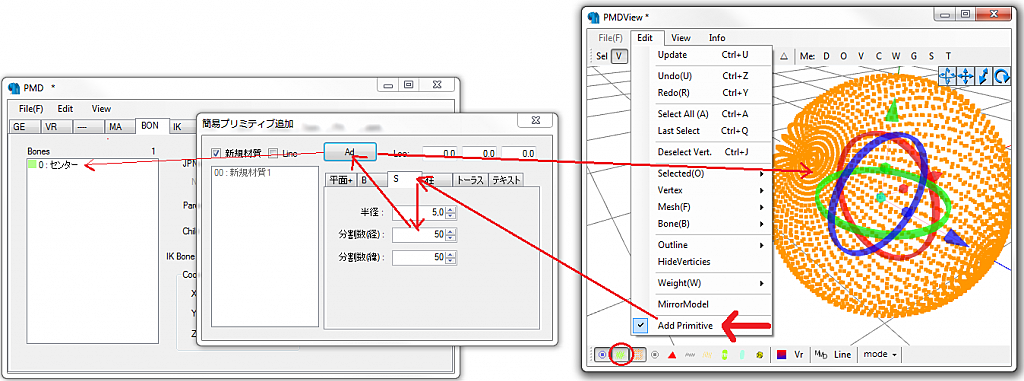
Open PMDE and start a new model. In the PMDView window, select Edit/Add Primitive menu command. A new window will open. By selecting various tabs of it you can add: 1) a simple square plane, arbitrarily filled with vertices, 2) a cube/brick shape (with corner vertices only!), 3) a sphere, 4) a cylinder, 5) a torus, and 6) a text-shaped model, respectively, to the PMDView window. For our purposes, we well be interested in third and fifth option. The “sphere” tab has three main parameters – the radius of a sphere, and amounts of “latitude” and “longitude” circles that form the object – in other words, how densely vertices will be populating our sphere. This is important, because SelfBurning does *not* simply enwrap the model as such with its shining. It selects some of its vertices (apparently, not even all of them but some percent of the lot) as nodes for fire sources. A simple brick model, for example, will be illuminated with its eight burning corners, and that’s it. So, in order to get a solid burning surface, you’ll need a *lot* of vertices. In the picture above, I used 50×50 setting for visuals; for the real thing that should shine with regular glow – 100×100. Uncheck the “Line” checkbox (or the transparency won’t work properly) and hit the Adding button. A sphere of dots will appear in the PMDView window (also, if you look at the main PMDE window’s Materials tab, you’ll see there a new mesh that wasn’t there before). Every dot is a vertex – a node of a carcass to which the texture is supposedly stretched (though, of course, in our case it will not be seen). Selected vertices are painted orange… and deselected ones will be invisible unless you switch on the second button in the bottom toolbar (‘Vr’, a cloud of green dots). I recommend you to do that, lest you risk losing some vertices when selecting them and distorting the model. When you have one, few, or all vertices selected, an “astrolabe” tool appears, allowing you to manipulate them. By grabbing and dragging the central diamond, you move the selection, little cubes on axes stretch it by the respective axis, hoops are used for rotation, and arrowheads drag the selection in exactly one direction without affecting other coordinates.

The sphere is not what our portal should look like, so let’s morph it into an oval. First, rotate it randomly in all directions so that flattened sphere wouldn’t look like a set of ordered lines. Now, flatten it completely by dragging it by one of astrolabe’s axis-cubes and stretch a bit by another. You got an oval shape! You only have approximate impression, though, about its size and proportions regarding the rest of the scene it’s supposed to appear in. The best way to attune it would be to compare it with a real terrain. In the main PMDE window, select File/FullImport/PMD File (while you may want to use a portal straight on an .x stage, I’ll assume for now that a PMD model of a relatively small size will be used for portal-homing surface) and load the wall where your effect will be supposedly used. To avoid accidentally mixing your shape’s vertices with vertices of the wall, click on “V” button in PMDView’s upper toolbar (called “Vert/Mat” in the newer PMDE v.129), in the panel that opens select “MA” (“Materials”) option, and deselect all materials except the first one in the list. Now you can freely select all vertices in the image with the box-tool or simply with Ctrl-A. Turn the whole contents of the window so that the shape overlaps the hole in the reference model, pull it closer to the wall, and adjust it to exact size and proportions by astrolabe’s controls. Once you’re done, come back to the main PMDE window. Select Edit/Mesh/Del Part. In a window that opens, select all (if there are more than one) items except the very first and hit “Go” (if the model you used for reference had other components like bones, IKs, etc., you’ll have to delete them too, all but the bone #0). Now you have the shape of your portal alone again, with no additions.
Now for the final part. By default, the model without texture looks all white. You will want to make it invisible instead. Save the file under some name. Load a graphic editor of your choice and prepare a transparent texture*. Place it into the same folder where you saved the shape. Now load the shape into PMDE again (so that now the editor will know where your files reside), and in the MA tab select the sole element in the list, then type the name of the texture in a corresponding field. Check the PMDView window – if everything is done correctly, you must be able to see the coordinate grid through your shape now. Save the file again. You’re done!

You’ve got the shape for a “closed” portal, now repeat same steps for an “open” one. The process is very similar except you use a torus Primitive instead of a sphere. Its parameters are: “thickness” of the torus, its diameter, amount of vertices in a cross-section (you don’t need this number to be particularly big) and the amount of torus’ cross-sections (this one you certainly do). The only small peculiarity differing from the process described above is that the minimal thickness allowed (the field is reluctant to accept fractional numbers) may be still too thick for what you need. You overcome that by creating a patently larger primitive than necessary and then downsizing it to desired size – gaining suitable thickness as well.
(*) In case you do not know how to do a transparent texture, here’s a sequence of commands for a popular free tool GIMP:
- Create a new file (no need for its dimensions to be any big).
- Layer/Transparency/Add Alpha Channel
- Ctrl-A/Del (the background has to turn checkered)
- Save the file using an explicit .png extension
In Paint.NET (also free) you don’t even have to specify the step 2 – it’s assumed by default.
Fire, walk with me

All right, we have shapes that will illuminate our portal, now let’s make them visible. For that, we use Beamman’s SelfBurning MME effect that you can download from its home page. Original effect, though, only works for an orange portal, and we will also need a blue one. Fortunately, it’s easy to make the fire any color you wish.

First, enter the folder where your SelfBurning effects reside. Copy files SelfBurning.x, SelfBurning.fx and particle.png with names like SelfBurningBlue.x, SelfBurningBlue.fx and particleBlue.png. Now, open SelfBurningBlue.fx in a simple text editor and find the following line (it should be around 120):
string ResourceName = "Particle.png";
and replace the file name with ParticleBlue.png. Open the ParticleBlue.png with a graphic editor (anything that is more advanced than Paint should suffice) and use Hue/Saturation tool to give the texture a necessary color.
Well, that was simple.
UPDATE: The described process applies to the v4 version of Beamman’s SelfBurning; there’s a newer v5 version on his site now that can change colors without such adjustments. Just load it like described in the article. The only exception will be that instead of reddish-orange it will be solid white. Change SelfBurning.x’ X, Y, and Z coordinates in the Accessories Manipulation Panel to give the fire any color you choose.
Now you see it, now you don’t
Now that we have all necessary parts, let’s stitch it all together. Load MikuMikuDance and build your stage. Behind the place you’re going to position one of portals, you must construct a fake space depicting the look through another one. Complete it with items that would be recognizable enough to persuade viewers that they *are* looking into a place they could see from a different viewpoint. If there are models, their motions have to be copypasted respectively. Load the customized version of SelfBurning in Accessory Manipulation panel, and map the model to SavePos.fx and Mask.fx in VertexPosRT and VertexPos_MaskRT tabs of Effect Mapping dialog. Since effect mapping can’t be assigned to more than one object or switched mid-sentence, you actually have to load *two* instances of the effect – map one to the open portal and another to the closed one.

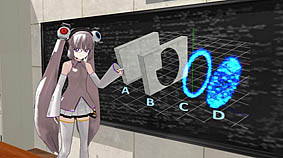
Stage is prepared, actors are in their places, now comes the moment of hustle. At the place supposed for the portal itself, you should superimpose four models: a solid wall, a wall with the portal, an effect-infused hoop, and a solid oval. First, make all of them but model A invisible. Then, at certain intervals of time, sequentially turn on models D, C and, B, and turn off models A and D. When you’re done, your portal is opened.
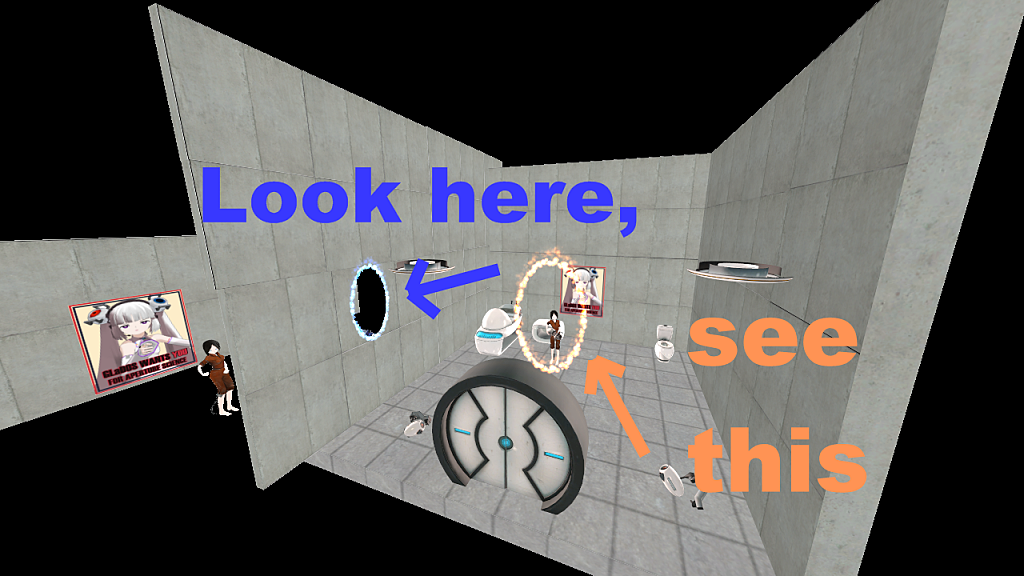
At 1:04 of the video, you can see this trick extended a bit. The closed portal shape appears for a moment, obstructing the fake space behind it, and then the latter is disabled, opening *another* fake space. That is what happens in game when you re-open one of portals while another one stays stationary.
This is it! You learned to use portals in MMD!
Models used in illustrations: Chell and GLaDOS by MahosMMDaccount. Environment models: by SKaa3w. Classroom interior by MMDFakewings18
Bonus level: They do it with mirrors

Actually, not every portal in the video is made using the complete routine. At 0:35 and 0:47, you can see portals made with “cheap and dirty” technology. BeamMan’s MaskMirror effect, placed in the middle of a fire oval, reflects the *same* area you’re in, but objects reflecting in it are configured to deceive you into believing you’re looking through it. For example, at 0:35 you can see a piece of a ceiling lamp supposedly on the other side of the portal. In truth, it is on *this* side of the portal, just outside of the scope of the camera. Since both views are made of identically dull gray walls, I didn’t bother to create one more fake space and a multi-layered wall. Of course, such a trick would work only for a limited sort of environments. You must consider your lines of sight carefully, before choosing this cheap solution.
Originally, MaskMirror effect is round rather than oval, so for this particular purpose you’d have to modify it as well. Copy MaskMirror.fx, MaskMirror.x, and Mask.png under new names, change your new instance of MaskMirror.fx to refer to the new texture instead of Mask.png, and edit that new texture. White is for reflecting surface, black is for the invisible part. You can make it any shape you require, though – in this case, oval. Now load the MaskMirror effect, attach it to a Dummy Bone, and place over the burning shape. You can set mirror’s initial size to 0.1 and expand it later with Si field of the Accessory Manipulation panel to make portal opening sequence more flashy.
– SEE BELOW for MORE MMD TUTORIALS…
— — —
– _ — –
![]()
