 How can I use Blender to make
a model for MMD? How do I assign materials to my MMD model in Blender?
Where is the eyedropper tool in the Blender color-picker? How can I use Blender to make
a model for MMD? How do I assign materials to my MMD model in Blender?
Where is the eyedropper tool in the Blender color-picker?
Making Your First Model Part 12
Assigning Materials in Blender
out on her (the toon shader) just kicked all of the sph files to the
curb! Adult Shader works with the sph files very
nicely, so you just have to ask yourself what
shaders you would use when thinking about
being avant garde and texture
your entire model with sph files.
The second is that you should segregate your materials
based on how you’re going to weight things. Yeah! It probably sounds a
little crazy. All of Camila’s
hair is the same color . . . So why would I make her bangs and braid a
different material?
Simple: Weighting.
I’m considering trying to add physics to Camila’s bangs.
If her bangs and her fringe were the same material, I would be stuck
trying to navigate around her fringe. However, if
I say they’re different materials, I will be able to mask the fringe to
get to the bangs!
Now, let’s talk about colors.
When you’re painting on the computer, you have an
eyedropper tool. Just click on the picture and you have the exact color!
Guess what?
Right as I was about to write a reason you don’t
need the eyedropper tool . . . I found it.
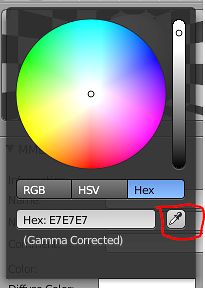
As Blender allows you to open images in multiple ways,
you could easily color pick to your heart’s content! However, that
likely won’t get you too far.
When you’re painting in SAI or Photoshop, you only need
to make sure the one color you’re using is correct. In MMD, you need
three different colors to interact to make one material.
How do the colors interact? (Note, skip to next heading
if you don’t want to hear a ramble about colors!)
Let’s start by making the colors clash something nasty.
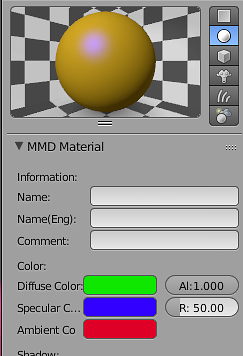
Complementary
colors chosen for ambient and diffuse
Do you remember when they taught you about complementary
colors in art class? When placed next to each other, complementary
colors pop! When mixed together,
they just get nasty.
So, let’s talk about the colors one at a time.
Let’s get the easiest out of the way. Specular
is the color of the highlight. To change how the highlight appears, you
can use “Reflect”.
This is a little counter-intuitive . . . so bear with
me! The higher reflect is, the smaller the highlight is. Why is that?
It’s because the more reflective a surface is, the less diffuse the
highlight is. Instead of being a relatively large glow, it’s a tiny
pinpoint.
While we’re on the subject of “Reflect”. . . Alpha is a
little disingenuous in Blender. Using Alpha either washes the part out
or makes it entirely transparent. It’s a good idea to not really mess
with alpha until you’re a pro!
If you set the specular color to black, then the
highlight ceases to exist.
Then there’s Diffuse and Ambient.
Alright, let’s talk turkey right now.
I don’t know how to explain how diffuse and ambient work
. . . But I also feel like I can say, “Hey! It’s advanced knowledge!
Let’s move on!”
Actually Assigning the Colors
Alright! When you create the first material for an
object, the entire object is assigned that material. However, sometimes
you want different parts of the same object to have different
materials. For that, select the object and go into edit mode. Turn on
“Face Select” and select the faces you want to be a different material.
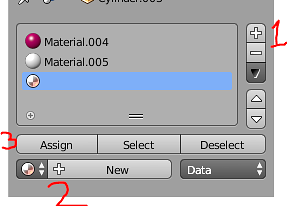
Material
Tab with Pertinent Parts Numbered
First, press the plus button to add a new material. Once
a blank spot shows up, press “New”. Then you can press “Assign”! The
faces will now have the default material.
Make sure to name your materials!
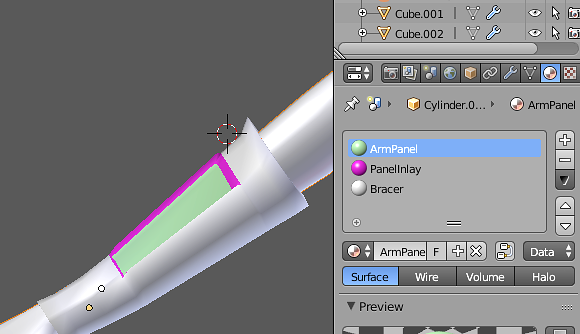
Arm
with Materials Named
While there is a section called MMD Material where you
can input a Japanese name, and English name, and a comment . . . the
materials tab is almost never sanitized. For that reason, just naming
them in the materials tab is close enough.
(And way better than the default MMD models that come with MMD! Those
are awful when it comes to materials!)
If you want to use a material from another object, it’s
easy! Make a new material the same way you did before . . . but instead
of pressing “New”, press the button with the same icon as the Material
Tab.
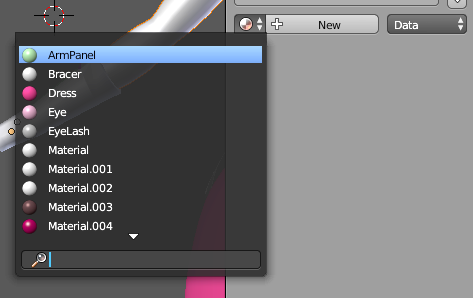
Pick
from existing materials from other objects
Pick the material you want to use, and you’ll have that
material on that object!
Now, let’s talk about Camila’s colors.
Is her dress red? Is her hair grey? Is there a blue
undertone? Depending on the reference image, any of
those things could be true! We’ll need to use our noggins to figure out
what looks best, even if it’s a little off-model.
Now, I’m going to be frank. I’m not going to try and get
the colors perfect right now. I
want to do a lot of work with
textures, so the color I actually plop down now isn’t too important.
However – if you know you don’t want to do textures, the
colors are important.
Textures aren’t exactly required
. . . apart from irises, the majority of the old
fashioned models lack them. If you need proof, just
open up the Model folder in a brand new MMD “installation”!
On lips . . .
I can’t figure out how to do the lips via material.
Maybe I’m a little out of it, but I can’t select just
the parts that I want to be colored without some
nasty jagged lines.
Until I found “Poke Face”. Select a face, and them press
“Alt + P”.
While it barely made
it better, it made it good enough for me to think that I could leave
the lips as their own material. Why is that important? For a woman with
lipstick, lips are either way less shiny
than skin or way more shiny than
skin. Having a separate material that would catch the light differently
would just add a little touch of
niceness.
After a good bit of thinking and thinking, I realized
that giant, plump, red lips were
important to Camila as a character. As unhappy as I am with them, they
do look like her.
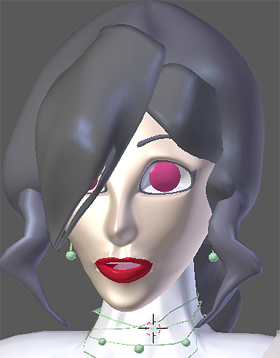
Now, I hate to do this to you . . . But I think you know
all there is to know about materials! For me to go through and say “I
did the same exact thing for the dress. I did the same exact thing for
the nails . . . ” Would get pretty grating pretty quick!
Are we going to finally import
the model into PMXe?!
Not yet! Check back in next time when I teach you about
exporting UV maps for texturing!
If you know you’re not interested in
texturing, you can skip the next part.
<
Previous
Tutorial CONTENTS
PAGE Next
Tutorial >
|

