 How
can I use Blender to make
a model for MMD? How do I add bones to my MMD model. Can I miror the
Left bones to make matching Right Bones? Where is the button to enable
the masknig window in PMXE? How
can I use Blender to make
a model for MMD? How do I add bones to my MMD model. Can I miror the
Left bones to make matching Right Bones? Where is the button to enable
the masknig window in PMXE?
Making Your First Model Part 16
Adding Bones
Alright, sorry about the last part! But thanks to the info-dump last time, we’re going to be getting straight to it this time!
Now, let me start by saying that it seems like the world doesn’t want people to make their own models from scratch! Why do I say that?
It’s because it’s very hard to just find a list of the
required bones! I was able to find one, and I was also able to put it in
a table and have it posted here (insert link to the bone chart
article)!
Now, let’s get straight to it!
The one thing I didn’t say last time was that Mother, Groove, and
Center are all green squares. That means they are Rotate, Move, Visible,
and Enabled.

Other than that, they’re normal. Once we add those three bones, we
can ignore those settings until we get to the eyes or the IK bones.
Until then, all of the other boxes will be a pretty blue.
Before we get started, let’s undress Camila. Why? So that it’s easier to add bones, of course! I’m going to show you a super cool method for adding bones, and clothes would get in the way.
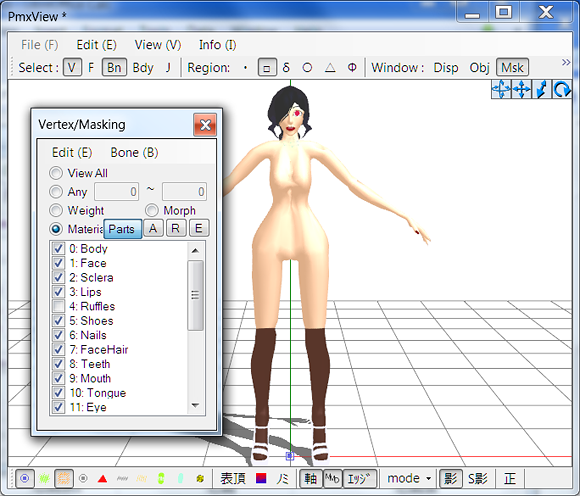
To undress her, find the “Msk” option on the toolbar to open up the “Vertex / Masking” window.
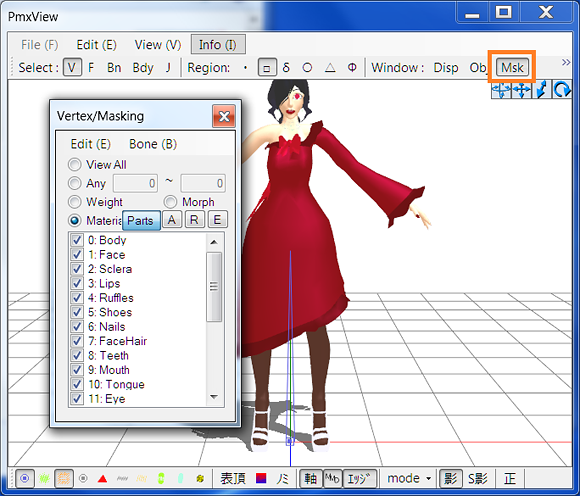 Location of Button to Enable Masking Window Now, you may remember that it is imperative that you name your bones in Japanese. It isn’t imperative that you name your materials
in Japanese . . . it isn’t even necessary! For that reason, it’s a good
idea to just name your materials however you see fit. The only way
someone will know how you named your materials will be if they open your
model up to edit it.
However, give them descriptive names! When you open an old model, you’re sometimes faced with this:
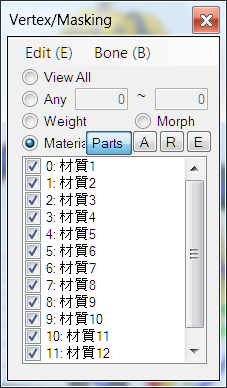
If, in the year of our Lord 2017, you name your materials like that,
I’m going to assume it’s a hamfisted attempt to keep people from
stealing your parts.
Sorry, I got sidetracked.
To mask her dress, just find the material called “Dress”. Check the box and the dress is gone!
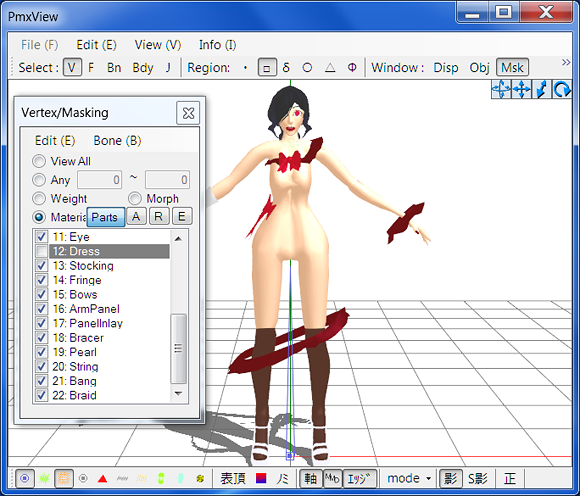
Now, she looks silly with disembodied ruffles and bows. Find the ruffles and bows and just mask them also.
For now, we are only going to work on the left side. For that reason, I’m leaving her bracer on.
Now, let’s start with the important bones! Because I exported with
MMD_Tools, the first bone is the Mother bone. Next comes the center
bone!
While I have an ultra-cool method for bone placement, we’re going to do the groove bone and the center bone the old fashioned way.
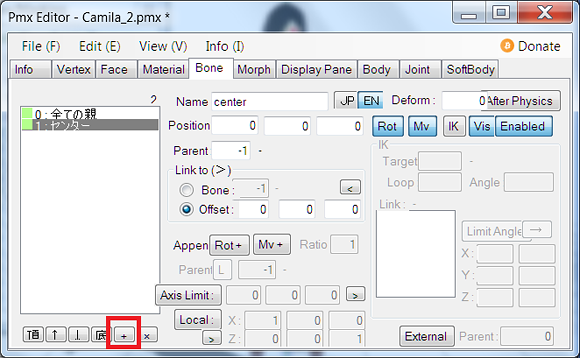 Location of Add Bone Button Simply press the plus sign to create the bone, and then type both the Japanese name and the English name into the name box. If the bone has special settings, change those also.
Using the spreadsheet I made last time, I can see that the center
bone’s parent is the mother bone. Because of that, “0” goes in the
parent bone box for Center. If I look up a little bit, I can also see
that the mother bone is linked to the center bone. We can switch over to
the mother bone and link it to the center bone.
Before we do anything else, let’s move the center bone into place.
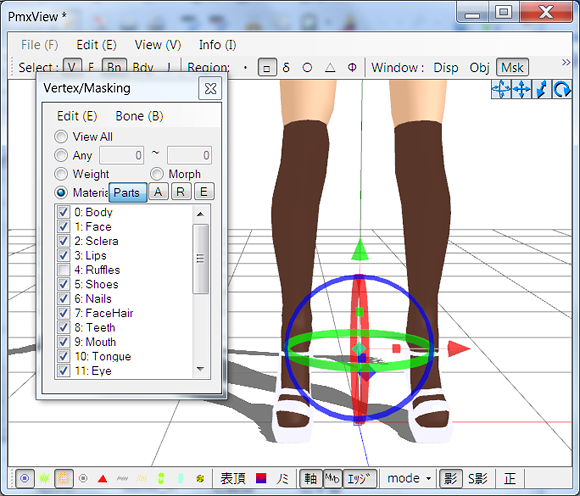
Make sure that you enable Bone select in the toolbar of the View window.
 Bone Select Enabled In the Y coordinate for the Center Bone, let’s type a small number so
that it isn’t on top of the mother bone. Once it’s far enough away from
the mother bone, click on it to select it. A handle should show up.
Click on the green arrow and drag it up so that the center bone is in
place.
Remember, the mother, center, and groove bones should all have X
values of 0 and Z values of 0. Unless, of course, you make a wacky,
asymmetric model in the wrong part of the grid! But if you made a body
using the mirror modifier and built your model in the correct place . . .
X = 0 and Z = 0.
PMXe has a bad tendency to randomly snap bones back to where they started. This is infuriating. The
only way to try and prevent it from happening is to click around the
bone settings a bit after you move it. The best way to make sure it
sticks is to click on a different bone and then click back, but that’s
not a guarantee it will work either.
Now, let’s do the same with the Groove bone.
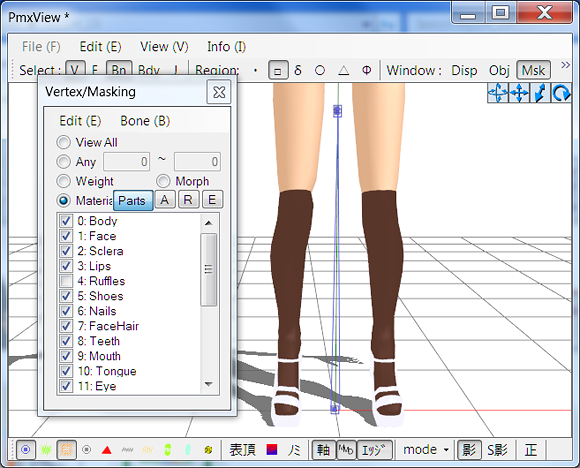 Camila with Center, Mother, and Groove Bone Now that we’ve added those . . .
It’s time for the fun to start!
When I was making my first model, I went to Bandages and whined about how hard bones were. So he taught me a trick.
I added the Upper Body bone. How will we get it into place?
First, make sure you have vertex select enabled. It’s the “V” up near
the “Bn” I had you select to enable bone select. Now, click and drag a
box around the area you want the bone to be. If you want to be fancy,
this is “Selecting Edge Loops”.
Now, go to Edit, then Object, then Copy Position . . . Or just follow along with this image:
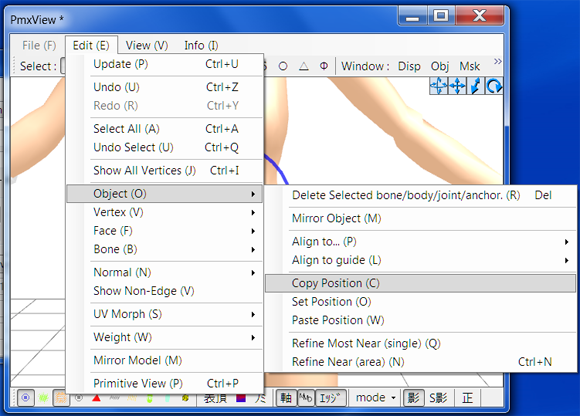
Click on some blank space in the view window to deselect everything,
then madly click on the Upper Body bone in the bone window to select it.
Then, follow the path above . . . But this time, choose “Paste
Position”. If nothing happens, repeat the process. PMXe is obnoxiously
finicky.
However . . . if it did work, you just placed a bone without ever touching the handles!
Let’s do the same for the next bone on the list: The neck.
Silly aside – even though I have to stop and think whenever I
see 腕 to try and remember the reading, the moment I see 首 I instantly
think “Kubi!” Whenever I see the wrist bone, I instantly think “Tekubi!”
The neck bone rests at the base of the neck, while the head bone
rests at the top of the neck. So after adding the neck bone, you add the
head bone.
The upper body bone is linked to the neck bone. The neck bone is
linked to the head bone. The head bone is linked to . . . nothing. But
it is the parent to the left eye and the right eye. But for right now, we only need to make the left eye bone.
Where does the eye bone go? Not on the eye.
The eye bone goes . . . Somewhere in this general vicinity:
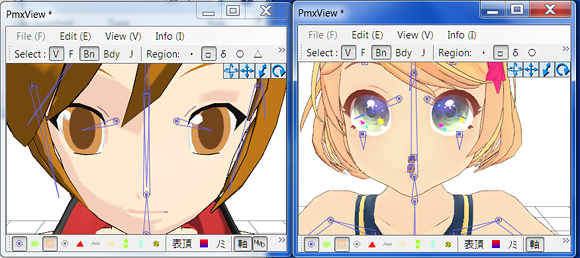
For both models, the eye bone is attached to an invisible bone. Let’s
add it quickly. This bone goes onto the surface of the iris.
So, that eye is parented (but not linked to) the head. It is also linked to an invisible bone.
Now, for the lower body. The lower body is just below the upper body.
Because of that, instead of copying the position of the vertices . . .
you can just copy the coordinates of the upper body and move it down
slightly!
The lower body is parented by the groove bone, but it isn’t linked to anything.
The shoulder bone seems a bit disingenuous. Why’s that?
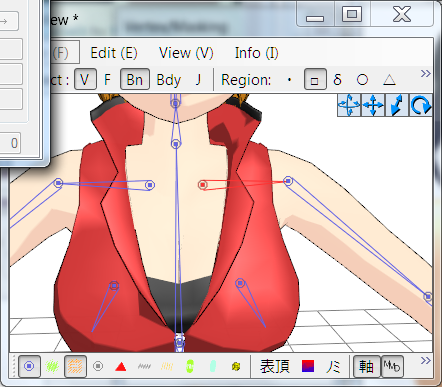
Because it’s placed more like a collar bone than anything else! But, who are we to question the people who originally named these bones? Plop that shoulder bone down!
As you can guess, the shoulder bones won’t be linked to the upper body. (The upper body will be
the shoulder bone’s parent, though.) But they will be linked to the arm
bone. . . Which looks more like a shoulder bone! Then the arm bone
links to the elbow, which links to the wrist . . . The wrist links to
nothing, but parents the first bone of every finger. Each finger is
completely linked . . .
If you want to make your life a little easier, add an
invisible bone to the tip of the finger in addition to the finger bones.
Name it whatever you want, it just has to be invisible.
Here’s a quick tip I learned – if you make one bone, set all the
parameters, place it, and then make another bone . . . You may end up
hating the program. However, especially for the hand, if you wildly
begin placing bones without even naming them, it will go by lickity-split!
Fun fact! 薬指 literally means “Medicine Finger”. I remember that
it is the third finger because of a demonstration my Japanese teacher
did on how the third finger was used for medicine back in the day.
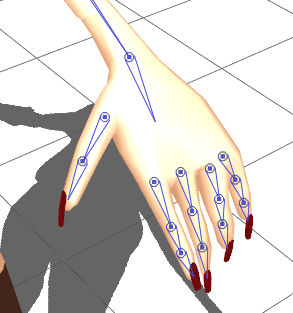
Let’s talk about those triangles attached to only one bone. Those are
actually connected to two – a visible one and an invisible one. The
invisible bones aren’t necessary in PMX models . . . but it makes it
easier to automatically add bodies.
You can achieve the same effect as linking a visible bone to an
invisible bone by using the “offset” option in the bone tab. However,
it’s just easier to copy the position of the vertices and add a bone
that way!
Once you’re done with the hands, it’s on to the legs. Parent the leg
to the lower body, but don’t link the lower body to it. Then, just go
down the line, linking each bone to the one before it.
Once you get to “Both Eyes”, just open up a model and look at how they are set up.
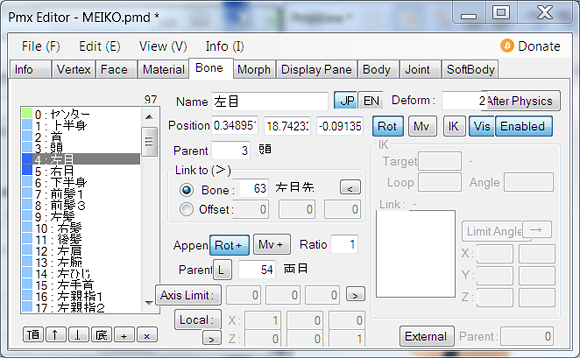 Meiko’s Eye Settings I had a bit of an issue with the text next to the parent and link to
bones turning red . . . MEIKO’s both eye / eye bones are set to “2”
deform. I copied that, and it no longer wanted to accept being connected
to something that wasn’t also set to 2 . . . yet the “head bone”
remained fine. Curious. With a little fiddling, I got it back to looking right!
Just copy those and we’re ready to move on to the exciting part . . . Oh . . . Wait, IK is next.
So, let’s use our thinking caps. 左足IK’s target is 左手首. An IK bone is always on top of its target . . .So, we just need to paste the ankles coordinates into the IK bone’s coordinates!
I wish I could be more help, but I literally just copied what Meiko.pmd did. I’m still really iffy on IK, and we can’t test if it works until we weight it.
Now, prepare to be amazed as we cut our workload in half . . .
Select as many of the bones with 左 or L in their name as possible at
the same time without letting any other bones in the crosshairs.
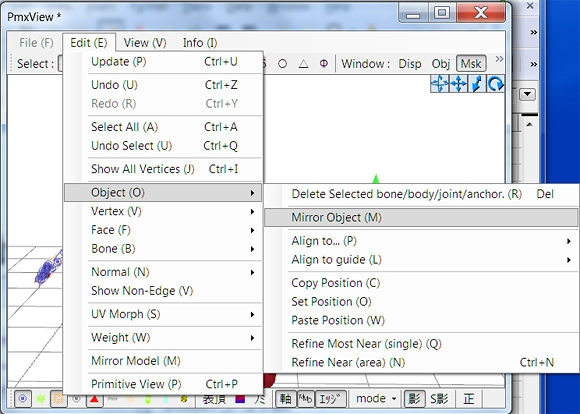
Press Mirror Object and then press OK . . . Then bam! Your bones are mirrored! Do it again for the ones you couldn’t fit in the first time . . . and then . . .
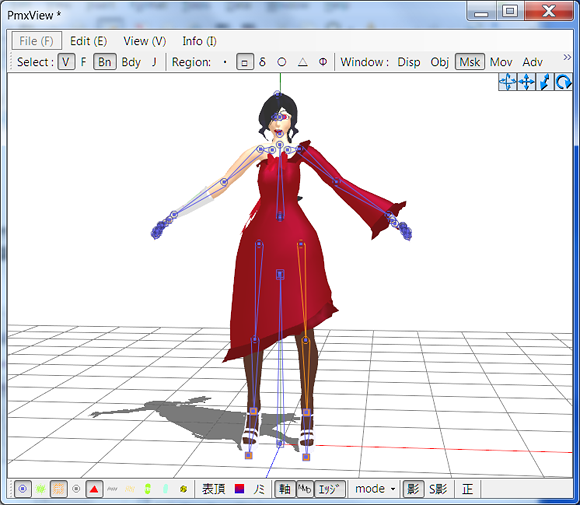
Camila has been boned! . . . Oh . . . Wait . . . I mean . . .
This model has had all of the required bones for basic movement put in
place! However . . . we can’t test her yet.
For that, you gotta tune in next time for when we weight her!
<
Previous Tutorial CONTENTS PAGE Next
Tutorial >
|

