 How can I use Blender to make
a model for MMD? How do I find out about the bones in MMD models? How do I add IK bones to my model in PMXE? How can I use Blender to make
a model for MMD? How do I find out about the bones in MMD models? How do I add IK bones to my model in PMXE?
Making Your First Model Part 15
An Explanation of Bones
Before we get started, I want to clear something up.
As MMD evolves, models will also evolve. There are two
bones which are virtually required now that were non-existent in the
earlier days.
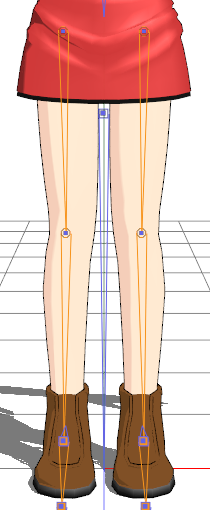
When you look at this model, you will almost
automatically notice that there’s only one bone between . . . let
me rephrase that . . . There is only one bone
present on the X axis below her hips. That is the center bone.
The center bone is located on the X axis and falls
somewhere between the model’s thighs. However, this isn’t a constant as
seen in the Luka model that comes packaged with MMD.
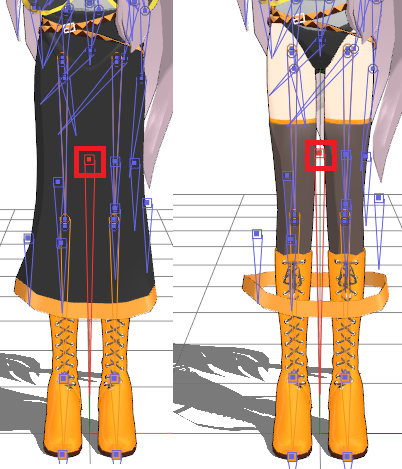
With her skirt on, it looks like the center bone falls
between Luka's knees. Taking off her skirt reveals that there was a bit of
an optical illusion going on. However, her center bone is quite lower
than most models that I have seen.
Since the days of PMD models, there have been two new
bones added which are now considered standard. The mother bone and the
groove bone.
While I don’t know enough about animation to tell
you what they do, I can tell
you where they go. (Model by Michi-K)
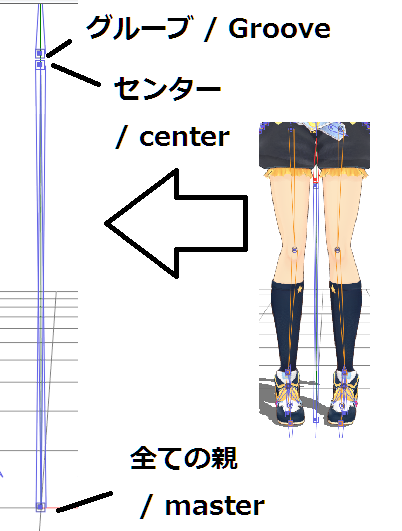
Nothing is weighted to the grove, center, or mother bone.
To study what is parented to what, you can select all of
the bones in the bone tab and right click on them to select “Copy as
CSV”. You could also press “Ctrl + C”.
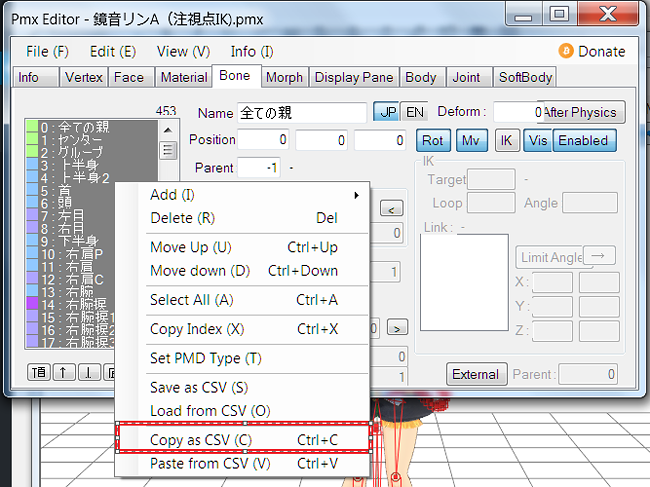
Once you have it copied, you can paste the information
into any spreadsheet program.
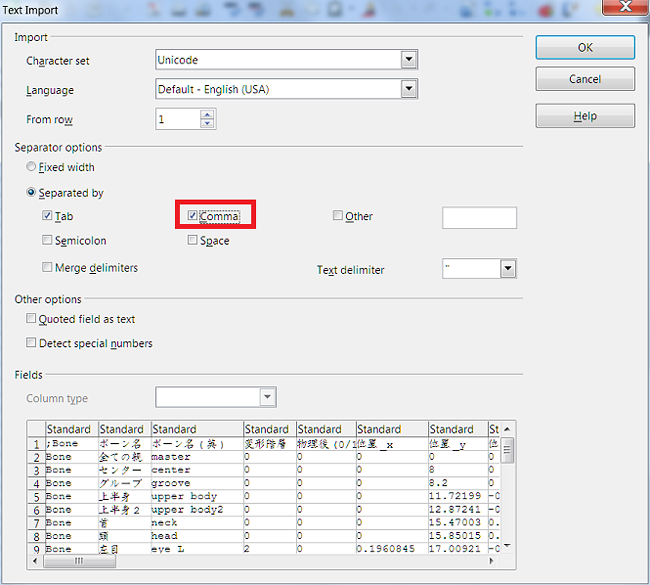
When you paste something like CSV data into LibreOffice
Calc, it will bring up an import dialogue. If you choose for it to
separate cells based on commas, everything will be sorted into nice
columns. This is important, because the majority of the cells between
the bone and what it is linked to are pretty useless for right now. You
can easily select those columns and delete them, leaving you with
something like this:
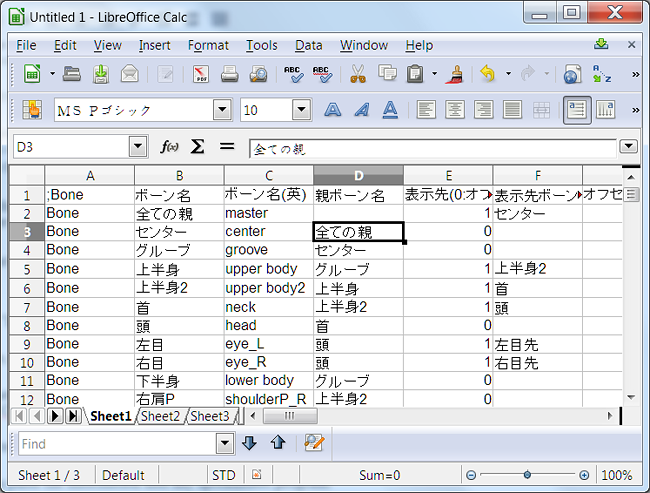
Now, let’s use my good friend Jisho
to figure out what the headers mean!
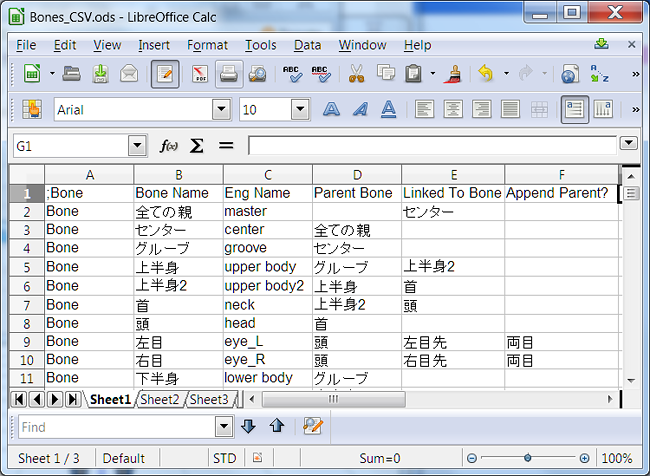
You can DOWNLOAD this
spreadsheet. The ZIP contains the file in two formats: .ODS
and .XLS
Now, let me point out a few things. The first is that
this is taken from an extremely high
quality model with a lot of
physics. Because of that, there are bones that an average user would
have never even heard of. While it would be easier to plop Meiko’s old
PMD bone CSV data into Calc or Excel, it would be less useful. As I
said, models have evolved. We’d be bogged down with hidden finger bones
and we wouldn’t know what is linked to the groove bone!
The second is that if you can’t read Japanese . . .
Sorry. Other than the English names, the data is 100% in Japanese. (See the LearnMMD articles about translating Japanese models.)
For someone like me who studied Japanese for five years,
that’s no problem. For the most part, bone names use the most basic
characters. If you’re willing to learn that 頭 means head that 右 means
right, then you should be able to learn the bone names through brute
force. (You can read 頭 as head in your head – you just need to know
that it means head!)
As a note, writing scripts (“macros”) for spreadsheet
programs is pretty easy! If you were willing to copy all of the
Japanese names and write out their English names, you could convert all
of the bone names in the CSV data to English. If you think you’ll use
this spreadsheet a lot to remind you of what goes where, it might be
really helpful to do something like that!
Now, enough of that! Let’s use those English headings to
explain each box.
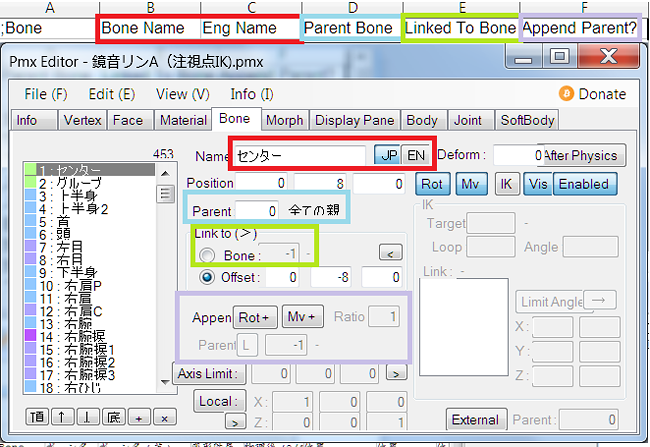
Bone name and English name are pretty self explanatory!
That is simply the name of the bones. If you have an English copy of
MMD, then it is extremely important that you give your bones an English
name in addition to a Japanese name. Otherwise, your bones will be
“null”. However, even if you have an English version of MMD, you still
need the Japanese name. Otherwise, motion data will
not work.
Why’s that? Well, let’s open a copy of a motion data in
Notepad++.
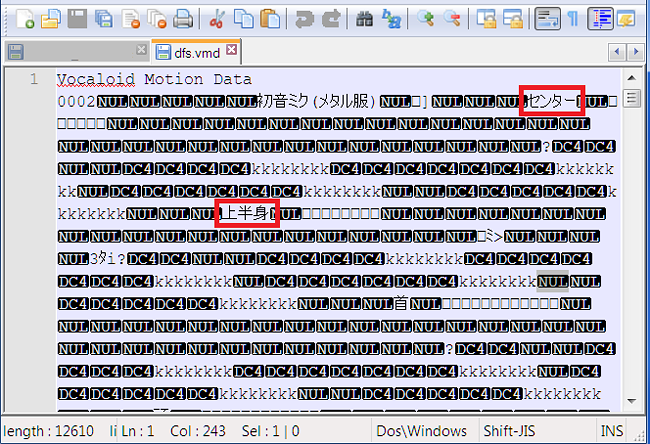
With all of those NUL characters, it’s a little hard to
point out what’s happening! But you can see where I drew a box around
the bone names.
The first thing to note is that MMD uses the Japanese
names in the data. The English names are there to make your life easier
while using the program . . . but they’re useless in the motion data.
The second thing is that you
personally can make motion data with the bones named
incorrectly. If you wrote the English names in the Japanese box, or if
you just mashed your keyboard at random in the Japanese name box,
you personally could make motion
data for that model. However, there’s a problem. No
one else could use your motion data with any other model! Nor
could you use anyone else’s motion data for your model.
For bones for special things that aren’t standard, you
can name the bones whatever you want. But for the standard bones? They
need the correct Japanese name.
In blue is the parent bone.
Let’s talk about the wrist.
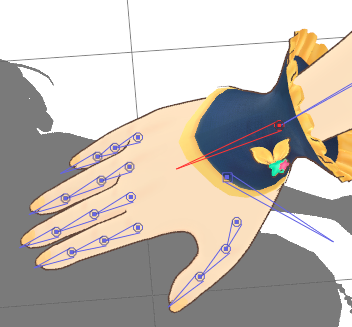
The wrist is parent to five bones. However, a parent can
only be linked to one bone. Therefore, the wrist bone isn’t linked to
anything, as you can see in that picture.
However, you can also see that some bones are linked
to something. For example, thumb0_R is linked
to thumb1_R.
If a bone is linked to another bone, then the first bone
is the parent to the second bone.
Let’s use “fore2_R” as an example.
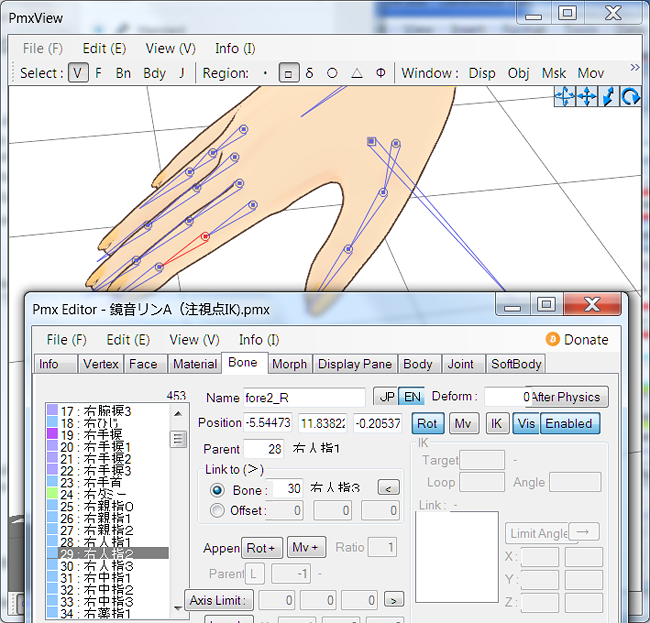
When you select a bone in the bone tab, it turns red on
the model. You can see that this bone is linked to two other bones. The
first bone is “fore1_R”. That bone is the parent.
Remember the green box from earlier? This is where it
comes in to play. Because “fore2_R” is linked to “fore3_R”, you put the
number for “fore3_R” into the “Link To > Bone” area.
However, even though “fore1_R” is linked to “fore2_R”,
you still just put the number for “fore1_R” into the Parent box for
“fore2_R”. “fore1_R” has “fore2_R” in its “Link to > Bone”.
Now, for the lavender box from earlier. For a basic
model, there is only one set of bones that uses that section. Those are
the eye bones. Their “Append Parent” is 両目 (or Eyes
or Both Eyes . . .)
The purpose of the “Both Eyes” bone is to rotate around
the eyes simultaneously as opposed to rotating both of the eyes one at
a time. For the both eyes bone, I had to open up a good model and just
copy her bones.
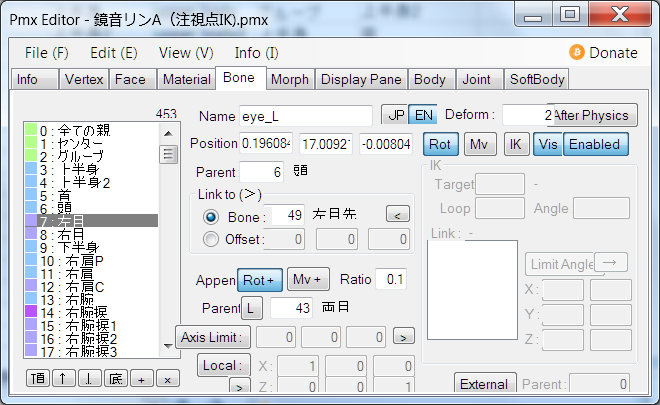
It’s a little confusing, and your eyes will most likely
glaze over if you ask a smart person to explain appends! So for now,
just know that it’s 100% legal to stare hard at a model and copy their
settings!
Now . . . For the part I left out.
IK bones. This is another thing that will make your eyes
glaze over. There are tons of tutorials on fixing IK
bones . . . Bandages has made quite a few advanced tutorials on IK
bones . . . but those made my eyes glaze over too!
So, what can you do?
You can download a model that works well and copy their
IK settings, of course!
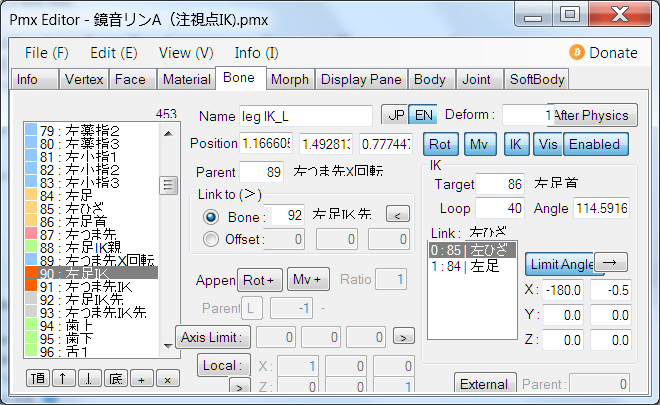
I feel like I should explain it, but all I can think of
to say is that to link the regular bones to the IK bones, you copy the
regular bones’ indexes and paste them into the IK Link box. I also know
that your IK bone must be in the
exact same spot as the target bone.
Other than that? I can’t even look at an IK bone for too
long without getting confused!
But for when you decide to copy from a good model,
remember something important. A lot of bones are
invisible! “toe IK_L”‘s target is “toe_L”. (Remember – it’s
hard to find a bone by name, but the number of the
target is what’s in the box! Using the number in
the box will make it a lot easier
to find the bone.)
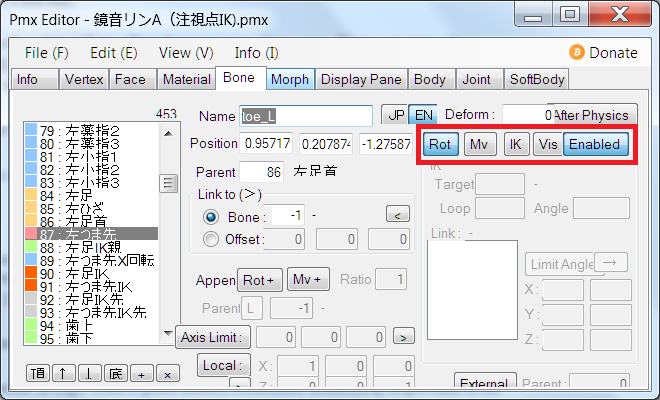
If, while copying a model’s bone settings, you need to
see an invisible bone . . . All you need to do is find the invisible
bone in the bone list and click “Vis”. That will make it visible.
However, for IK targets, the Target bones are in the
same exact spot as the IK bone. So, that is a little useless in this
case!
For leg IK bones, it’s a good idea to study an older
model which will be more simple. A newer model may have bones like
“右つま先X回転” . . . which I’m sure is important! But it’s not vital.
Let’s open the good ol’ Meiko model to look at her IK
bones. The only IK bones she has are the four that are vital to
any model: Leg IK left / right and Toe IK left / right.
Let’s take some time to explain the colors associated
with IK bones.
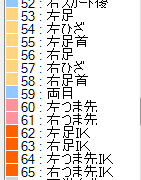
A normal bone is a pretty, pale blue. A normal bone that
is linked to an IK bone is yellow. An IK target is pink. An IK bone is
red.
A yellow bone is set up just like any other bone, and
pink bones are almost identical to other bones. The main difference is
just that a pink bone is usually set to invisible. Is it so people
don’t mess with it? Is it just to make things look nice and
tidy? I don’t know! I do know
that regardless of if you make it visible or invisible, it will still
be pink.
And red bones? Well, like I said earlier, they’re
confusing! But if you have MMD, then you have quite a few extremely
basic models to base your IK bones on!
Sorry for another chapter that simply explains things!
But look on the bright side . . . You won’t have to hear it next time!
Tune in next time for when we add bones!
<
Previous Tutorial CONTENTS PAGE Next
Tutorial >
|

