 How can I use Blender to make
a model for MMD? How do I set up Blender for making an MMD model? Where
do I get the MMD Tools for Blender? How can I use Blender to make
a model for MMD? How do I set up Blender for making an MMD model? Where
do I get the MMD Tools for Blender?
Making Your First Model Part 2
Setting Up Blender
Tutorials are just the Worst!
Oh, wait. Let me rephrase that.
There are different kinds of tutorials. Beginner tutorials, advanced
tutorials . . . amazing tutorials, awful tutorials . . . You can find
one that teaches you exactly what to do and feel excited . . . and then
find one that just confuses you.
Whereas I should probably go through each step in detail, this can be
described as a listing of tutorials as opposed to a tutorial in itself.
I will be using Blender, but you can apply the methods I use to other
software as long as you know the basics of that software. However, as
Blender is free and relatively lightweight, it might be a good idea to
switch over to Blender.
You havta learn Blender on your own...
Before we get started, you should make sure that you have a good
understanding of how Blender works. For that, there are two channels I
suggest checking out. The first is tutor4u.
His teddy
bear tutorial was what gave me the confidence
to actually learn the software. If you want to see tutorials on things
that are more advanced, check out Ali
Arango.
Full disclosure - I won't be using any of
the methods from their tutorials in this tutorial. Their videos are amazing
for teaching you the basics of modeling, but they often fall apart when
it comes to more intricate things.
This tutorial uses Blender 2.78.
Feel comfy with Blender yet?
If you do, let's get started!
Wait! What about MMD Tools!?
I was planning on writing this series so that if you're only interested
in making a model with someone else's mesh, you can skip to the
appropriate part and not be lost. But if you want MMD
Tools now, here's
the download. To install it, find the folder
called "mmd_tools" in the RAR and place it in the "addons" folder for
Blender. The path for the folder should be "C:\Program Files\Blender
Foundation\Blender\[version]\scripts\addons" on Windows . . . Of
course, replace [version] with the version number! To activate it,
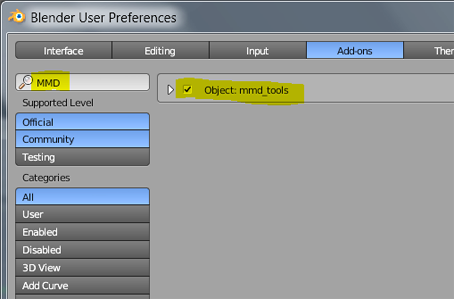
press "Ctrl + Alt + U" to open "User Preferences." Click on the "addon"
tab and search for "MMD". Most likely, there will only be one option.
Make sure to click the checkbox to enable it.

Ok . . . so now what?
So, let's start by deleting everything. Mash the "a" key until
everything is highlighted in orange. Then press "x". It will ask if you
want to delete . . . and click delete, because you sure do!
Feel comfy with Blender yet?
I'm going to assume you have a basic knowledge of Blender from this
point forward. Instead of saying "Go to View, then front" . . . I'll
just say "go to front view." Thank goodness I don't have a number pad,
because then you might get stuck with me saying "Mash num 3!"
So, let's start by switching into front, orthographic view. This is the
only way we can use background images - they just don't show up in
Perspective view.
In my last article, I wrote about making
"franken-references". You can either use a reference you made
on your own or one you found online, but you should have a reference to
make things easier. The important thing is that your references are
lined up well and you have a front and side view.
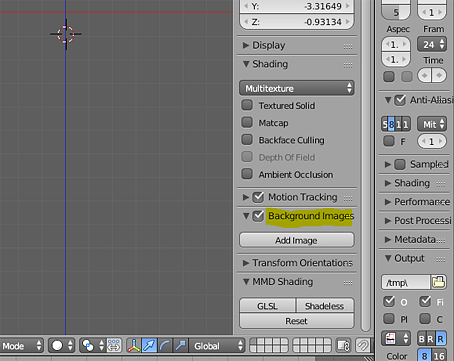
To load your reference image, mash the "n" key. In the bar that shows
up, find where it says "Background Images". It's a little hard to find
at first, even if you know where it is!

Once you find it, click "Add Image". After that, click the button that
says "Open."

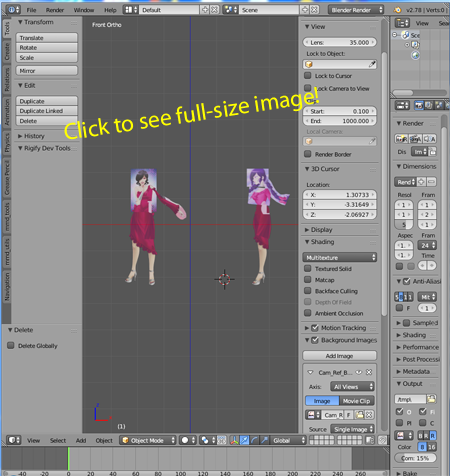
Hopefully, your reference will have popped up. If your image did not
pop up, make sure you are in orthographic view. Use the buttons below
the "Opacity" slider to move the reference image around so that it is
properly centered. Something I always prefer is to click the button
labeled "Front" directly under "Opacity" so that I can see the image
through the 3D model. Next to "Axis", it says "All Views." If the image
you just centered was the front view, change it to "Front." If it was
the side view, change it to "Right." Do this again with the side you
did not just center.
A nice thing to note is that you can use the same image and apply the
same values for size and Y coordinates. That way, the image will be as
lined up as it can be!
This may be around the time that you realize that despite spending
hours on your reference, the face doesn't line up properly. Whoops!
But you carry forward none-the-less!
That was a lot of work to do nothing!
Yup! Now, let's start with something that is also a bit pointless.
On the sidebar, there is a tab that says "Create". Press "Shift + C" to
move the cursor to the origin point, and then click "Cube" on the
Create menu.
Go into edit mode and press "Ctrl + R". Click twice without moving your
mouse to create a loop cut in the dead center. Go into wire frame mode
and select the side of the cube closest to the "Create" toolbar. (I
can't tell left from right) Press X, and then choose to delete faces.
Go to the modifier tab and add the "mirror" modifier. Make sure to
check the box next to "Clipping."
And it's mirrored! The reason I do this is just because if you add the
mirror modifier later, there's a chance it won't mirror the way we want
it to. Let's move that cube out of the way and actually start!
Can we start modeling now????
Well, usually I would say yes . . .
But this is already getting pretty long!
Save your project and check in next time where I actually get to
modeling!
<
Previous Tutorial CONTENTS PAGE Next
Tutorial >
|

