 Does
it matter what names I give the bones in the MMD model I am making from
scratch? Why don't I see a list of my model's bones in the bone
chart? How do I sort my model's bones into the proper groups for MMD? Does
it matter what names I give the bones in the MMD model I am making from
scratch? Why don't I see a list of my model's bones in the bone
chart? How do I sort my model's bones into the proper groups for MMD?
Making Your First Model Part 23
Sanitizing the Display Panel
We’re almost to the finish line! After this, we only need to add textures and then we’re done! Now, you may be wondering . . .
Why clean up a model when you’re not actually finished?
The truth is that the majority of old school models lacked textures
and only had a few spheres. If we sanitized our display pane and sent
our models back to the 2000s, the only thing anyone would think was
missing was the eye textures!
Adding textures goes above and beyond, so we’ll save it for last.
As a note, I threw my hands up after completing the ‘required’
facials. It is rather painful to make facials that don’t look jacked up
for any model that is even remotely ‘high poly’! If you’re making your
first model, a tip to make facials easier . . . is to put less faces on
the face! If I were to use this model for a lip sync, I would surely
make the extra shape keys I blathered on and on about last time.
However, I’m not exactly sure if I’ll be doing that as of now.
Now . . . What is the display pane?

There are two display panes in MMD – the bone pane and the facial pane.
If you do nothing but use other people’s motion data, the state of
your bone pane doesn’t matter. If you make your own motion but only
modify the bones by clicking on them on the model, it won’t particularly
matter . . .
But if for any reason you need to track down a bone and your bone list looks like this . . .

And unlike the model with its bones nicely sorted, you can’t expand
either of those. You have no way of finding a bone, other than clicking
it on the model.
Sadly, when you make a new model, it doesn’t come with all of the
standard groups you will need. You’ll have to copy them from a place
like here, my Bone Chart article on LearnMMD.com.
Let’s start by sorting out some bones!

To add a new group, press the little plus sign I drew a rectangle around. Then, change the name in the name box . . .
And then you have a choice. Do you want the easy way, or the hard way?
The hard way is to select each bone from the drop down one by one and add them that way. The easy way? Copy index.
Open up the bone panel of PMX Editor. Select the bones you want to
use and right click. (If all of the bones are next to each other, you
can click one and then shift + click the last to select them all. If not
all of the bones are together, used ctrl + click to select one at a
time.) Select “Copy to Index”. Go back to the display pane panel and
right click on that big white space I drew a rectangle around above.
Right click and press “Add from Index”.
Hopefully, doing that will leave you with something like this!
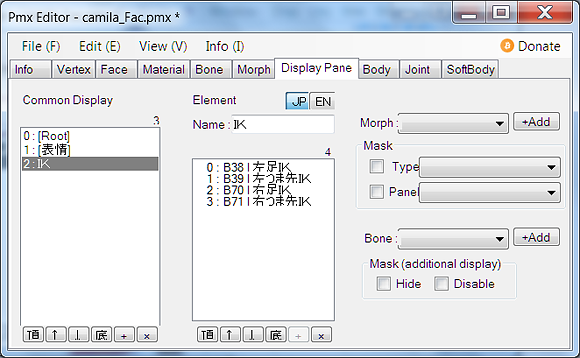
As a note – make sure to give your groups English names!
The names on the display panel have no bearing on the motion data – so they could be whatever you want. However, make sure that the English box has something in it! Otherwise, all of your groups will be “Null”. That’s no fun at all.
Now that I sorted the majority of the bones using the index tools, let’s sort out the rest using the “Add Bone” drop down.

When you click the drop down, you’ll see a list of all of the bones
that have not been assigned a group. Click on one of them to select it,
then press “add” while the appropriate group is open. (In this case,
“Others” for the eye bones.)
After you click “add” for that bone, it will pop up the next bone in
the list. Just madly click “Add” until you have no bones left to sort.
The way you know all of your bones are sorted is by clicking on that drop down and finding nothing.
That took care of the bones! Now, let’s move on to morphs.
While adding morphs to the display pane is almost identical to adding
bones (facial morphs have their own group, “表情”), first we need to sort
them and give them English names.
There are four different classifications of facials in MMD – each one gets its own box. Eyebrows, eyes, mouth, and other.
The process is exactly the same. Select the facial . . . rename it.
The only difference is the addition of having to assign which panel
the facial shows up on. To do that, you can select as many morphs as you
like, then go over to “Panel” and choose which one is correct.

Remember – English names are just for show. You can name
them something else without affecting the motion data. The only problem
will be if a user who uses English MMD gets confused by your out there names!
Partially because I already had a spreadsheet with the English names
up and I love using Copy and Paste, I gave the facials the same English
names Animasa had given Luka.
Once you name and classify all of the morphs, copy and paste them into the Facial panel in the display pane panel . . . And bam!

Now, before we go a hootin’ and a hollerin’ about being so close to being finished, let’s check out the model diagnostic!

This will tell you if there are problems with your model . . .
There’s just one catch, though . . . It’s 100% in Japanese! Though
people have tried to explain each part on deviantArt . . . I still spent
a good few minutes muttering “te . . . ku . . . su . . . cha . . .”
under my breath until I broke and Google Translated it. Just copy it and
pop it into Google Translate.
That is how I found out that Blender had plopped some of the things I
made while making the UV maps into the material settings. . . And it’s
how I found out that one of the eye bones didn’t have an append parent
assigned! It was extremely easy to fix.
Now that we have the display pane sanitized, let’s name our model and give her some info.
Should you actually give your model a Japanese name and Japanese info? Of course, the Japanese blanks need to
be filled . . . But you can fill them with a copy of the English. So . .
. If you don’t speak Japanese, should you write the info in it? Eeeehh . . . Do
you expect Japanese people to use your model? And when I say Japanese
people, I don’t mean Masao or Mianaito. I mean users who can’t speak
English . . . and wouldn’t be likely to stalk dA to find a new model.
As I have no interest in dusting off my NicoNico account, I’m not
expecting any Japanese users to stumble upon my model. For that reason,
I’m just using English.
Now, let’s talk about what model info does. In UTAU, the only way you
see a model’s info is by clicking on their little icon in the corner.

That means that you can make it as long or as short as you want. It’s in a window with a scroll bar!
However, in MMD . . . The model information pops up every
time you import a model. So, logically you’d want to just be straight to
the point. “Model by X, Read the Read Me for Rules”.
But . . . My MMD inspiration has other ideas.

Every time you import the model, you get that splash screen. If you
don’t click “OK”, the model doesn’t load. That means that you have to go
hunting for the OK button at the bottom of the screen.
For that reason, it’s a really good idea to leave the info box as clandestine as possible.

Animasa has the right idea right there – extremely to the point!
What information you give your models is up to you. . . But it’s a good idea to make the info as short and sweet as possible.
Whoo! We learned quite a bit today! Tune in next time when we play with materials!
<
Previous
Tutorial CONTENTS
PAGE Next
Tutorial >
|
