 How
do I make the Wink and Blink morphs for my MMD model in Blender? When I
create the mouth morph-sliders, do I need to make morphs for
consonants? As I create the mouth morph, do I have to move the
chin/jaw, as well? How
do I make the Wink and Blink morphs for my MMD model in Blender? When I
create the mouth morph-sliders, do I need to make morphs for
consonants? As I create the mouth morph, do I have to move the
chin/jaw, as well?
Making Your First Model Part 22
Adding More Complex Facials
As a note, I was able to get skirt physics to work wonderfully on a quick test.
However, I was unable to achieve those same results on Camila. Taking
advice from Bandages, I used a Solidify modifier to make Camila’s dress
solid as opposed to a flat, two sided mesh. However . . . This did
nothing of note. This may be due to bad settings on my part . . . Or bad
body placement . . . But we are still working on a model with no skirt
physics as of now.
Last time . . .
Last time, we went over how to add the easiest facials . . .
The eyebrows! Once you get those eyebrows done, you feel like you’re
the king of the world. You just made your first shape keys and they’re
looking awesome!
Well, I hate to burst your bubble, but faces are hard!
The more high poly your face is, the harder it is to do anything with it.
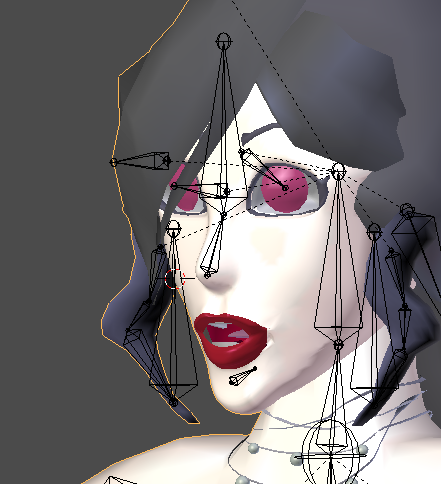
So, let’s struggle through our first shape key for the eyes . . . The blink.
To see if it makes it easier, I’m hiding the irises so that I can
use the proportional editing with “Connected” turned off. I don’t actually know if it will be helpful . . . But I struggled to make anything half decent for the eyes with “Connected” on last time.
Let’s talk about C . . .
There are quite a few ways to select things in Blender. The most
useful thing for shape keys is likely “C”. When you press C, it allows
you to paint your selection onto the model. It’s a bit confusing at
first, however, as left clicking selects the area and right clicking
exits the paint selection mode. Holding the wheel mouse while painting
over an already selected area will deselect that area. (I think? It’s
finicky when it comes to deselecting!)
Now, we’re already running into a tiny bit of a problem . . .

I’m not the best modeler. I’m probably not
even a half decent one! Something that looked awesome stationary can
look disastrous when moved. That’s the problem we have here.
Let’s try to make this in a more round-about way . . . First, I moved the eyeliner around so that her eye was covered with it.

Huh! That actually looks really cool! I’m saving it . . . but it’s not the “blink” that PMX particularly wants.
I was able to move things around to get a nice shape on one side . . . but not so much the other!
Now . . . How do we fix this?
Let’s talk about Stack Exchange for a second.
If you’re ever in a bind, you have three options. Sit there and try
your hardest to fix it . . . Run crying to your nearest adult . . . or
Google It.
With MMD and PMX, Google isn’t the most help.
It’s not a very widely used software, and most people just use other
people’s parts. I couldn’t find a tutorial on what I needed . . . because no one else needed it enough to ask someone who knows to make a tutorial. So, I ran to Bandages.
However, with something like Blender . . . Google is your friend.
There is countless documentation online and thriving communities. For
the most part, every question you will ever have in Blender has been
answered five times in other places.
I wasn’t sure if it was possible to do what I wanted, so typed
“delete half of shape key” in Google. I was frustrated and too out of it
to tack on “In Blender”, but it worked! I found this result and almost hooted in celebration. It worked!!
While there are a ton of resources you can find, Stack Exchange is usually the best resource.
Once I learned how to reset that part of the shape key, I was able to
make a new shape from mix, then mirror that. I named them Wink and Wink
R . . . and by setting both of their values to one, I was able to make a
new shape from mix and name it Blink!
Now, there are still several shape keys left for the eyes . . . But let’s skip to something more important!
The Mouth
Before getting started, let’s talk about lip syncing.
How do lip syncs work in MMD? If you’re extremely new, it’s as simple
as dragging a VSQ into MMD. The VSQ will tell MMD when to trigger each
movement.
I was going to show you an example of a VSQ and the resulting lip
sync data side by side . . . But I have to use UTAU to make VSQs, and
exporting a VSQ from UTAU results in the lyrics being replaced with
question marks. whoops.
So, you’ll just have to take my word on this . . .
 Lip Sync Generated from VSQ in Face and Lips Using Face and Lips allows us to analyze the lip sync data. And . . . it’s pretty bad!
For shorter notes, there is an abrupt switch over from one vowel to another with literally no room
for consonants. Near the end, I had “かんぼんそん R んあ” You’ll notice that in
the data, there is no shape key for “n”. The only indication that “n”
was there is the gradual increase in the final “a” as opposed to
beginning suddenly.
I tested this on a model that does have “n”. There still was
no “n” phoneme in the lip sync data. Why is that? Well . . . heh . . .
You’re supposed to make models with their mouths closed. whoops. Simply closing the lips looks close enough to “n”.
The main problem with both Face and Lips and MMD in general is just
that the only phonemes you need for lip sync are a, i, u, e, and o.
(Note, these are using the Japanese pronunciations. Japanese i is “EE”.
Japanese e is “eh”.) The irony of it? Most people outside of MMD will
tell you that “a” and “e” look so similar, that it’s pointless to make
two different versions. Just use the same one! Try it out for yourself –
if you make a conscious decision to not move your lips, you can switch
from “a” and “e” just by moving your tongue.
While it is possible to say “e” by baring your teeth . . . That’s kind of silly!
Here’s a head scratcher, though. The basic Miku model has no “e”
shape key. However, she is able to sing “e” in Face and Lips. The “e”
looks very similar to the “a”. A way to make an “e” from an “a” in
Blender would be to set “a” to a value below 1 and then create a shape
from mix. Easy!
So, now that we know about the vowels . . . Let’s point out that Face
and Lips utilized exactly zero consonants. Even if it wanted to, most
models don’t have shape keys for consonants.
Now, let me warn you – if you add shape keys for consonants, your motion data will look a bit like this:

Lipsyncing well is hard. It’s a puzzle that has you ask “What is realistic? What is not realistic but seems more realistic? What shape should this sound make?”
As far as what shapes you should have, a chart here makes it pretty clear. At most, you
can expect to have seven shape keys for consonants without factoring in
the tongue. If you do factor in the tongue, it’s quite a bit more.
However, adding a separate shape key for the tongue would allow you to
add that bit of added realism without making an insane amount of shape
keys.
Taking cues from Flash animation, however, you only need four shape keys for consonants.
Whether you go the traditional route of no consonants or add
consonants is up to you. If you add them, they’ll likely never be used
by anyone except you. If realistic lip syncs are your goal . . . You
need them. If you don’t care about lip syncs, ignore them.
Now . . . For actually making the keys!
Let’s start with “a”.
Remember – your top teeth are physically incapable of moving. Your
upper lip is able to move about as much as it wants to, however! The
upper lip moving around is extremely important for rounded vowels.
Rounded vowels are . . . Just kidding! I won’t bore you more with phonemes!
Now . . . What makes mouths so hard? The first is simply that you
have to choose if you want a realistic shape key where the jaw moves
along with the mouth or if you want a simple shape key where only the
mouth is affected. Once you decide . . . Well, either you’re in for a
nightmare of checking to make sure everything is moving naturally . . .
Or you’re just going to change the mouth around and hope for good
topology!
Which will I choose? The more realistic one, of course!
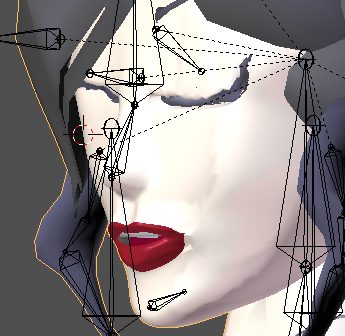
To do that, I simply selected part of the chin and used connected
proportional editing to lower it. Then, I did the same to her bottom lip
and her teeth so that they were lowered also.
However . . . I’m not particularly fond of it in side view . . . So I will redo it!
But if I made you stick around for that entire process, you’d be pretty bored pretty quick!
I’ll just finish up the shape keys . . . Then tune in next time for when we sanitize our display panel!
<
Previous
Tutorial CONTENTS
PAGE Next
Tutorial >
|

