
|
|
|
|
|
RIGGING WITH APPENDS-- AND KASANE TETO! By LearnMMD's Bandages  What
is rigging?
In the world of professional 3D modelling, it takes a whole team to create a single scene. You'll have a modeller. You'll have a texture artist. You'll have an animator. And you'll probably also have a rigger. (Unfortunately, us amateurs don't have the luxury of passing our rigging on to the specialists.) Riggers take care of all the jobs that make the animator's life bearable, so that the animator doesn't have to push individual vertices around. MMD uses skeletal animation, so a big part of rigging in MMD is about the creation and placement of bones. Sometimes people make a distinction between skinning and rigging. Skinning refers to the way that 3D meshes attach to bones. If you're familiar with weight painting, that's skinning. In this tutorial, we won't be talking about skinning at all. Rigging is part customer service. The first question you need to answer when rigging is the same question asked for any art: Who is my audience? When it comes to rigging, your audience is your animator.
If
you're rigging a character that you only intend to use yourself, to
create custom animations, you don't have to worry about usability very
much-- any time there's a usability problem, you'll easily be
able to
fix it. You can load your model full of bizarre bones and
poorly named
morphs without worrying about it.
If you're rigging a character that you want to use with existing motions, you start to run into some constraints. You can make a bone that sits between the leg and the pelvis, but no motions are going to take advantage of it-- you'll have to animate that part of the model yourself. You can make a ton of new morphs, but existing motions won't take advantage of those either. If you want to make a character intended for wide use, you run into still more constraints. Do some of your animators prefer animating using semi-standard bones like those IK parents at models' heels? Are there too many bones for animators to cleanly pick them out when they want to select from the 3D view? Are there new bones that your animator has to learn, assuming they're even willing? Are any of the bones or morphs named confusingly, or in a language that your animator doesn't understand well? Any of these issues are going to lead to problems in the final motion. Time spent learning your model's ins-and-outs is time that could have been spent on fine-tuning animation. That's why you want to automate as much of that process as possible. And that's where you can really go wild with some advanced bone techniques. Two Important Bone Principles 1) Bones are points. They should have been called "joints" from the start, but it's too late for that now. Bones aren't lines. They don't extend into space. Those lines leading to the child or offset are meaningless as anything except a visual aid. Bones are points around which other points (vertices and other bones) rotate. If you think of them as lines, you're going to run into problems over and over again. I still find myself thinking of them as lines-- and making mistakes because of that. 2) Bones are sequential. What does that mean? It means that they need to be in a particular order. We all know that children need to follow parents, but why? It's because the position of the child depends on the position of the parent, but not vice versa. In order to know where the child is, we need to first know where the parent is. Parent/child relationships are not the only place where this is important, as we'll see. Let's look at the window...  Hopefully, you're familiar with this window. If you're like me, you've looked at a lot of those options and wondered exactly how they work. I'm assuming you're familiar with the basic options, but let's go over a few: Name. This is an extremely important field. If you don't use the right name, existing animations won't use the bone. Note that adding an English name is very easy, and every high quality model should have both English and Japanese bone names. If you make a new bone, give it a Japanese name even if you yourself only speak English! A huge number of MMD users are Japanese, and one of the ways we can bridge the culture gap is through these simple, respectful gestures. If you need a translation, try https://translate.google.com. Even if you get it wrong, people will appreciate the effort. Vis. What's there to say about Vis? If it's checked, the bone is visible, if it's not, it's not. Managing visibility is an important part of reducing clutter in the 3D view. Unfortunately, hidden bones placed in the display panel won't register properly, and hidden move bones cannot be moved except through numeric input. So if you need a bone to be adjusted, make it visible, but seriously consider if adding more control is going to be worth the clutter to your animators. But this tutorial is also going to introduce you to some techniques that you can use to at least move some of that clutter off to the side. Link to. What's to be said about this? Just that it's not very important. Bones don't need children to function, because they're points, not lines. Feel free to use the offset setting to create a visual indication of relative rotation, and if relative rotation isn't important for that bone, then feel free to link to bone -1 to reduce visual clutter. Using the Append Settings If you can, open up a model in your editor and follow along. We're going to look at the 両目 bone, which you might be familiar with as the "both-eyes" bone. This is a great example of a simple thing that a rigger can do to make an animator's life easier. Let's take a look at it. To make your life simpler, I'll red-out everything that doesn't affect how this bone functions:  Can it be that nearly nothing about this bone is important to its function? Apparently the only thing that matters is its name, its order, and the fact that you can see it and rotate it. How can that move both eyes? It's because the important stuff isn't in the both-eye bone. It's in the eye bone. 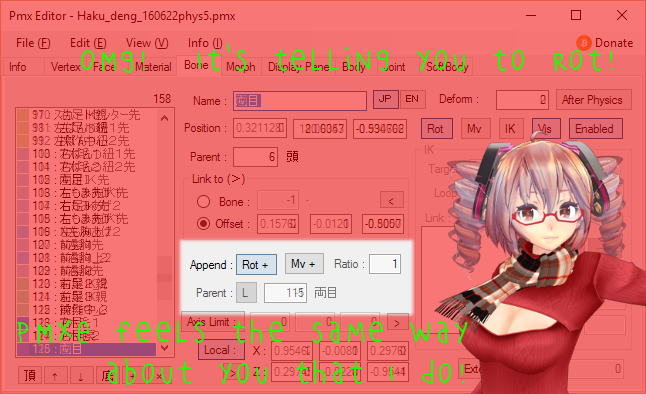 I guess that when you hire chimeras, you get what you pay for, and Teto's working for hard drive space. We're looking at the window for the left eye bone. There's a funny little field in there labelled "Append." You'll notice that in the parent field is the number of our both-eye bone. What it's saying is that every time both-eyes rotates, we want this bone to rotate as well. Since the ratio is 1, for every 1 degree that both-eyes rotates, the left eye rotates 1 degree as well. This is in addition to any rotation applied directly to the left eye bone. Let's do some math. If the ratio is 0.5, then if we rotated both-eyes 90 degrees, left eye would only rotate 45 degrees. If the ratio is -1, then left eye would rotate 90 degrees, but in the opposite direction. If the ratio is 4, then left eye won't rotate at all, because 4 times 90 is 360 degrees, which is a full circle! Take a minute to look at your right eye bone. You'll see that it has the exact same append settings. So when both-eyes rotates, both eyes rotate. It's easy. It works. That's why animators use it. Remember that I said that the order was important? That's because, in addition to its parent, left eye depends on both-eyes to know exactly how to rotate. So both-eyes needs to be evaluated earlier than left eye-- it needs to be higher in the bone hierarchy, just as if it was a parent and left eye its child. (Or you need to change the deform tier, which functions similarly. Don't worry about that yet.) Making IK parents You may have been irritated at how hard it is to select the IK leg bones, because they have to be at the exact same position as the ankle bone. Let's use the append field to fix that. 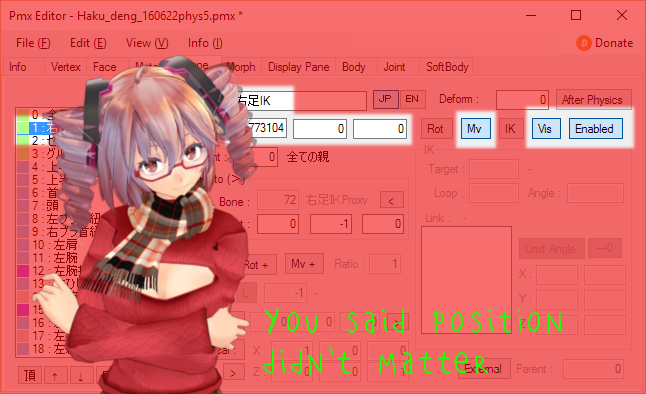 Fine. Position does matter. Kind of. We'll get to that. We've given it the same name as the IK bone. Why? Because that way, existing animations will use it. Otherwise, it will lag behind our center bone. Of course, we'll need to change our actual IK bones' names to something else. We've made it a move bone, because that's how IK bones are moved around, but not a rotation bone, because rotation does nothing to IK bones. And, yes Teto, we've given it a particular position and made sure it's parented to the motherbone. Position and parent don't affect what the bone does. But they do affect where the animator sees it. In this case, we want the animator to see the bone close to where they expect to see an IK bone so they're not wasting their time looking all over the model, and so that the bone more accurately represents the position of the IK bone. Note that there's one important thing that we haven't done. We haven't made this an IK bone. It's not an IK bone. It's just a move bone. It doesn't do any fancy IK stuff. Just like with the both-eyes bone, all of the real action is in another bone. 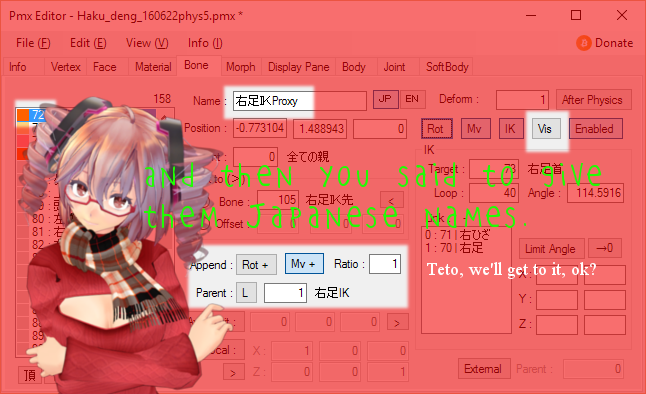 I hate to say it, but
Teto's right. Even though this bone is hidden, you might
consider translating the word "proxy." If you make a great
model, Japanese editors will want to edit it. When we do our jobs poorly, we're hated. When we do our jobs well, nobody ever knows.  Let's get creative! We've recreated two bones that, hopefully, you've seen before. But is there anything new that we can do with bone appends? Actually, there's a lot. MMD modellers have demonstrated incredible creativity with their models, textures, morphs, animations. But when it comes to interesting bone structures, the territory is mostly unexplored. Let's make something new. Let's make it easier to model convergence. Convergence is what your eyes do when the focus on something nearby: they cross. But this is hard to animate. So let's simplify the process for any animators that want to animate this. We'll start by making our cross-eye bone. Just like with our both-eye bone, hardly anything about this bone matters. But to make it easier for the animator to keep track of, we'll make it the child of the head, so that it stays close to the eyes. Translate the name of your new bone into Japanese...  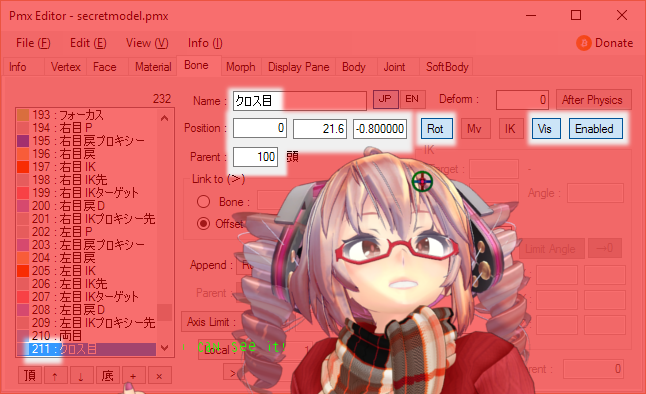 We've parented it to the head bone, and placed it above the important bones so that it won't get in the way. We've given it a Japanese name. We've taken note of its position in the bone queue, so we can make sure that our eye bones follow it. And, of course, it's visible, enabled, and can rotate. That's all we need Just like with our both-eyes bone, the action takes place in the eyes. If we give one eye a ratio of 1, and the other eye a ratio of -1, then they'll move in opposite directions! Perfect! There's only one problem. Our eyes already have an append from the both-eyes bone. There's no room to put another append in there. Proxies But there's something we can do about that. We can make another set of eye bones. 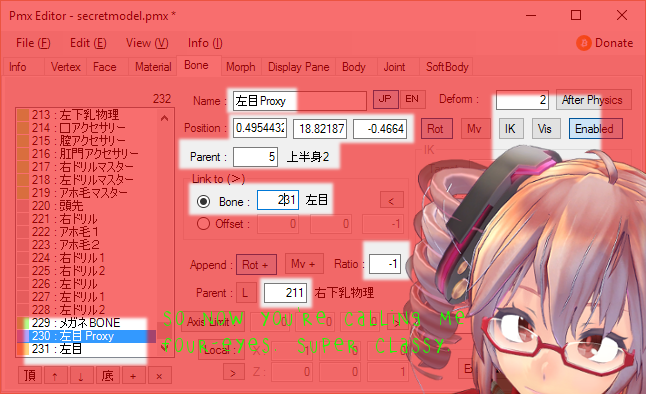 No, that's not-- I just-- never mind. We create a proxy for our eye. The proxy takes our head as parent, and our eye takes our proxy as its parent. The proxy is at exactly the same location as the eye. And the proxy gets the append from our cross-eye bone, while the actual eye gets the append from the both-eye bone. Finally, because animators never want to know about this proxy-- they just want that sweet cross-eyed sugar-- we make the proxy invisible. The right eye works the same way, but it gets a ratio of (positive) 1. Now, our both-eye bone works, our cross-eye bone works, and our eyes work. There's no limit to how many proxies you can chain together like this. If you want to use a third append, just make a new proxy to which you can parent the old proxy! Finished... ? So we're about done here, but Teto has been hacking away furiously at PMXE-- or maybe the F5 key-- and there's something she wants to show you... the Camshaft...  That's it! ... Thanks for reading! Go to the article posted on LearnMMD.com to leave comments/ask questions.  CREDITS: Model is remii's Little Devil Teto, available (with pw) at https://bowlroll.net/file/94261 . Author doesn't have a webpage, but has a nico nico user page at http://www.nicovideo.jp/user/10024450 |
|
||||
 |
|||||
