 How can I use Blender to make
a model for MMD? How do I add seams to the model's UV map? How can I
have two different views open at the same time? How can I use Blender to make
a model for MMD? How do I add seams to the model's UV map? How can I
have two different views open at the same time?
Making Your First Model Part 13
Prepping the UV / AO Images for Texturing
This
article is the reason that this series exists.
I wanted to make textures, but I couldn’t figure it out
. . . until something just
clicked. I tracked down the author of that article and told him how
happy he had made me. He introduced me to the editor here, and now
you’re reading this!
But, it wasn’t just that tutorial that helped me figure
it out. Bandages is one of the smartest guys I know . . . so he forgets
how big of dummies everyone else is!
So, this is a tutorial for the big dummies like me.
What are we doing?
So, does anyone remember The Sims?
The only game I’ve ever “modded” was The Sims 2.
. . but the only thing I ever learned to do was swap out textures!
When I first thought about texturing models, I thought
it would be like The Sims. I was wrong.
In The Sims, the texture maps make a lot of sense. They’re vaguely
shaped like whatever part you’re coloring and you don’t have to do
anything to make them that shape.
However, MMD is a whole ‘nother story.
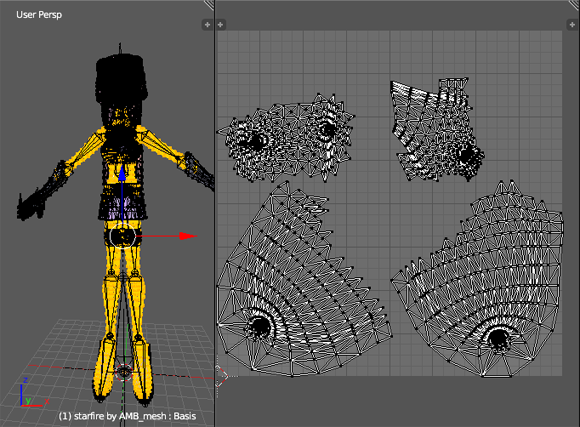
Can you make heads or tails of what’s up? I sure can’t!
Now here’s the thing – there’s a feature called “Smart
UV Project”. If you’re interested in procedurally created textures,
then it’s pretty awesome! It will project everything decently enough
for you to paste something on top of it without too much warping. Now .
. . here’s the problem.
It’s a mess.
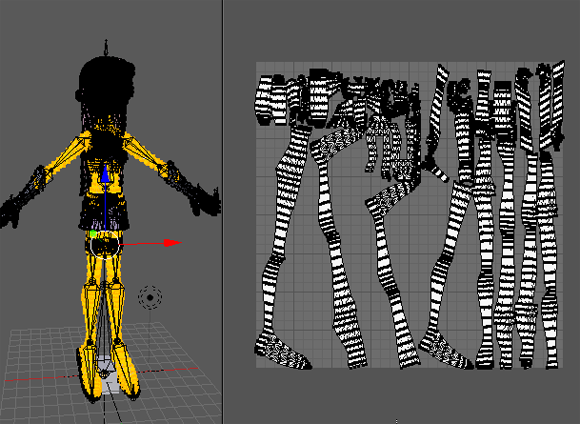
Oh, of course, it’s a lot better than the original one,
but I have no idea what belongs where! Instead of sharing
some little tricks I learned to tell what is where on the Smart UV
Projection, we’ll just pretend it doesn’t exist!
You can do this at any point.
You can do this at any point. However, exporting
to PMX will mess with your model’s topology in a weird way. It will
look virtually identical in Object Mode, but you won’t be able to
select entire edgeloops with “Alt + Right Click”. This is a major
problem just because selecting entire edgeloops
makes life easier.
Why do we need edgeloops so badly? Seams!
I’m getting ahead of myself, though.
First, let’s select the braid in object mode. Once it’s
selected, go into Edit mode.
It is possible to have two different views open at the
same time. Throughout the work space, there are little triangles that
you can pull out so that you have a split screen. In the bottom corner,
there’s a button you can press to change the view. In 3D view, it looks
like a cube. We want to have a window open with UV view, which looks a
bit like a photograph.
What we want to do is to chop up the braid so that it’s
both as continuous as possible
and as flat as possible. To see
what we’re working with, let’s first just select the part and press
“U”. Once the menu pops up, select “Unwrap.”
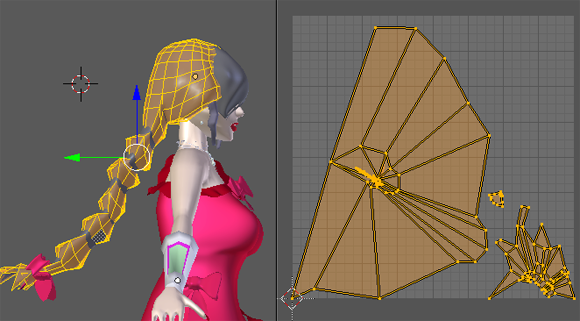
UV
Map without seams
Without doing anything, that’s what pops up.
It’s pretty bad! What can we do to make
it better?
Add seams! To access the menu with seams, press “Ctrl +
E”. Once there, choose “Mark Seam”.
Let’s start by adding one seam to the bottom of her
braid, and one seam at the base of her head.
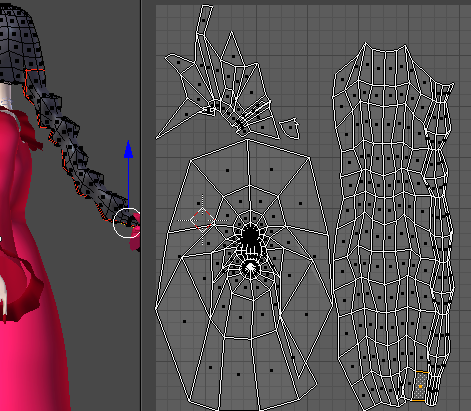
UV
Map with a few seams
Now . . . Let’s think of a way to make it
better. If we were to add a seam to the transition between each bump of
the braid, we’d hopefully get little lumps that we could color one at a
time . . . or, that we could copy and paste the same
texture on to!
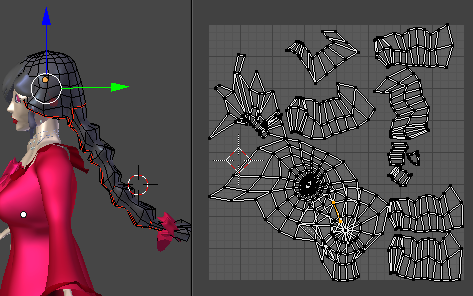
UV
Map with More Seams
[13_005.png , alt
text “UV Map with More Seams”]
Now, let’s start talking about some fun we can have to
make the UV map look better.
The first is an amazing tool that syncs up your
selection in UV view and 3D
view. That way, you’ll be able to see exactly what part you’re working
on.

The second great feature in UV View is just “S” and “G”.
Pressing S resizes the part. Pressing G moves the part. You can move
the entire part, or just vertices or edges. The first thing I did was
resize the UV map for the part of her hair that is mostly hidden
and push it over to the side.
Another amazing tool is UV Sculpt. UV Sculpt allows you
to work out the kinks in your UV maps without selecting every vertex.
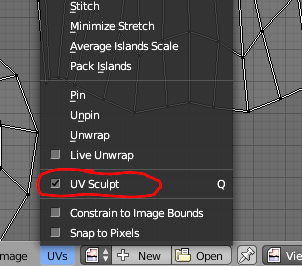
After playing around quite a bit, I got something that
makes sense!
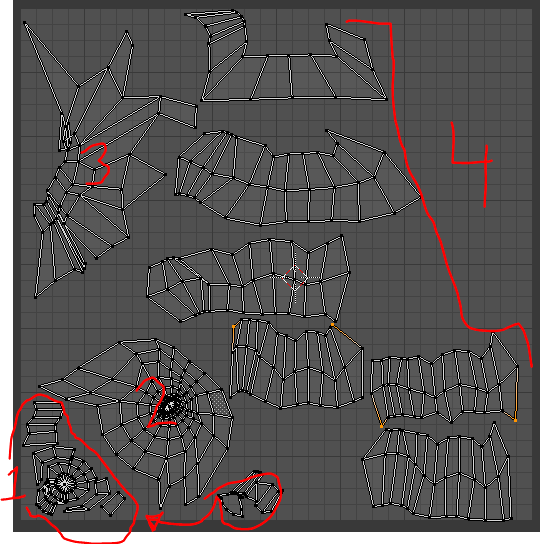
Edited
UV Map for Braid
The first section (marked
“1” in that image) is the island of hidden faces. I can, for
the most part, just ignore those.
The second (“2”) is the
top of the head.
Three is the end of the braid. I’m
actually hoping to try and improve it with transparent areas of the
texture.
The fourth and final section is the braid
itself. I was pretty sloppy and ended up with some pretty bad looking
UV maps. But, hey, we’re n00bs here!
Alright, now that we got that out of the way, let’s mash
“New Image” and just blindly click ok.
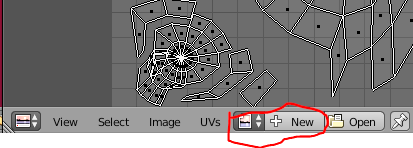
Now your UV Map should have a nice black background!
Let’s start by exporting the UV map. Hover your mouse
over the UV Map and press “A” to select all. Next to where you mashed
the “New” button, there is a drop down menu option called “UV.” Choose
that and then choose “Export UV Layout”. If you don’t have the faces
selected, it will just export an empty image.
Now, let’s export something I didn’t think I needed when
I started . . . But boy was the egg on my face once I realized what a
good crutch it was!
In Bandages’s tutorial, he talks about exporting an AO
map. He tells you so many details on how to set up everything . . . But
he is making an AO map to use as part of a texture. If you’re going to
hand paint your texture, you don’t need a fancy pants high quality AO
render. The main reason I’m not all about getting high quality renders
for AO maps is because my computer is old. I’ve
been using this computer since high school!
If you want to use your AO map as a part of the texture
and not a guideline, then you should read his tutorial. For me, an AO
map is just a guideline to see where everything lines up.
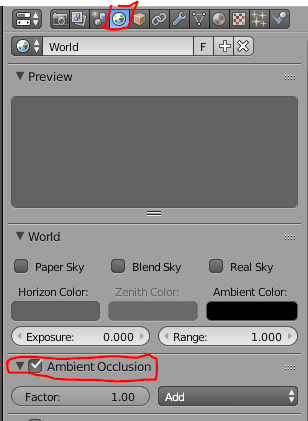
First, go to the World tab and scroll down until you
find “Ambient Occlusion.” Check the box.
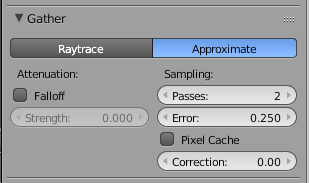
Then, set the “Gather” to approximate and change the
number of passes to anything other than zero.
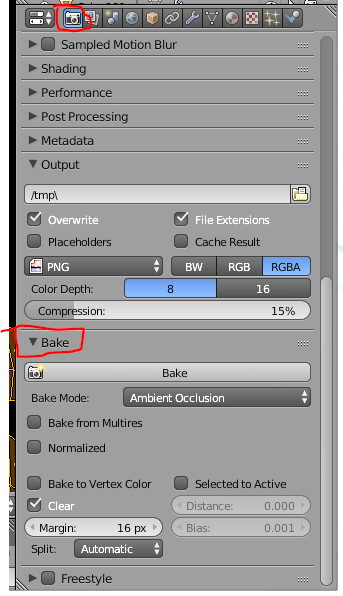
Open the render tab (it looks like a camera!) and scroll
down until you see “Bake”. Expand that heading if it isn’t already.
Select “Ambient Occlusion” from the drop down menu and press “Bake”.
. . .
So, I’ve done this before . . . And it wasn’t working.
It would just stay at 0% and make my computer whir like something was
going on. But nothing happened. And then I realized something. I had
modifiers on! Maybe that was it!
Nope. Removing the
modifiers did nothing.
And here’s the crazy thing.
When I tried it on a cube that I edited, it worked perfectly.
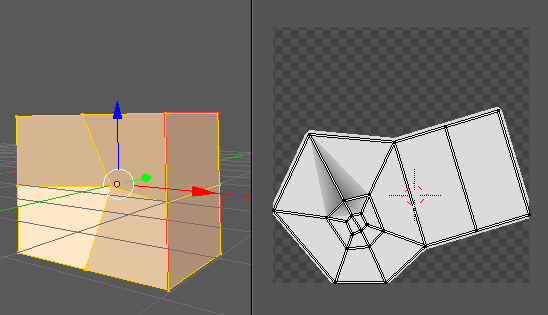
An
AO Map Working
But if, for the life of you,
you cannot get AO maps to bake . . . There is an alternative. Texture
paint mode.
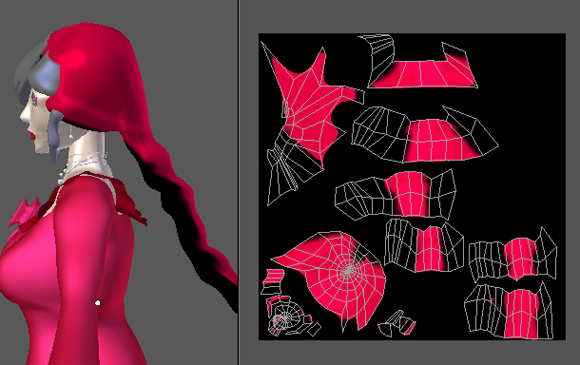
Guideline
for Texture painted on
While extremely clunky,
this allows us to paint on guidelines. I painted the visible part of
the hair directly on her head red, then painted the top of the braid
red also. If the texture isn’t showing up on the UV image screen,
switch to Object Mode then back to Texture Paint mode. Once you have it
colored the way you want it, you can click on the image in the UV
editor window and press “F3” to save the image.
I sent the model off to Bandages to see what’s up . . .
Hopefully you guys at home aren’t having this problem!
I believe there is a chance that after importing the
model into MMD, it will fix whatever is messing up the AO Bake. The
only thing I really need to do
before importing to MMD is take advantage of edgeloops to make seams.
I still have to fix all of the UV maps to make them
usable! See you next time when we finally import the
model into PMXe!
<
Previous
Tutorial CONTENTS
PAGE Next
Tutorial >
|

