![]() How do I format captions in MikuMikuMoving? Is formatting captions easy to do in MMM? Can I change the type style of my captions? Can I change the color of MMM captions?
How do I format captions in MikuMikuMoving? Is formatting captions easy to do in MMM? Can I change the type style of my captions? Can I change the color of MMM captions?
Formatting Captions is Easy in MMM!
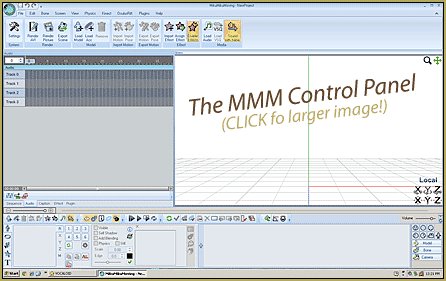
In my last article, I showed you how easy it was to add captions to your videos using MMM. Captions can be used to add subtitles for your songs, dialog for your characters, titles and characters for your videos, even sound effect annotations (Bonk!). In this article, I want to show you the tools you have to make your captions pop. You will notice that there are 5 boxes on your caption tool tab 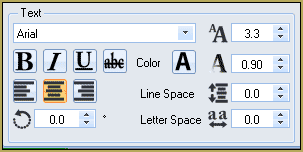 labeled (from left to right) Text, Border, Shadow, Frame, and Etc.
Lets start with Text. The first box has a drop down menu that probably says Arial. This is the font that your caption is using. You can change the font on all or part of you caption by selecting the by selecting the text you want changed (by dragging you cursor over relevant text) and choosing a different font from this list. If you’re like me, you don’t know what all of the different fonts look like. A trick you can use here is to click on the word Arial and use your up and down arrow keys on your keyboard, you can see the changes in your text and select the font you like! To the right of the font box, you’ll see a pair of A’s followed by a number selector box set at 3.3, this represents your font size. Remember that all of these formatting options only affect the selected portion of your caption. You increase this number to make your text larger or decrease it to make your text smaller. Under the font selector you see 4 buttons to make your text bold, italicized, underlined, or marked with a line through the letters (strike out). The color button opens a color picker dialog that allows you to change the color of the selected text. If you’re using the caption to display dialog for your characters, you can use colors to match their hair or outfits to indicate who is talking! The next number selector controls how transparent your caption appears, the smaller the number, the more transparent. The next line starts with 3 buttons that affect the justification of multi-lined captions: Left justified, Centered, or Right justified. The Line Space number selector controls the line spacing (Duh). The circle with the arrow number selector rotates your caption, positive numbers counter clockwise and negative numbers clockwise. The Letter Space selector controls the kerning or spacing between the letters.
 Next we come to the Border box. On a scene with lots of detail, sometimes your captions can be hard to read. This can be solved by adding borders to your text! A black text with white background or white with black background can be read easily with any scene. You are not limited to these choices however. The ‘a’ button turns on borders, the Color button launches a color picker dialog that lets you choose the color of your border and the Weight selector controls the border size.
 The Shadow box gives you the ability to add drop shadows. These give your captions a neat 3D effect. The button turns shadows on and the Distance selector controls the distance that the text appears to float.
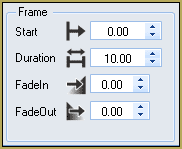 In the Frame box, you can select the frame number where your caption appears and how many frames it remains on the screen. The FadeIn and FadeOut selectors allow you to add neat fade effects to your captions.
The Etc box is simply the XY coordinates where your caption is displayed. You can control this position  with the selectors, or alternately by just dragging the caption to position by holding down the left mouse button over the caption and dragging it to location.
As you can see, not only can you add captions to you videos, you can us the built in formatting tools to really enhance the quality of your work!
Happy animating!
Bull :)
– SEE BELOW for MORE MMD TUTORIALS…
— — —
– _ — –

