


![]() How do I make a model for MikuMikuDance? How do I make my own MMD model? How do I make my selfie model for MMD? How do I use PMDE to make a model for MMD?
How do I make a model for MikuMikuDance? How do I make my own MMD model? How do I make my selfie model for MMD? How do I use PMDE to make a model for MMD?
I Would Not Exist, If Not Because Of Those Around Me
 Use PMDE to make a Model for MMD…
almost from Scratch!

In my previous article, we learned how to do a simple “model parts replacement and addition”, and also how to use a “dummy” or a placeholder .x file to help with the editing. (You missed the article? Read it here. We’ll be using some- if not all- the techniques mentioned there and it’ll be easier if you read it beforehand since I’ll be keeping them short in this tutorial)
Now let’s kick it up a notch, shall we?
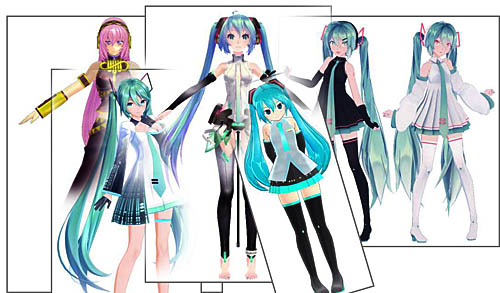
I’ll show you how to make your own model by using parts you already have and parts you can download. We will use PMDE to transplant parts from Miku, in this case, into your new creation.

As with my PREVIOUS article, about using a .x dummy as a placeholder while you install parts using PMDE, THIS article is uploaded onto its own free-standing page:
https://learnmmd.com/Make_PMD_Model_PMDE/

Visit the page…
We’ll see you there!
– SEE BELOW for MORE MMD TUTORIALS…
— — —
– _ — –
![]()


i love mmd
It was a very helpful tutorial! Thank you so much!
I have a question though.. After completing my model I loaded it on MMD to test it out and well….. What I saw there was what’s hunting me in my nightmares xD I used the levan polkka motion data to test it and the model’s right hand got like 9 meters long and the eyes rolled into the back of her head…I was worried I was watching an exorcism take place.. So how do I fix that? Did I miss a step or something?
Oh, there are plenty of ways for something to go wrong while assembling a model from parts. The article (as is often the case with articles :) ) describes an optimistic scenario, where all parts agree to comply. In reality, things are rarely this benevolent.
In your case, I suspect, there’s something wrong with bone sequence. Open the model in PMXE, open the Transform Window, and try to move bones one by one. If you see some movement beside what is supposed to be there (or *don’t* see what you expected to), check bone’s parent/child relationships with its neighbors. Scan through the bone list and look for red marks – that’s usually a sign of bone sequence disorder. Also, try to run “File->PMX Info” command, Google Translate its output, and see what other errors your model may have. See the tutorial for more details.
Also these tutorials may help:
https://learnmmd.com/http:/learnmmd.com/adding-and-weighting-bones-pmde/
https://learnmmd.com/http:/learnmmd.com/troubleshoot-mmd-models/
Whenever I export my .pmx model as a dummy .x and import it in PMXE, the program opens up but there is no trace of model whatsoever. If I import the model instead and select Add, it does show up, but it’s all white, the parts are all named differently, and the paths for the textures are all different. It’s in the same folder as the original pmx, and even making it have the same settings and texture paths, it’s still white. Selecting New instead just makes it black instead. But when I open the .x in MMD, the textures show up just fine. I’m so confused by this please help
http://oi63.tinypic.com/2mfn32s.jpg
I’ve had trouble exporting to .x at times myself, but anything a .x file can do, a .pmx file can do, so I don’t really consider it an issue— for purposes of this article, it’s fine to use a .pmx dummy.
PMXE does have some bugs. Sometimes it screws up some materials on import. Sometime the problems it creates will resolve on saving the file and closing and reopening PMXE, sometimes they don’t. Nothing in modelling is fire-and-forget, and if PMXE screws something up, well, fix it– change the name of the material to what it ought to be, check other material settings.
Sometimes, when textures are white, it’s a path or file issue; sometimes, it’s just that PMXE doesn’t really know where to look, or has an invalid working copy. A wise man once asked, “Did you turn it off and back on again?” Restarting PMXE is usually a good idea. You can also force PMXE to try to reload all textures with edit->update in 3D or transform views.
Shift+Delete dosen’t work for me.
Shift+Delete only works on vertices (those orange and green dots on every surface of the model). You’ll need to select which vertices that’s gonna be deleted and when they turned orange, hit Delete while holding down the Shift button. For other objects like bones and joints, just hit Delete.
Also, my PMDE dosen’t have the ‘surface recongnizing synchronizer’ button.
Err… what? I never heard of that before as well.
I’m talking about the Vertex selection button though. If you’re using the same version of PMXE as the one used in the article above, it’s the “V” button in the upper left of PMDView window.
To view the vertices, there are 2 buttons you can use at the lower left of the PMDView that looks like green and orange spray paint trace of sorts. Green will show all vertices while orange will highlight those you’ve selected. Use them in conjunction with the Vert/Mat button at the upper center to single out the layer of material you’ll be working on.
aaa love this tutorial!! very usefull
but i have a problem. when i import a part its colour change (different from the real image and body parts go white) and transparent. what should i do? i try to uncheck the 2-side, group the part in a folder, change the tex but it was useless.
please help me :'(
Ah, probably you didn’t copy the textures with it?
If you import parts from different folder, PMDE won’t be able to find the textures used in the imported parts.
To fix this, simply copy the necessary textures from the part’s original folder to your edited model’s folder (make sure to make a separate folder for all your models!). In case the textures don’t pop-out in place right away, save and reload the model.
So I made my whole model and such but when I tried to open and pose it in MMD the face and body were moving separately
Some help please?
I’m new at the PMD editor
I replied to you via email… please check your email.
Thanks a lot for the help!
My model keeps crashing mmd T^T . i deleted all un-needed physics and joints but it still won’t work. Please help!
There are several reasons why a model might crash. Try to run the command “File->State verification of the PMD data” (or “PMX info”, as it’s called in a newer PMXE) and run its output through Google Translate. It may give you an idea where to look in the first place.
it worked perfectly but i could not understand this one:
Duplicate registration bones: 943 | … × Bad! The bones below are duplicated in the display frame.
(5, 5, 11, 15, 15, 14, 15, 15, 15, 14, 14, 14, 14, 14, 14, 14, 14, 14, 14, 14, 14, 14, 14, 14, 14 , 14, 14, 14, 14, 14, 14, 14, 14, 14, 14, 14, 14, 14, 14, 14, 14, 14, 14, 14, , 14, 14, 14, 14, 14, 14, 15, 15, 15, 15, 14, 15, 15, 15, 11, 15, 15, 14, 15, 15, 15, 14, 14, 14, 14 , 14, 14, 14, 14, 14, 14, 14, 14, 14, 14, 14, 14, 14, 14, 14, 14, 14, 14, 14, 14, 14 , 14, 14, 14, 14, 14, 14, 14, 14, 14, 14, 14, 14, 14, 14, 15, 15, 15, 15, 14, 15, 15 , 15, 14, 16, 16, 16, 16, 15, 15, 14, 14, 14, 14, 14, 14, 14, 14, 14, 14, 14, 14, 14, 14, 14, , 14, 14, 14, 14, 14, 14, 14, 15, 15, 15, 15, 14, 14, 14, 14, 14, 14, 14, 14, , 14, 14, 14, 14, 14, 14, 14, 14, 14, 14, 14, 14, 14, 14, 15, 15, 14, 14, 14, 14, 14 , 14, 14, 14, 15, 14, 14, 14, 14, 15, 14, 15, 14, 14, 14, 14, 14, 15, 14, 14, 14, 14, 15, 14, 15, 14 , 14, 14, 14, 14, 15, 14, 14, 14, 14, 15, 14, 15, 14, 14, 15, 14, 15, 14, 14, 14, 14, 15, 14, , 14, 15, 14, 15, 14, 14, 14, 14, 14, 15, 14, 14, 14, 14, 15, 14, 15, 14, 14, 14, 14, 14, 15, , 14, 14, 15, 14, 15, 14, 14, 15, 14, 15, 14, 15, 14, 14, 14, 14, 15, 14, 14, 14, 14, 15, 14, 15, 14 , 14, 14, 14, 14, 15, 14, 14, 14, 14, 15, 14, 15, 14, 14, 14, 14, 14, 15, 14, 14, 14, 14, 15, , 14, 14, 15, 14, 15, 14, 14, 14, 14, 15, 14, 14, 14, 14, 15, 14, 15, 14, 14, 14, 14, 14, 15, , 14, 14, 15, 14, 15, 14, 14, 14, 14, 14, 15, 14, 14, 14, 14, 15, 14, 15, 14, 14, 15, 14, 15, , 15, 15, 15, 15, 15, 15, 15, 15, 15, 15, 15, 15, 15, 15, 15, 15, 15, 15, 15, 15, 15, 15, 15, 15, 15 , 15, 15, 15, 15, 15, 15, 15, 15, 15, 15, 15, 15, 15, 15, 15, 15, 15, 15, 15, 15, 15, 15, 15, 15, 15 , 15, 15, 15, 15, 15, 15, 15, 15, 15, 15, 15, 15, 15, 15, 15, 15, 15, 15, 15, 15, 15, 15, 15, 15, 15 , 15, 15, 15, 15, 15, 15, 15, 15, 15, 15, 15, 15, 15, 15, 15, 15, 15, 15, 15, 15, 15, 15, 15, 15, 15 , 15, 15, 15, 15, 15, 15, 15, 15, 15, 15, 15, 15, 15, 15, 15, 15, 15, 15, 15, 15, 15, 15, 15, 15, 15 , 15, 15, 15, 15, 15, 15, 15, 15, 15, 15, 15, 15, 15, 15, 15, 15, 15, 15, 15, 15, 15, 15, 15, 15, 15 , 15, 15, 15, 15, 15, 15, 15, 15, 15, 15, 15, 15, 15, 15, 15, 15, 15, 15, 15, 15, 15, 15, 15, 15, 15 , 15, 15, 15, 15, 15, 15, 15, 15, 15, 15, 15, 15, 15, 15, 15, 15, 15, 14, 15, 14, 15, 14, 14, 14, 14 , 15, 14, 14, 14, 14, 14, 14, 14, 14, 15, 14, 14, 14, 14, 15, 14, 15, 14, 14, 14, 14 , 14, 15, 14, 14, 14, 14, 15, 14, 15, 14, 14, 15, 14, 15, 14, 14, 14, 14, 15, 14, 14, 14, 14, 15, 14 , 15, 14, 14, 14, 14, 14, 15, 14, 14, 14, 14, 15, 14, 15, 14, 14, 14, 14, 14, 15, 14, 14, 14, 14, 15 , 14, 15, 14, 15, 14, 14, 14, 14, 15, 14, 14, 14, 14, 15, 14, 15, 14, 14, 14, 14 , 14, 15, 14, 14, 14, 14, 15, 14, 15, 14, 14, 14, 14, 14, 15, 14, 14, 14, 14, 15, 14, 15, 14, 14, 15 , 14, 15, 14, 14, 14, 14, 15, 14, 14, 14, 14, 15, 14, 15, 14, 14, 14, 14, 14, 15, 14, 14, 14, 14, 15 , 14, 15, 14, 14, 14, 14, 14, 15, 14, 14, 14, 14, 15, 14, 15, 14, 14, 15, 14, 15, 14, 15, 15, 15, 15 , 15, 15, 15, 15, 15, 15, 15, 15, 15, 15, 15, 15, 15, 15, 15, 15, 15, 15, 15, 15, 15, 15, 15, 15, 15 , 15, 15, 15, 15, 15, 15, 15, 15, 15, 15, 15, 15, 15, 15, 15, 15, 15, 15, 15, 15, 15, 15, 15, 15, 15 , 15, 15, 15, 15, 15, 15, 15, 15, 15, 15, 15, 15, 15, 15, 15, 15, 15, 15, 15, 15, 15, 15, 15, 15, 15 , 15, 15, 15, 15, 15, 15, 15, 15, 15, 15, 15, 15, 15, 15, 15, 15, 15, 15, 15, 15, 15, 15, 15, 15, 15 , 15, 15, 15, 15, 15, 15, 15, 15, 15, 15, 15, 15, 15, 15, 15, 15, 15, 15, 15, 15, 15, 15, 15, 15, 15 , 15, 15, 15, 15, 15, 15, 15, 15, 15, 15, 15, 15, 15, 15, 15, 15, 15, 15, 15, 15, 15, 15, 15, 15, 15 , 15, 15, 15, 15, 15, 15, 15, 15, 15, 15, 15, 15, 15, 15, 15, 15, 15, 15, 15, 15, 15, 15, 15, 15, 15 15, 15, 15, 15, 15, 15, 15, 15, 15, 15, 15, 14, 15, 14, 15)
And this one:
Rigid body A reference illegal: 8 | … × Bad! The following Joint has incorrect rigid body A setting.
(18, 19, 20, 21, 22, 23, 24, 25)
What should i do?
In the “Display pane” tab, bones are gathered in groups for representation in Frame Manipulation Panel (to the left). If a bone isn’t included into any group, you won’t be able to see it there (you can still select it in the rendering screen, but once you leave it, your control over it is gone). Listed bones, though, are included into too many groups. Purge them so that there’s no duplicate bones in groups and no unused groups – while the latter should not cause crashes, you’ll find your FMP much more orderly and convenient.
As for the second problem, in the Joint tab of PMDE check joints with respective numbers. Settings A and B refer to rigid bodies (aka, incorrectly, “physics”) that the joint connects. I can’t say what exactly settings are necessary without seeing, though.
it worked thank you!
Thank you so much, it worked!
Hi so I wanted to know how can we do all of this in PMXeditor . I couldn’t download PMDedtor (I don’t know why ^^”) so please help.
I can actually do all this but the only difference is that there is no physics button. Instead the buttons are : Vertex, Face, Bones, Body, Joints and I guess that’s it so please help me.
Uhh…really? No physics button? It’s the one at the PMDView window (the one with grid), simply labeled as “P”
If you’re using the translated version of PMXE, the top-left row just under the File button should read “Sel: V M B P J” and the physic button is the P.
Found it yet?
I clicked the link to the article. That’s a great article if you ask me. But some of the pics are gone. Please fix it. Thanks
P.S.
I see nothing’s wrong with my inet connection that I also refreshed my browser a couple of times. Still, those images wouldn’t show up
I checked the page with a debugger and indeed three pictures in Part I of the linked page are missing (starting from “Use parts from Miku to make an MMD model almost from scratch.”). Reggie/SH, please attend.
Hi! I have been trying to create models for a series I am planning. I have created the first model (which is Rosie). I saved and loaded it into MikuMikuDance. It’s in its default position. But, when I load a motion data, she comes out looking like she was possessed. Is there a way I can fix this?
Define “possessed”. Is it her skirt and/or hair flapping uncontrollably? Then it’s a problem of glitching physics, actually quite common. So far we have no tutorial on how to fix it, but there are ways to circumvent it.
Or is it that her legs that can’t find their fixed position around their IK bones (or hands, if you tried to insert IK bones into them too)? It can be if you did those bones yourself. Try to save the model as .pmx instead of .pmd and see if it behaves better.
If it’s something else, please be more specific.
hey, im new with MMD and have been playing with it about 3-4 days ago. and in this article i want to ask about how you manage your folders when come to modeling characters? it seems you separating the model folder and your OC folder. and i got a problem whenever i do separating folder thing, some of them had missing texture, so i always drop in all the model and the texture onto real model folder. please help ;-;
Yes… keep each model in its own folder… and move the folder into the MODELS folder inside the UserFiles folder… and do not mix files between model folders… unless you have some reason to do it. Funny that the original MMD download models are not in separate folders… ALL of their parts are just tossed into that folder. … I hope that answered your question.
Late reply, sorry ^^;
Here’s the thing, you got a default “model” folder whenever you unzip MMD.
Now that maybe the default folder, but that does not mean you can’t make another folder to better organize your model storage.
For me, each character got their own folder, so I can easily navigate through my massive model list and find them.
You said you lost the textures whenever you move a model to different folder, that’s understandable, since textures need to be inside the exact same place as the model.
What you can do is, whenever you download or edit a model and place them in another folder, make sure to copy the textures (and everything else, really) included in their original folder as well. Place them in the same folder as your .pmd/.pmx file, and that should solve the texture issue.
That’s as detailed as I can get, hope that helps!