What happens to your video after you’ve uploaded one to YouTube?
YouTube serves video playback quality to best suit your viewing-screen!
A bit of trivia for those of you who want to know a little bit more about what happens to your video after you’ve uploaded it to YouTube for streaming. To make it more easy to understand we’ll use one of my videos as an example
I usually make videos using the Xvid codec using an “economical” compression setting that balances file size with desired image quality. These usually weigh in at around 80mb dependent on length and visual complexity.
The example I’ll be using will be a heavy-weight AVI by my standards and originally when rendered it weighs in at the 138mb mark. It was rendered at 30 fps at 1280×720 pixels – this qualifies as “HD” on YouTube’s server. The original was embedded with a WAV audio file that accounts for 59.4mb of the total (so the visual component actually weighs in at about 138.304-59.4=78.904mb).
Here’s the video: https://youtu.be/yPI5yFmaWvc
Stats for Nerds
Now when you play a video on YouTube and right click on it, it will open up a submenu and one of the selections is “Stats for Nerds” and some of this information is actually quite useful, or at least interesting, and what I’ll do here is to explain what these stats mean.
It is important to note that my PC was connected to the Internet via a good WiFi connection whilst writing this; in Starbucks, if you must know, as, in addition to the excellent coffee, their Internet connection is actually pretty solid.
Standard YouTube page…
Here is the first capture:
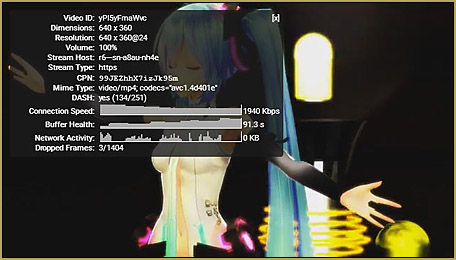
This is of the video playing in the standard YouTube page. Here’s what the stats mean:
Video ID: This is the video’s unique ID# on the YT service
Dimensions: The dimension of the window in which the video is playing
Resolution: The dimension of the size of the video playing – note that this can change. @24 means at 24 fps
Volume: Volume of the audio – this changes if you mess with the audio controls on the YT player
Stream Host: Name of the server hosting the file
Stream Type: https – over their secured connection
CPN: no one seems to know what this refers to…
Mime Type: The type of media – specifically it’s a mpeg standard video – remember that the original was an AVI. And the codec YouTube used to compress the video.
DASH: Dynamic Adaptive Streaming over HTTP (DASH), also known as MPEG-DASH – see detail explanation below
Connection Speed: self-explanatory – but at 1940kbps over a wireless connection, this is very good.
Buffer Health: how quickly data is buffering into your system
Network Activity: what else your PC is doing on the network
Dropped Frames: data that is lost in the transfer procedure – the higher this number the more choppy your video will be. Since my connection only dropped 3 frames out of 1404 served my connection is pretty solid.
DASH is interesting because basically what YouTube is doing is using http protocol to stream videos which has some technical advantages and you can actually see this in action. The easiest way to do this is to go full screen whilst a video is playing. At first the image will be a little bit blurred because the player is still using the data that was already sent into the buffer. Then (if your connection is good) the image will visibly sharpen as the video continues to play. This is because the YouTube service can detect what size you’re playing the video at and will send the best possible format with the following packages. It can do this because it uses http packages: each package sent at a quality optimized for best play back. Just to be clear, your PC and the YouTube server are actually communicating with each other whilst the video is playing. In case it is not obvious, let it be clear that the YouTube server (at the very least) knows your IP address, the type and quality of connection you have, what type of device the video is playing on, what resolution the video is playing at. This also means they know where you are… and if you’re logged in, who you are.
Full Screen on YouTube…
So let’s see this in action with the next screen capture of the same video playing full screen:
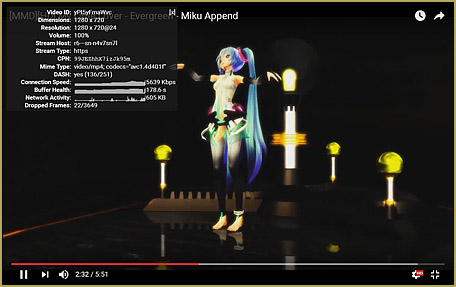
Somethings did change and here’s a quick explanation:
Dimensions: The video is playing at the maximum size available for the video on my monitor: 1280×720. My screen is 1280×800.
Resolution: This is the at 1280×720 – the size I made my original video at, and it’s playing back at 24 fps. Now if I made my video at say 640×320 and played it full screen, well it’ll look really bad. This is why I advise that you always render your videos to the maximum size available on your screen.
Connection Speed: see below
Buffer Health: see below
Notice how these two have increased! Why? Because I’m now playing full screen which means more data so the YouTube server really started pumping out the data so that I have the best possible viewing experience. The network activity figure also gives a clue as to how hard the two computers (YouTube’s server and my laptop) are working to keep the video playing seamlessly.
Dropped Frames: 22/3649 – losing only 22 frames out of 3649 served – no complaints there.
Well, hope you find some of this helpful. This information can be useful for those of you wishing to get the best out of the YouTube service. You’ll now know how to best optimize your videos for their server.
Oh. I forgot…
When you go from the normal player size to full screen, the YT server also switches files served. Crudely: if you’re playing in the normal window, the YT server just sends the 640×320 version of your video but when you go full screen it’ll switch to their version of the full screen render that (hopefully) you originally uploaded.
This is why I keep harping on rendering your videos at full screen sizes if possible.
Yeah, I hear a lot of people complain that it takes hours to render and just as many to upload, but that’s the price you need to pay for quality. Here’s what I do:
Render before you go to sleep – it’ll be done when you wake up in the morning.
Upload whilst you go to work, school or on the following night. But honestly, my videos usually upload in less than 15 mins because I do it during off peak hours when their service isn’t swamped and the network activity over the Internet in the area where I live is low.
Have fun with MikuMikuDance!
– SEE BELOW for MORE MMD TUTORIALS…
— — —
– _ — –









Just for the Nerds ,According to stack overflow, CPN stands for Client Playback Nonce.
CPN is a unique playback ID, computed on the client, CPN is a string to identify the playback; if people have problems with the playback, developers can use it to look up log/stats information on the playback so they can figure out what went wrong.