

Ray-MMD Nocturne…
Ray-MMD environment controls create MMD dreamscape…
One of the wonderful things about Ray-MMD is its ability to allow users to completely control the lighting environment. Many YT MMD video makers have taken advantage of this with varying degrees of success. But with those who put in some real effort into using the effect, some really outstanding visuals have been created that are competitive with the output from systems costing thousands of dollars.
This article will show you exactly how to use Ray-MMD to completely override the default lighting conditions and redefine it completely; yet retaining credibility. It really isn’t hard to do. This will be a step-by-step tutorial, but by the same token, it will assume that you already know how to use the effect; at least at a basic level. You can use the model assets that we used or select your own but if you want to use the assets featured here. These are:
And of course you will need MMD with the MME plugin installed as well as a copy of Ray-MMD.
As with all projects…
… always start with a plan or at least an objective.
This one is simple: a fantasy night scene featuring a fairy. Honestly, my project ties together with a piece of music so that makes it a lot easier. Music can really help get the creative juices going. However, everyone works on creative projects differently. Speaking for myself only, before I even open MMD, I already have a good idea in my head of what I want to achieve. So all that remains is to work out the details in MMD.
Into the Realm of Fairies
Fantasy themes are fun to develop because, you can’t really go too wrong with them as they don’t need to follow any rules. So this opens up a lot of areas to be really creative.
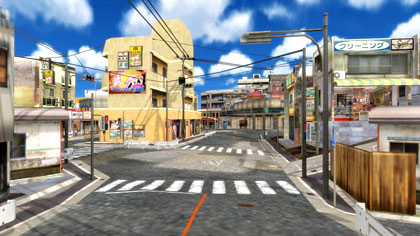
Start by loading up the fairy model and the stage and you should have something that looks like the image below. The image shows the fairy model posed and since that is actually a fairly straight-forward process, I won’t go into it more. If you want to use the same pose, you can grab the pose data here. Alternatively, you can create your own pose or even add a motion.
Important: Make sure that the fairy model is drawn last in the draw order table.

This fairy model is absolutely gorgeous but do be aware that she has a lot of transparent textures and some of these are going to be problematic and will need to be accounted for accordingly. Even in the image above, you can see that her translucent shift is problematic.
Note also that this stage is by design set in the background. The intention is that the foreground areas is filled with some type of water effect.
Setting up the lighting environment
Load ray.x and ray_controller.pmx.
Step 1:
- Load the Time of Night sky box, make sure that this model is drawn first in the draw order list.
- Add Time of lighting.fx to it under the MME lighting tab.
- Add material_skybox.fx to it under the MME materials tab.
- Lower the position of the moon so that you can see it though the tree lines.
- Use these settings:
- SunRadius+, 30
- SunRadiance-, 55
- MiePhase+, 0.40
- MieTurbidity+, 0.60
- RayleighHeight+, 0.45
- RayleighColorV+, 0.50
- EnvDiffLight+, 0.50
- EnvSpecLight+, 1.00
- StarBrightness+, 1.00
- Meteor-, 0.25

Values used to position the moon.

Step 2:
- Add main.fx to the stage under the MME main tab.
- Add material_2.0.fx to the stage under the MME material tab.
- Make sure that the stage is drawn immediately after the sky box.
Note that there is an issue with this stage’s model data file; it has no visible labels. That’s probably because the labels are in Chinese and not Japanese. You may need to set your PC’s locale to also support Chinese text but the problem is that the user has used two types of Chinese characters in the labeling. But the bottom-line is that this stage has no labels in any of the MMD/MME fields. This could be a problem when saving the work file.
Step 3:
- Load water.pmx from the Ray-MMD materials programmable sub-folder.
- Make sure the water is drawn after the stage and before the fairy model.
- Set up the water to its maximum size using the slider provided.
- Add main.fx to it under the MME main tab.
- By default it should be loaded with materials_water.fx under the MME materials tab.
Step 4:
Use the follow settings on the ray_controller:
- SunLight-, 0.55
- BloomThreshold, 0.55
- BloomRadius+, 0.55
- Exposure-, 0.35
- Contrast-, 0.20
- Saturation+, 0.75
- Gamma-, 0.20
- Temperature-, 0.75
- BalanceR+, 0.50
- BalanceG+, 0.75
- BalanceB+, 1.00
If you have Bokeh DOF enabled use these settings:
- Fstop+, 0.60
- FocalRegion+, 0.20
Your screen should now look something like the image below:

Shading the fairy and her glowing crystal ball
Step 5:
The crystal ball is just really PointLightIES.pmx with the settings listed below. I used the OP function to fix the ball to the fairy’s left hand and the directionalIK bone to direct the light at her head bone. Done this way, the light will always illuminate the fairy’s face. This focuses visual attention to the face as the brightness contrasts sharply with the surrounding darkness.
- R+, 0.40 / G+, 0.60 / B+, 0.80
- Range+, 0.50
- Intensity+, 0.15
- Intensity-, 0.95
- AttentuationBulb+, 0.15
- AttentuationBulb-, 0.60
- Hardness, 0.40

Step 6:
Shading the fairy model is fairly straight forward; but do note that to solve a lot of transparency issues, the following materials were disabled:
- The hi-tech screen highlights in the eye area.
- The faux hair shadow.
- Her shift (chemise).
Disabling her shift’s visibility does make it easier to see her panties but that can be addressed by simply being more judicious when setting camera angles. But that shift just looks wrong so this was the easy fix. You could try to fix this in the PMXeditor but honestly, it isn’t worth the trouble.
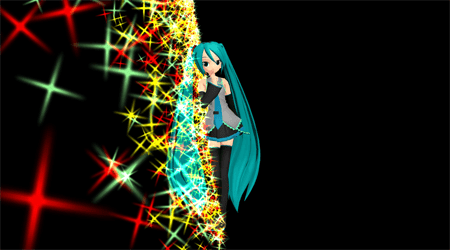
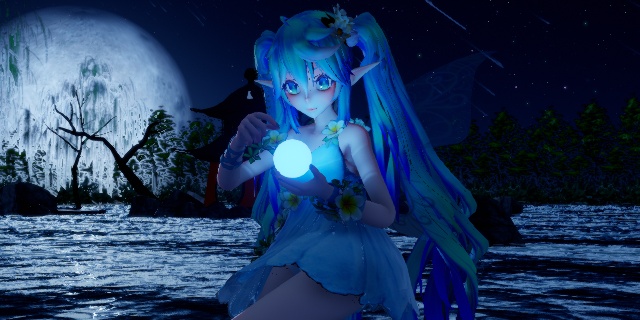
By this point, your scene should look something like the image shown below. There’s a lot of darkness but the glow from the crystal ball illuminates the character very nicely, helping focus visual attention on to the fairy. The overall impression is slightly moody but dreamy at the same time which helps create an air of mystery around the whole scene.
Finishing touches
Step 7:
Add the Kira Kira effect and load the controller. Apply the default settings to the controller (コントローラ用オススメ設定.vmd). Then tweak the settings:
- Range X, Y and Z, 0.45
- Particle Si, 0.45
Step 8:
Add a blender / softener effect to increase the dreamy quality. diffusion7 was used in this set up, but feel free to use an alternate effect.
The final image is shown below and was original set up to be rendered as a HD full screen render (1920 x 1080 pixels).
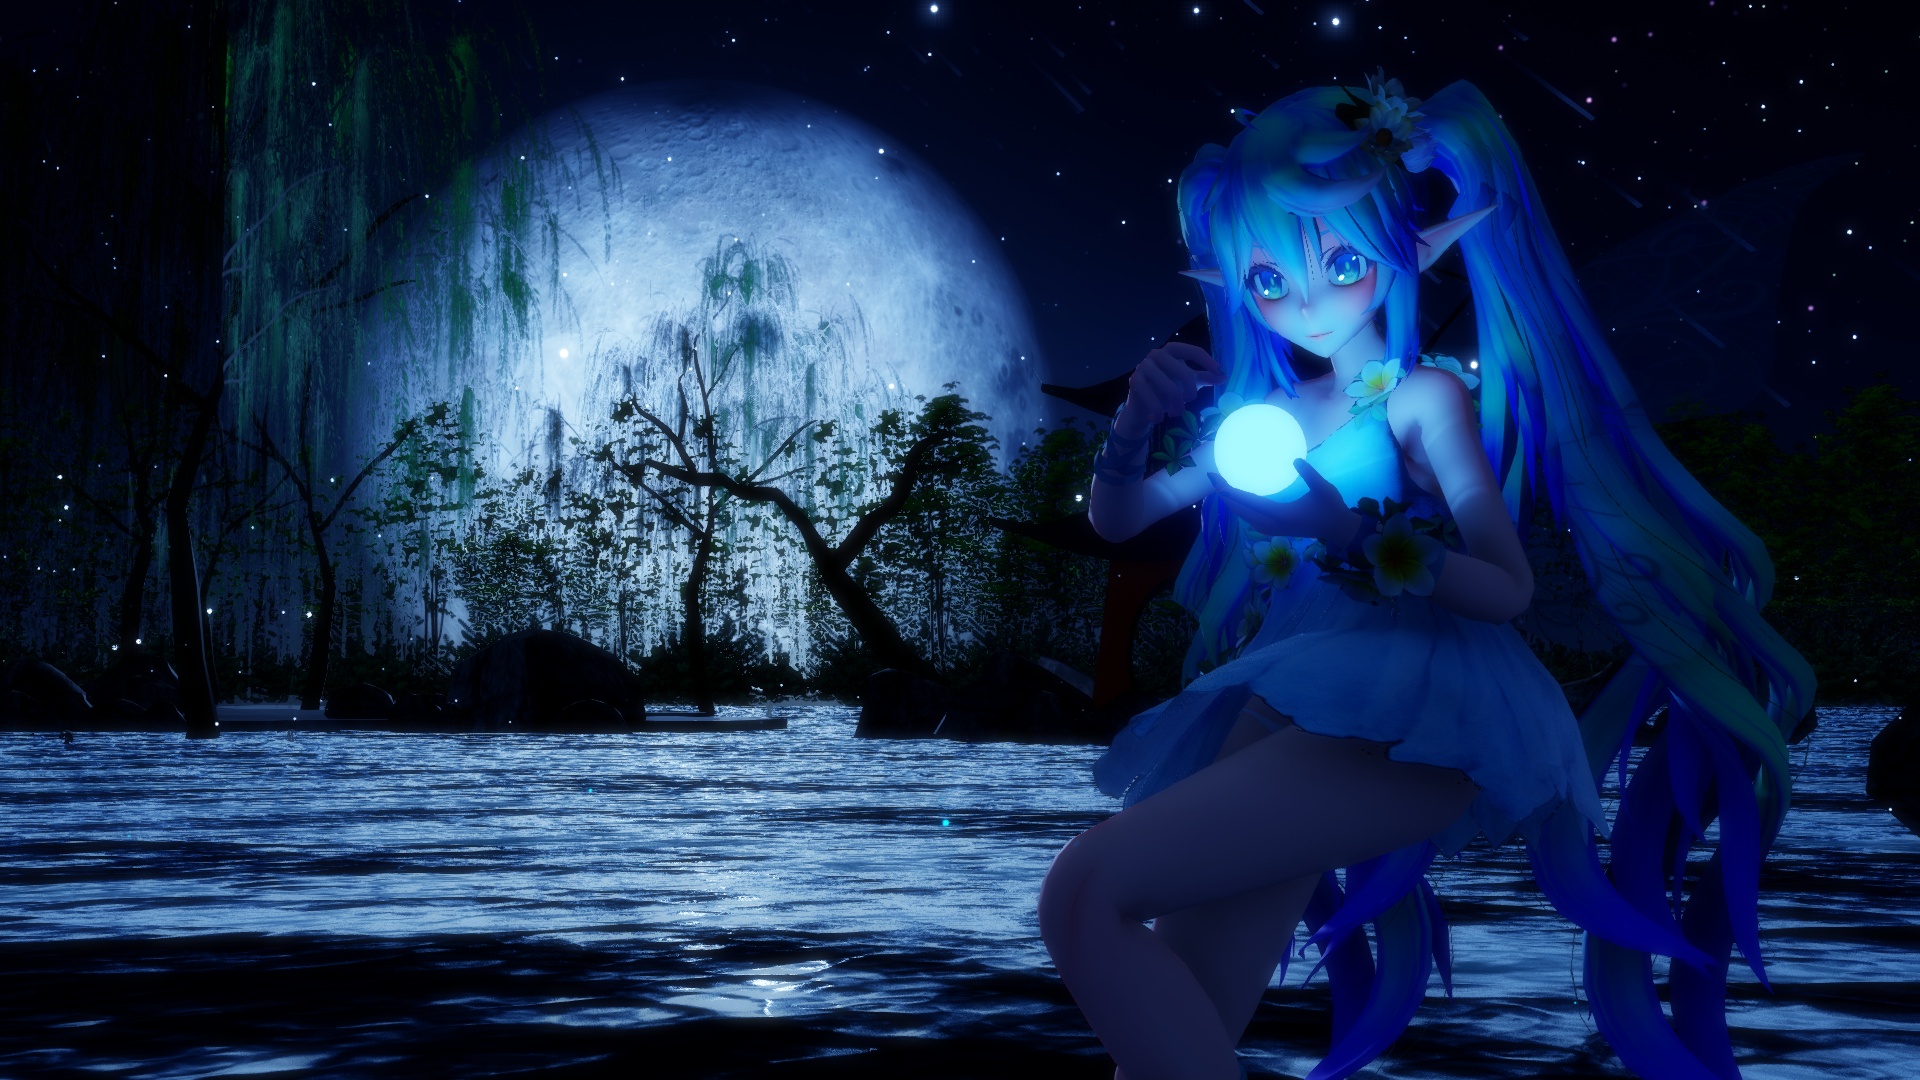
Afterwords
Scenes like these are relatively easy to set up and are actually quite versatile. There are many ways to present the scene plus as a basic set up for a video performance it offers a lot of flexibility. Add a bit of appropriate music and you will handily have a very presentable performance as the example “Still-Mation” video below demonstrates.
Anyway, hopefully you have been able to pick up some tips from this article. As always, my settings are not set in stone, so feel free to use these as the starting point for your interpretations. I went for a blue-dreamy kind of look, but other colors in the spectrum can be given the same treatment. Colors really do help set moods and using the method shown here with Ray-MMD, makes doing projects like these relatively hassle free.
Credits
Tda Fairy Miku – Tda/Skary66
Miku Hatsune © Crypton Future Media, Inc.
Stage – 椛暗式 / 椛暗
MMD 9.32
Ray-MMD 1.5.2
Kira Kira v2
Diffusion 7
AviUtil
IrfanView64
– SEE BELOW for MORE MMD TUTORIALS…
— — —
– _ — –
![]()