H![]() ow do I make MMD textures? How do I use Blender? How do I use MMDTools? How do I make better textures? How do I start with Blender in MMD?
ow do I make MMD textures? How do I use Blender? How do I use MMDTools? How do I make better textures? How do I start with Blender in MMD?
Making MMD Textures with Blender
PMXE is a great program for making minor edits to MMD models. And it’s a great introduction to 3D modelling. But there will come a time when its limits become apparent. Eventually, you’re going to want to map UV coordinates more accurately, use proportional editing in more advanced ways than are possible with PMXE, and make cool new textures. You’ll want to step up to Blender.
3D modelling is complicated. Blender was never meant for people new to 3D modelling. And the various import/export scripts that various talented programmers have created are unfortunately limited, and sometimes difficult to use. Your first month in Blender is probably going to be a period of intense frustration.
But eventually, it will click. And you’ll have access to fantastic new tools. One day, you’ll wonder how you ever lived without them.
In this tutorial, we’re going to use Blender to do something that we could never do in PMXE. We’re going to use it to help us create a skin texture. It’s one of the simplest things we can do with Blender, and it will give use a taste of how Blender works. We’ll use a bit of GIMP as well.
Installing Blender, MMDTools, and GIMP
Blender, MMDTools, and GIMP are all open source software released for free to the public! I’m very grateful to the many talented programmers who were more interested in helping everybody than they were in making a profit or holding on to their tools for personal use.
You’re going to need administrator privileges on your computer to install these programs. You’re smart enough to figure out these installations yourself, so I’m just going to give you links.
Installation of Blender and GIMP should be painless, but you may still have issues. We can’t always help with these, because it’s very hard to do long distance tech support, but if you ask, we might be able to help. No promises!
MMDTools doesn’t have good installation instructions. To install it, find the directory to which you installed Blender. If you’re using Blender 2.77a, the files in the download should go in 2.77\scripts\addons\mmdtools. That folder should contain folders like properties and files like utils.py. For example, look at my path and folder contents– yours may look slightly different!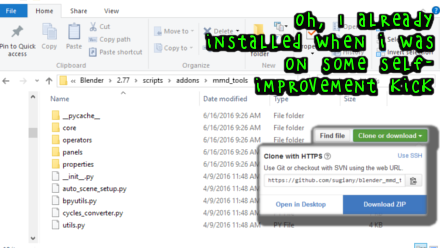
Running Blender for the first time
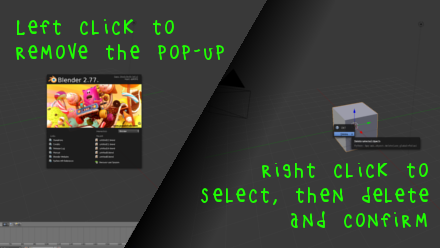
When Blender finishes loading, the first thing you’ll see is a pop-up. Left click on the pop-up to dismiss it. By default, Blender loads a cube for you to play with, but you don’t want that, so right click on the cube to select it. Make sure your mouse cursor is in the main, 3D view, then tap your DEL key, and a confirmation menu will pop-up right at your mouse cursor. Go ahead and confirm the deletion by clicking on the Delete option. If you move your mouse and this menu disappears, don’t worry. Just tap DEL again and the same menu will come up!
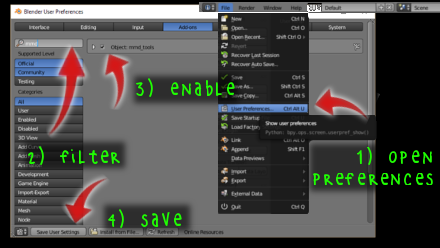
 The first thing you need to do is tell Blender about MMDTools. On the topmost menu, select File->User Preferences, then, on the User Preferences tab, select the Add-ons tab. In the search bar, type “MMD.” Blender will list all of the potential add-ons containing that phrase. Click the checkbox next to Object: mmd_tools, then hit the Save User Settings button. Now, you can go ahead and close the User Preferences dialogue by hitting the X button in its upper right corner.
Importing a model into Blender
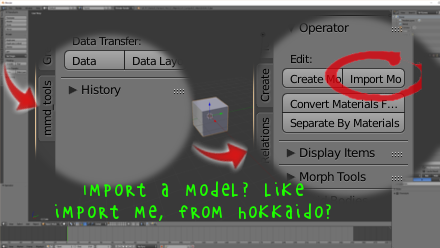
There should be a bar running alongside the left margin of the Blender window. This is your toolbar. It has several tabs that you can select. Now that you’ve enabled your add-on, you have a new tab labelled mmd_tools. Left click on that to select it and you should see your toolbar change. One new option is a button to import a model– on my screen, the text is cut off, and it’s only Import Mo. Click that button, and Blender will open a new dialogue to choose a model.
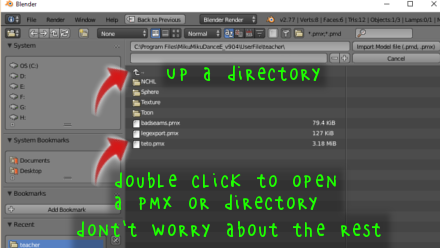
 Find one of your models– any of them will do! Even though this open file dialogue may not look like others, it works similarly. Click a folder to open it, click the up arrow to go up a directory, and double click a file to import it.
When Blender is done thinking, you should see your model. Right click the model to select it. The model is outlined in orange to indicate that it’s selected, and you have some new options on the toolbar. There’s a new button: Separate by Materials. Click that now; it might spend a minute thinking. When Blender is done, your model will be outlined in red. That indicates that you now have multiple objects selected. Move your mouse cursor to the main, 3D window, then tap your ‘a’ key to unselect all objects. Now right click, say, your model’s legs. Instead of your whole model getting selected, only that material is getting selected.
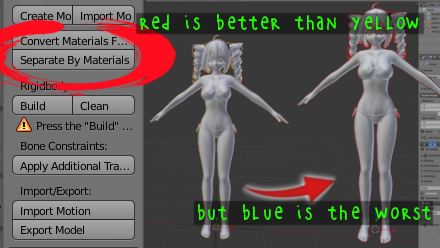
We want to create a new skin texture, so let’s select all of the body parts of our model and join them into a single object. Tapping ‘a’ while your mouse is in the 3D window will toggle between selecting all and deselecting all, so if you ever make a mistake, tap ‘a’ once or twice to unselect everything. To select a second object, hold down shift while you right click on it. Go ahead and select all of the parts of your model that use your main body texture. Now, with your mouse cursor still in the 3D window, hit ctrl-J to join them. Those objects are now joined. Try deselecting all by tapping ‘a’, then right click on this new compound object to select it. You should see the yellow outline around all of the objects you joined.
Edit Mode
Make sure you have your body object selected. With your mouse still in the 3D window, hit your Tab key. The selected object turns into a wireframe. You’re now in edit mode, from which you can make changes to your model. When we separated our model into materials, some of its vertices– those that lay on the borders between materials– may have been duplicated. That will change their normals and will affect our bake. So let’s fix that by joining any of these vertices.
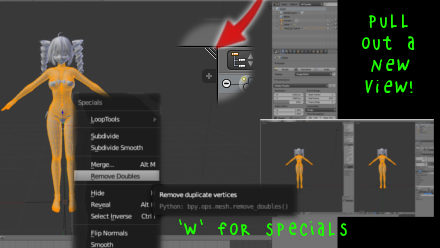
With your mouse cursor still in the 3D window, tap ‘a’ to select all vertices. You should see everything light up orange. Now, tap ‘w’. A new menu– the specials menu— should appear underneath your mouse cursor. Look at the options. We want the Remove Doubles option. Go ahead and click that one.
UV View
Even though this is already the most complicated user interface that I’ve ever seen, there’s more! In the upper right hand corner of your 3D window, you should see a few diagonal lines. This is a handle to create a new window. Left click on this handle and drag it to the left about half way into your 3D window. Now you have a new view!
We don’t need a new 3D view, but we do need a UV view. There’s a little button in the lower left corner of your new view, just to the left of that view’s “View” menu. If you left click it, you’ll see a pop-up of potential views. Left click the “UV/Image Editor” option and you should see the view change to a grid. This is your object’s texture layout. Move your mouse over the grid and tap the ‘a’ key. Now all of these UV coordinates are selected.
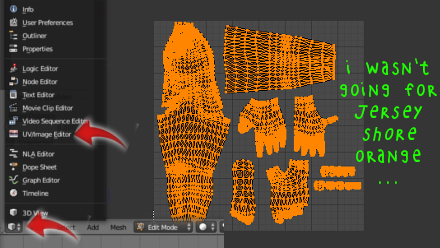
We’re going to bake an ambient occlusion map. To do that, we need an image to which to bake it. Click on the “New” button on the bottom of your UV view and tap “okay.” Default options are fine. We’re going to overwrite the image anyways.
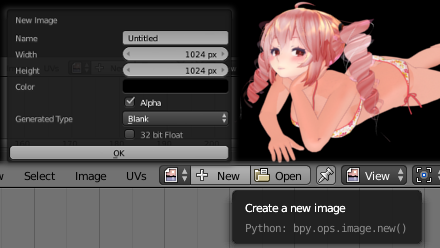
This is a good time to take a look at your UV map. If it looks like two parts of your mesh are overlapping, they probably are! They may not use the same texture. When these meshes overlap, you’re not going to get accurate results from your texture bake. Later, you may want to try again, keeping these materials separate, but don’t worry about it for now. We’ll just learn the process first.
Baking Textures
Make sure that all of your vertices in your 3D view are selected and that all of your UV coordinates are selected. They should all be glowing orange. If they’re not, move your mouse cursor to the appropriate view and tap ‘a’ once or twice to get everything selected. Blender’s hot keys change depending on where your mouse is on the screen.
Now take a look on the far right of your Blender window. There are two other views on that margin; the lower one is the Properties window. At its top is a row of icons.
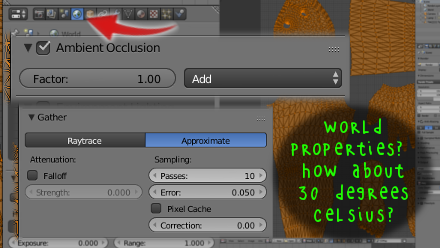
Select the blue sphere. This allows you to specify World properties. Look at the options it opens up below. Check the checkbox next to Ambient Occlusion to enable it. Then, look at the options for Gather. Click the Approximate button to change the way ambient occlusion is calculated, then increase the number of Passes to 10 by clicking on the right arrow on that button 10 times. Decrease the Error to 0.050 by clicking the left arrow on its button twice.
 Now, look back at the row of icons on your properties view. Click the camera icon. This allows you to set render properties. Near the bottom, there should be an entry for Bake. Click the arrow next to it to expand its properties. The only option we need to change is Bake Mode. Next, click on the option labelled Full Render, just to the right of Bake Mode and select Ambient Occlusion from the options. Don’t worry about the other options. Finally, click the Bake button.
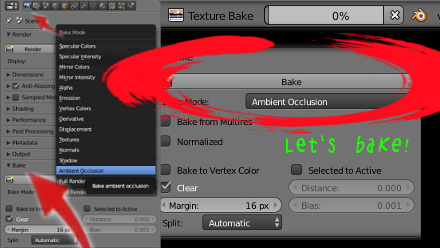 Look to the top of your screen. There’s a progress bar up there, labelled “Texture Bake.” It might take a while for Blender to figure out the ambient occlusion. On my computer, it takes between 5 and 10 minutes. While we wait, let’s talk about what we’re doing.
What is an ambient occlusion bake?
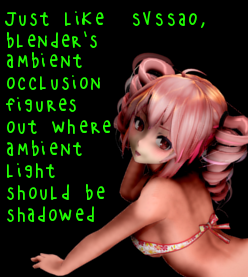
You might be familiar with the concept of ambient occlusion from MME effects. It looks at pixels and shadows them based on how near that pixel is to other vertices. Ambient occlusion is computationally expensive, so real-time implementations like MME’s are often low-resolution, and sometimes ugly.
But ambient occlusion can be pre-calculated instead. This has some drawbacks– it doesn’t take the whole scene into account, for instance. But it does let us create much higher quality occlusion. And it’s a good way to get a minimum level of detail into a texture. If you look at professionally created MMD models, their flesh textures are very simple. They use a base color and a multiplication layer masked by an ambient occlusion map. That’s all! And we’re going to do all of that in this tutorial, and even a bit more.
Is your bake completed yet? See how it replaced your black texture with shades of gray? That’s the ambient occlusion that Blender calculated for your selected objects.
Saving your map
In your UV view’s menu, select *Image->Save a Copy, then navigate to an appropriate folder and save your new texture. I’m saving mine as fleshAO.png. While we’re here, let’s do something else that will be useful. Make sure you have all of your UV coordinates selected, then, in your UV view’s menu, select UVs->Export UV Layout. Again, pick a good name. Don’t overwrite the AO map you just saved! I’m saving mine as fleshUV.png.
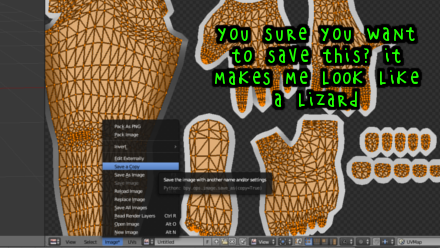 Okay! We’re all done with Blender for now. We didn’t make any important changes to our model, and we saved our new image. So let’s close Blender and open GIMP.
GIMP
Open up your AO map in GIMP. It should be a 1024×1024 pixel file– that’s plenty big enough. You’ll notice that there’s no wireframe on the image, and there’s a chunky border around everything Blender mapped as well. That’s because, sometimes, rendering engines get their pixels off by one (for reasons), and you don’t want it rendering a pixel you didn’t compute.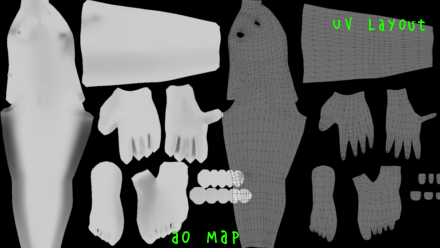 Open up the UV layout. There’s your wireframe! You don’t want to include this in any textures you make. But it’s a very handy thing to have around if you want to place an image in a particular place on your model.
Okay, let’s leave those files open and create a new file in GIMP. You want a 1024×1024 pixel document in RGB color. White is an okay background color. Some professional artists start with a red background, the color of the blood that gives our skin its pink color, and build layers until they have a skin-colored texture. By the end of this tutorial, you should be able to imagine how you could do the same.
Next, make a new layer. (Right click on the layers tab and select New Layer, then hit enter to confirm the default options.) This is going to be your multiplication layer. Pick a good, darker skin tone and fill this new layer with that color. I used 214, 168, 155 RGB. You can change colors by clicking on the palette in the toolbar. You can fill with the paint bucket tool or by using Edit->Fill with foreground color.
How to layer mask in GIMP
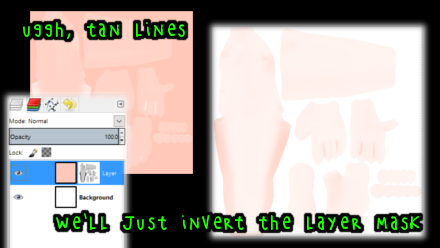
Now we’re going to create a layer mask. This tells GIMP that we want this layer blended only in certain places, and we’re going to use a different picture to tell it where to blend. Right click on your new layer and select “Add Layer Mask.” On the pop-up, just click “Okay.” Default options are fine.
Navigate back to your AO map for a minute. Select the whole image (Select->All) and copy it (ctrl-c). Then navigate back to your new texture. Select the new, masked layer. It should have two images on the layer view. The one with a white border is selected, the one with a black border is unselected. If the rightmost box– indicating your mask— is outlined in black, left click it to select it, and its outline should turn white. Paste in (ctrl-v) your AO map. Right click on the floating selection layer and select Anchor Layer to collapse it onto that layer.
Rather than pasting your AO map as an image into that layer, GIMP pasted it in as a mask. Where the layer is white, GIMP blends the layer fully into the image. Where the image is black, GIMP doesn’t blend the image at all. And where it is gray, GIMP smoothly blends it, depending on how gray it is.
But it’s still not quite right. On our AO map, the darker areas are supposed to be dark, and in our image, they’re light. So let’s invert the mask. Make sure we have our mask selected and outlined in white on the layer panel. Select all. Then, on the main menu, select Colors->Invert. Now, all the black turns white, and all the white turns black, and our mask is masking in the opposite way.
You can do other things to the mask layer, too. Playing with the grayscale levels (Colors->Levels) is a good way to change the distribution of your ambient occlusion across your model.
Playing with color
Now is a good time to play with some colors. Change the blend mode of your new layer to multiply. Since your background is white, that doesn’t matter yet (multiplying things by 1 doesn’t change anything!) But then, try playing with the background color and the color of your new layer. If you want to change the color of your new layer, make sure you have the main box selected and not the mask box. The main box is the left-most, and when you left click it, it should become outlined in white. Then, you can adjust hue, saturation, or change the color via any other fashion you’d like. I used Colors->Hue-Saturation. Slight changes in hue give more life to your texture.
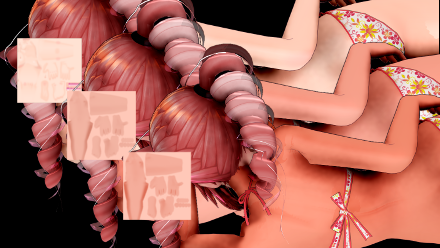 This is as much as nearly any MMD modeller does for creating flesh textures– a base layer and a masked multiply layer. It’s almost good enough for Teto! But do we want to settle for that? We can do better.
Adding a noise layer
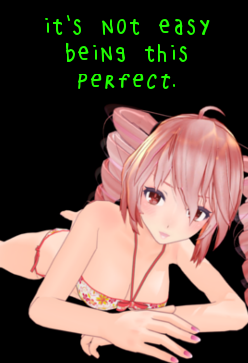
One of the problems with 3D graphics is that everything is just too perfect. There aren’t any flaws. Viewers notice this, even though they’re usually unable to describe exactly why it looks bad. This is one reason for the uncanny valley.
So let’s improve our skin texture by adding some slight imperfections. They don’t have to be masterpieces, because people aren’t going to look that closely. They just have to suggest a little more realism than our simple, too-perfect flesh texture does.
Make a new layer in GIMP and fill it with white. Change the blend mode to multiply. Select the whole layer and select Filters->Noise->HSV Noise from the main menu. Default options are fine, so just hit the OK button. It fills your layer with tiny imperfections that will slightly darken your texture.
Adding noise isn’t just for flesh. It’s a good way to improve any kind of texture. And you might want to play around with other ways to create noise– there’s a reason so many different filters exist!
Blender textures in MMD
Back-up your old skin texture, then export your new texture. Make sure it’s in the same directory as your old texture, using the same file name, so that MMD knows where to find it.
Leave GIMP open, and open up MMD. Load your model. It’s a good idea to load any effects that you plan on using as well. How does your model look? Take a good, close look. Try changing the lighting, too.
Maybe the noise is too strong. That’s easy to fix. Navigate back to your GIMP window and adjust the opacity on your noise layer. Maybe 50% is good? Export it again. Then switch back to MMD.
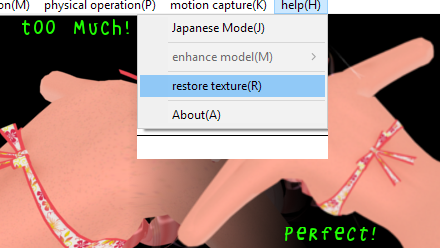 MMD won’t know that you changed the texture, but there’s a way to let MMD know. On MMD’s menu, select help->restore texture. It will reload all of the textures in use. How does it look now?
Go ahead and repeat this, moving back and forth between GIMP and MMD, until you’re happy with your result. That’s all there is to it!
Advanced editing with Blender
Baking AO maps in Blender is just the beginning. Blender also has texture painting tools that will allow you to easily blur textures across seams. Once you understand Blender, you won’t need GIMP to do any of the work we did in this article– you can use Blender to apply a noise layer as easily as you can use GIMP!
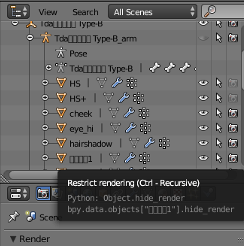 Eventually, you might explore Blender’s nodes. Using nodes, you can create advanced material setups that will allow you to render any number of things directly into a texture. For instance, you can use a normal map to create some detail in your texture, even if you’re not going to use a normal map in MMD.
When rendering AO maps, Blender takes its entire scene into account– but you can tell it to ignore certain objects, and you can use a model’s armature to change how it self-shadows for your AO bakes. You can use this to create multiple AO maps that you can integrate into a single texture. For instance, you might have one AO map darkening the texture for shadows, and a different AO map lightening the texture for tan lines.
But all of that is beyond the scope of this article. It’s only offered as a teaser to get you excited about the possibilities for texturing using Blender. If you want to get started, there are a lot of excellent tutorials available. I recommend the Newb to Pro series. Just be warned– it’s not going to be easy!
Credit your sources and help others make great art! This tutorial used Marebito124’s Tda Teto Bikini Type-B. Many thanks to Marebito124 for releasing his model to the public!
– SEE BELOW for MORE MMD TUTORIALS…
— — —
– _ — –




For learning the blender, i’d recommend Zacharias Reinhardt beginner tutorial series on youtube. it’s 12 parts and is best tutorial i’ve ever seen. you won’t regret. it teaches texturing also.
Awesome… Thanks!
I can follow most of this but, any chance this could be updated since blender changed its UI design? There are some steps that I cannot figure out where to go or what to click.
Is this useful for Ray-mmd?
The Blender instructions are excellent I followed through it perfectly, the GIMP instructions however are terrible. I have followed your instructions perfectly 5 times using your exact colour and everything for my trials and I only get a silver mapping with Navy blue background every time once I click the invert button. Help and clarification would be greatly appreciated as I have spent all up around 7hrs trying to figure this last part out. So the end product is the same usual silver textures I made in blender with a Navy blue back ground. instead of skin on the silver textures.
One: There’s a possibility that you *think* that you have DirectX installed, but in truth this is not so. Check your C:\Windows\System32 folder for d3dx9_NN.dll files (where NN are 24 to 43).
Two: Google says that Surface Pro has Intel Iris Plus Graphics 640 chip (maybe your model has something slightly different, but I wouldn’t expect *too* different). Some of embedded Intel Graphics chips manage to run MMD with effects, but only as an exception rather than a rule. In general, you need a real graphic card to run MMD, an Nvidia or Radeon.
If you’re getting navy blue somewhere, and you’re using the exact colors I used, where is this navy blue coming from? I’m afraid it as much a mystery to me as it is to you. But does it look like how you want before you invert the mask? If so, don’t invert the mask. If you want to host the .xcf (GIMP) file somewhere and link it, I’d be happy to take a closer look.
Do you know how this works with UV mirroring?
I probably don’t understand. Can you clarify at all?
UV mirroring usually refers to flipping your U or V coordinates. This is exactly the same as opening up a texture in GIMP and using the Flip tool. Whether doing that is a good idea or not depends on your model’s UV layout– if it is not symmetrical, then mirroring your UV or texture (same thing in this case) is not a good idea.
UV mirroring can also refer to the practice of mapping a model so that both sides of it use the same texture space. A UV map like that looks like only half a model. That saves some texture space, allowing higher resolution, but prevents asymmetrical texturing and can create some issues with some shader techniques like normal mapping. People involved in MMD that ask about this are usually wondering how to make asymmetrical textures for a model mapped like that. The easiest answer is to split your materials into L/R halves and specify different texture files for each half.
Yeah, I should have clarified, sorry.
I have a mesh that is mostly symmetrical. I want it to have a symmetrical UV map. I’m worried that I’ll mess up the rig if I use a mirror modifier to split it.
You’ll have to remap the UV of the mesh. If one half of the mesh has a UV mapping that you want, you can instead separate into two materials like I said. Mirroring in either Blender or PMXE won’t screw up your rig, provided that, in PMXE, your bones have appropriate 左/右 prefixes, or in Blender, that your bones have appropriate .r/.l suffixes and that you enable vertex group mirroring in the mirror modifier.