

 Simple centuries-old art techniques can be used in MMD to bring your model’s to life. This article will introduce the basic methods behind these concepts.
Breathing “SOUL” into
MMD models, scenes and images
using traditional fine-art techniques
… and Shaders!
MMD models are 3D anthropomorphic representations of anime characters which in themselves are caricatures of real humans even though they are fictitious characters. Recently there have been several articles on this blog about creating mood and emotions in pictures but they don’t really touch on the subject of how to really bring models to life – a process I call breathing “soul” into the subjects of the images. So that’s what we will do here in this short article.
The techniques that I will be using here are nothing new. They’ve been developed and used by artists ever since the late renaissance period and, basically, the general principle behind everything that I will be presenting here is that it is the job of the artist to tell the story behind the people shown in the imagery. It’s a complex subject and volumes have been written about it but the concept is really very simple: the picture that you create should captivate the viewer by showing the “humanity” of the persons shown in the work.
THE METHOD
The method in general is very simple and just requires a few simple steps which I will detail below. However, the trick to creating “soul” totally depends on you, the artist, presenting the work correctly. This last principle no one can really teach you as it comes from within you… and how well you do depends purely on your skill as an artist.
The method is relatively straight forward and consists of the following steps:
1. Set up the scene
2. Compose your picture
3, Set up the lighting
4. Render the image
and finally,
5. The hard part – making the image tell the story you want to tell
Note: Please click on the images to see them at their original render sizes – it really does make a difference to see what I was seeing.
SETTING UP THE SCENE
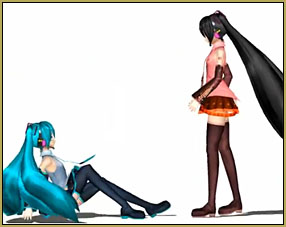
To illustrate the ideas behind this article I am using only 3 models:
Miku Append by Tda
Neru Append by Tda and VK
Train interior by SeasideExp
Simply, I have the girls taking a nap on a train at the end of a long tiring day. The image below shows the basic setup. Now, I will admit that I set up these poses really quickly and they’re not perfect, but they’re good enough to serve to illustrate the ideas discussed in this article.

COMPOSING THE PICTURE
I use the KOZU alignment grid a lot when composing my pictures. Basically this is an MME overlay that has a Rule of Thirds and other compositional grids built into it to help set up scenes correctly using century old composition techniques. I used the Rule of Thirds in setting up my scene and the theory behind this dates back to ancient Greece. If you want to know more about this rule, just Google it as there are hundreds of articles written about it as it is still used by professional designers, artists and photographers.
Suffice to say, the Rule of Thirds really does help you get set up the composition and the focus of your imagery right.

COMPLETING THE SCENE
Once I was happy with the composition I filled in the rest of the scene. Simply, I just added a screen capture from a BBC nature documentary as a background image for the sky – I wanted a late afternoon/early evening setting for my picture so chose a suitable sky image for this. The choice of background is important as it will ultimately dictate the settings of the lighting for the scene and this affects the overall mood of the presentation.

SETTING UP THE LIGHTING
There’s a setting sun in the sky background. This mandated the primary lighting source coming from behind the two models so this was set up according and I deliberately emphasized the play of shadows on the train cabin’s walls as this really helps to add mood to the scene. Since the two characters are in Append gear I added AutoLuminous to them to get a good idea of their lighting characteristics.

ADDING MMES – FIRST PASS
I darkened the cabin with dDarkShaderS2. On Miku and Neru I used G_Shader_02_S3 and G_Shader_02_S3_skin. This gives their form a good play of light and shadows without overwhelming details and reflects their environmental lighting conditions fairly well. But there’s too much shadow on their faces, especially Miku’s. Although this is correct given the back lighting set up, this isn’t how I wanted the scene to look.

ADJUSTING THE INTERIOR LIGHTING
Miku and Neru are inside an illuminated train cabin. This interior light source isn’t accounted for by the global light settings so we’re going to have to add another light source and fortunately we can do that in MMD. So I added a single PostPointlight to the scene. This is located slightly in front of them with the aperture turned way down and a slight yellow bias added to match the scene color. This evens out the lighting at the front of the models.

ADDING MMES – SECOND PASS
To really set the mood and make the models much more realistic, global shaders and scene diffusers were added. So I added:
o_BleachByPass – this darkens the scenes and adds rich dark tones to the image
o_ToneMap – brings back some of the colors killed by the previous effect and saturates the colors
o_Diffusion – softens the scene
Diffusion 7 – softens the scene even more and increases the play between the light and dark tones in the image making it much more moody
Essentially, we’re done. A nice intimate scene of the two girls snoozing on a train. There is a level of intimacy between the two characters that should come through the imagery if I did things right even though both of them are asleep.

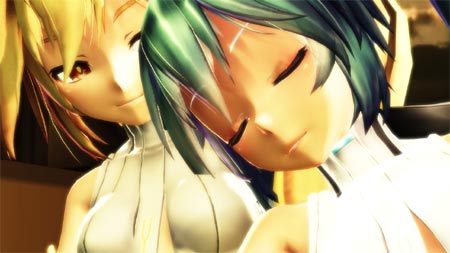
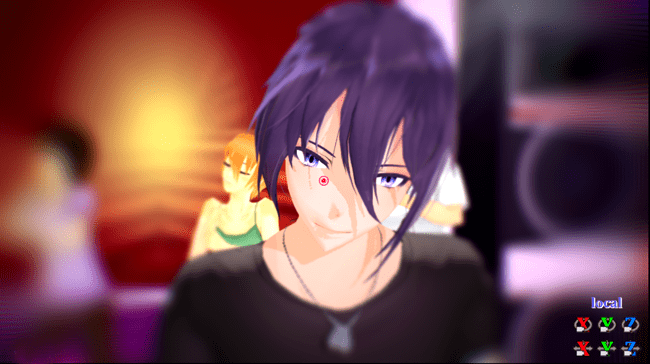
ADDING SOUL – BREATHING LIFE INTO YOUR IMAGERY
But the same set up can be taken even further. We can add even more intimacy to the scene simply by tweaking the lighting level and choosing a more intimate angle for the camera. Let’s intrude for a moment into the intimacy between the two characters to really allow people to see into the “souls” of these characters. The next two images shows how this might be done. The only changes made were:
1. The settings of the o_BleachByPass and o_ToneMap effects.
2. Tweaked the global lighting directions and PostPointLight.
3. I opened Neru’s eyes.
4. The camera angles were changed (same focal length as above though – 24mm telephoto).
Each of the following images has a different level of intensity and if they have managed to pull your interest and made you really look and see these models as “living” characters, then I did all of this right.


Thanks for reading and hopefully you found some useful ideas here.
CREDITS
Miku Append – Tda
Miku Hatsune (C) Cypton Future Media, Inc. (Japan)
Neru Append – Tda/VK
Akita Neru (C) Smith Hioka
Train Interior – SeasideExp
Sky Background – BBC
MMD 9.26
Photoshop 7
MMEs:
KOZU
Auto-Luminous4
G2 Shader suite
dDarkShader suite
o_BleachByPass
o_ToneMap
o_Diffusion
Diffusion 7
PostPointLight
– SEE BELOW for MORE MMD TUTORIALS…
— — —
– _ — –
![]()


This is not a how to do this is a what you did. I was hoping for a tutorial on how to uise the shaders and where to put them in etc etc. There are allot of people coming to this program with no animation programming experience like myself nd while how you did this was awesome, i can;t seem to find any ” This is how you load in and use a shader” type tutorials that don’t go super fast and take things step by step. I will say ty however for telling us which effect and shader you used becuase the picture turned out awesome.