How do I use the Hologram effect? Where can I download the Hologram effect? How do I set-up the effect?
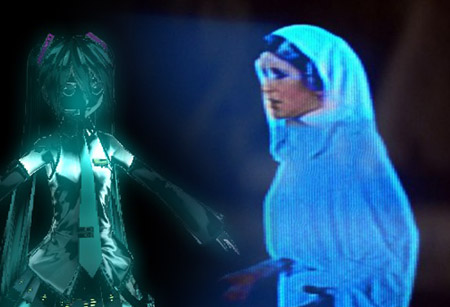
In need of a sci-fi feel to your latest project? Look no further! The hologram effect provides your model with a Star Wars look.
Hologram Effect yields a Sci-Fi image
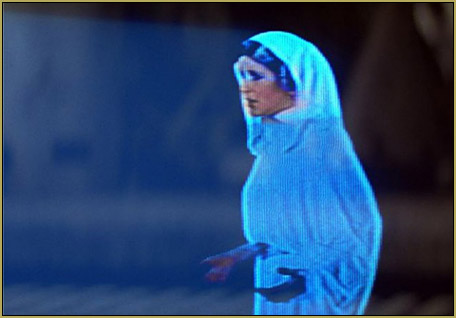
… You can make your own!
If you’re new to MME, stop by https://learnmmd.com/downloads/ to download our English version of MME. If you have troubleshooting problems, leave me a comment and I’ll do my best to help you.
For the tutorial, I’ll be using YYB’s Miku.
Step 1:
Download the effect here on Harigane’s page. The name is in English, it will be hologram_v004.
Extract the effect and place it in your effects folder. (If you don’t have an effects folder, creating one will be super helpful for future effect collecting). The names are already in English so you don’t need to worry about translating the names.
Step 2:
Open MMD. Load your model of choice and motion data (or pose data if you’re creating a picture scene instead of a movie). Models with lighter colors work better than darker ones. In the MMD View  menu, remove the edgeline (set it to zero) and disable the ground shadow.
Set the background color to black.
NOTE: Hologram will work with stages if you control the Accessory Edit order under the Background menu.
Step 3:
Once everything has been set up, it’s time to load up the effect! Go to the accessory panel to load the .x file and navigate your way to the hologram folder. Select hologram.x. Nothing exciting happens here, not yet anyway…
Step 4:
Now we will apply the effect to our model. Go to the MME effect manipulation panel. Under the main tab, double click on the model’s name (it will be under hologram.x). In the hologram folder, select Hologram_Objext.fx.
The model will disappear.
Step 5:
Under the MaskHologramRT tab, remove the effect from the model. The model reappears as a wavy blue hologram.
Step 6:
Under the HologramRT tab, check the box next to the model’s name.
Voila!
Your model is now a hologram!
Whoa! It’s flickering!
We’ve had readers comment that “it’s not working; it’s flickering!” Yes. Part of what makes this effect so cool is the flickering. You can adjust that. Our KillerBeer wrote this note to a reader who wanted the flickering to stop:
Flickering is a part of the effect. Still, if it irritates you, you can get rid of it. Open the Hologram.fx in a plain text editor that won’t mangle Japanese characters (which rules out both Notepad and MS Word, for opposite reasons; I find Notepad++ to be an instrument of choice) and find the following fragment (it’s near the top):

Replace the number 4.0 with 0.0, and the flickering is gone.
You can play with other numerical parameters at the first part of the script to tune effect’s looks to your liking.
– –
Reggie D made a short, silent video to demonstrate the effect…
There you go… the Hologram Effect
IF you have any questions about the effect, or using it, drop a comment and I’ll help!
Thanks for reading!
MAY 6, 2018… A Reader, “Misaki”, adds new info!
The instructions in the readme are confusing and it was hard to open (it uses SHIFT_JISX0213 encoding, not normal SHIFT_JIS). But the key point is that under MaskHologramRT tab, you should load Hologram_Mask1.fx for the model you’re using the effect on. The default is Hologram_Mask2.fx, which apparently just hides the model. The readme never mentions using Mask2.
This makes the noise affect the random pattern.
Then you can also use another shader effect for the hologram under HologramRT, and you can fade the hologram in or out from the bottom with Hologram.x’s Si, or uniformly with Tr, and fade in the original model with Z, and alter where Si fades from with X and Y (not recommended, it works weird, but X=20 and Y=-20 reverses direction). Also, turning on Shadow for Hologram.x changes the color to an average of the original model, instead of blue/green.
But I don’t know if you can put another effect on the original model, as opposed to on the hologram. It seems like all Hologram_Object.fx does is turn the original model off when it isn’t wanted, even though the effect is 18 kB. So if you load another effect instead of Hologram_Object.fx in Main tab, it will show up with the hologram’s glowy aura surrounding it, and if you uncheck the model, the hologram will show up instead; but you can’t fade in the original model using Hologram.x’s Z parameter.
Thank you, Misaki… you have added so much to our knowledge about the Hologram Effect.
I just translated the README into English via Google Translate… DOWNLOAD the Hologram Effect README to see the result. Watch out for that translation as Google Translate does only a marginal job with the Japanese language.
Enjoy MikuMikuDance!
– SEE BELOW for MORE MMD TUTORIALS…
— — —
– _ — –















How can i make it work with a stage?
Same way, only instead of model’s .pmd you operate with stage’s .x file in the Effect mapping panel.
How can I do so? Whenever I change the layer order the hologram is still behind the stage.
I guess I misunderstood you… I thought you wanted the stage itself look like a hologram.
To make the hologram visible while the stage is loaded, select Background->Accessories Edit, then select Hologram.x and press Down until it is below all other .x files in the list. If it doesn’t solve your problem, explain it (and what you wanted to achieve, in the first place) in more details.
Oh, thanks, I dont know why it didnt work before! But it works now UwU
The instructions in the readme are confusing and it was hard to open (it uses SHIFT_JISX0213 encoding, not normal SHIFT_JIS). But the key point is that under MaskHologramRT tab, you should load Hologram_Mask1.fx for the model you’re using the effect on. The default is Hologram_Mask2.fx, which apparently just hides the model. The readme never mentions using Mask2.
This makes the noise affect the random pattern.
Then you can also use another shader effect for the hologram under HologramRT, and you can fade the hologram in or out from the bottom with Hologram.x’s Si, or uniformly with Tr, and fade in the original model with Z, and alter where Si fades from with X and Y (not recommended, it works weird, but X=20 and Y=-20 reverses direction). Also, turning on Shadow for Hologram.x changes the color to an average of the original model, instead of blue/green.
But I don’t know if you can put another effect on the original model, as opposed to on the hologram. It seems like all Hologram_Object.fx does is turn the original model off when it isn’t wanted, even though the effect is 18 kB. So if you load another effect instead of Hologram_Object.fx in Main tab, it will show up with the hologram’s glowy aura surrounding it, and if you uncheck the model, the hologram will show up instead; but you can’t fade in the original model using Hologram.x’s Z parameter.
Great info… Thank you! … I really appreciate your input on this effect! … I have added your text to the body of our Tutorial… and I have translated the README and made it available to the readers of that tutorial. Thanks, again!
I also added the little demo video I made last year…
umm when i remove effect under maskhologramrt my model isnt there
Thank you! Now, my background is almost finished \( ^w^ )/
Wait a minute, why is my model looks like glitchy model after I take all the step ._. help
In what way does it do so? Can you provide a screenshot (with detailed spotting, if possible)?
It’s happening to me too. The face and everything is flashing, and it looks strange.
This effect DOES flicker. See my short test video: https://youtu.be/L1-VuIR7U1o
Watch it full screen… you can see that the model flickers.
As Reggie said, the flickering is a part of the effect. Still, if it irritates you, you can get rid of it. Open the Hologram.fx in a plain text editor that won’t mangle Japanese characters (which rules out both Notepad and MS Word, for opposite reasons; I find Notepad++ to be an instrument of choice) and find the following fragment (it’s near the top):
// ノイズ関連パラメータfloat StripeThick // 縞太さ
string UIName = "縞太さ";
string UIWidget = "Numeric";
bool UIVisible = true;
float UIMin = 0.01;
float UIMax = 10.0;
> = 4.0;
Replace the number 4.0 with 0.0, and the flickering is gone.
You can play with other numerical parameters at the first part of the script to tune effect’s looks to your liking.
Cool. KB, Thank you! I have added your bit of a tutorial, there, to that Hologram tutorial.
https://learnmmd.com/http:/learnmmd.com/hologram-effect-projected-image/
oh, oops i forgot it flickered sorry //rip