





 I love Raycast but how do I compensate for the Raycast color desaturation? My model’s skin goes white when I use the Raycast effect. How can I bring color back into my model when I use the Raycast effect?
Modifying model texture color to
Compensate for Raycast color Desaturation
I am learning how to use the Raycast Effect.
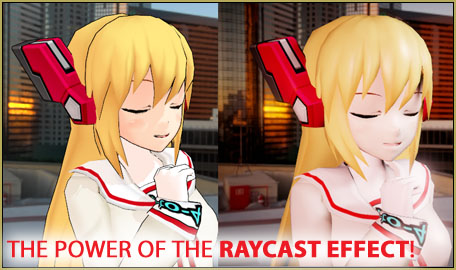
Raycast takes your “ink and paint”-looking model and transforms it into an almost photographic  image of a 3D object. I often experiment with my Crimrose model (CyberStep, Inc. )… and, when I subject her to Raycast, her already pale skin gets even lighter… she looks like a porcelain figure.
Today I experimented with the idea of modifying my model’s texture file images so as to compensate for that Raycast color desaturation… and had great success!
How do I use Raycast?
LearnMMD’s GloriaTheAnimator, GTA, for short, wrote an article to introduce us to the Raycast effect. I find that Raycast is a complicated effect with “more than one way to skin a cat”… so these are the steps I go through to invoke Raycast:
- Open MMD and create your entire animation, saving Raycast as a final step. (Raycast is “computer intensive” and your machine will hardly be able to crawl once you load Raycast. If you load it early in your project, you will go crazy waiting for your computer to do every little step. Save Raycast for last.)
- Load a Skybox model… and ignore it, for now… just let it be there, in the way.
- In the MME menu (upper right of MMD screen) Select Effect Mapping, select your model, and Set Effect by navigating to your Raycast folder and inside the Main folder, choose main.fx. Your chosen model turns black. Close the MME menu.
- Now, as an Accessory, load the ray.x included in your Raycast folder. Your computer, at least MY computer, will lock up for several minutes as it crunches the numbers for you. When it comes back to life, you will see your model is now enhanced; dark, but enhanced.
- Load the ray_controller.pmx model. Fiddle with the many morph-slider options. Build the light on the stage and model… no “tutorial” here for that… you just need to try everything and see what you like.
- From inside the Lighting folder, load the DirectionalLight.pmx model. Before you do anything else, turn up the R+, G+, and B+ morph sliders to mid range. You will see nothing on-screen… until you use the Y-Rotate bone control to swing the light around so that it shines on your model. Use the XYZ rollers to aim and position the light on your model… and now go back to those R+, G+, and B+ sliders to get the color of light you desire… go back to the Ray_Controller model adjustments to modify what you see… keep working both ends against the middle until you like what you see. Remember to go back into Camera mode to see the REAL look of your project. You will be striking a balance between the Camera view and your Ray_Controller view. Keep at it… this is the “fun”… yes?
- Load a second DirectionalLight.pmx model to light the OTHER side of your model… and go through all of those adjustments, again… Looking good, right?
- See the GTA tutorial for a method to hide from sight the Skybox model, the Raycast_Controller and the DirectionalLight models.
After doing all that…
 My image was looking good… but, poor Crimrose, she had a deathly complexion… as I said: porcelain-like.
The more I tweaked the brightness and color of the many lights that illuminate my model and scene, the more it became clear that I didn’t want to distort ALL of my colors just to give my model tanned skin. I decided to re-color the model’s texture files to give her that tan.
Photoshop or GIMP those textures…
My Crimrose is a simple model… she has one PNG image for her entire body and another image for her face colors.
I have the original image, above, and three tests that I made as I progressed from naked-white skin to nice, realistic color and shading.
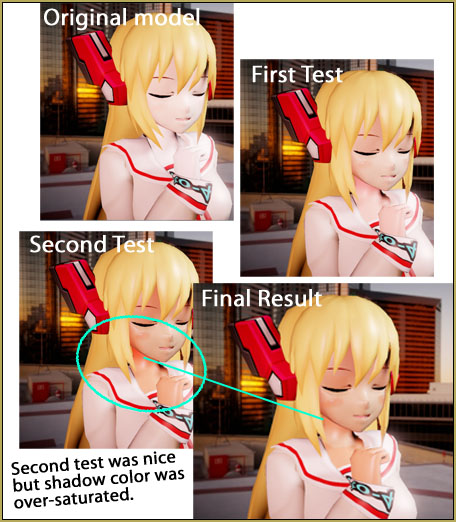
I first started with the FACE.PNG… in the First test, I simply adjusted the midtone levels (Photoshop Control-L… GIMP Tools>Color Tools>Levels)… sliding things for a darker, more saturated look. … and… That wasn’t enough!… better color, yes… but still too light.
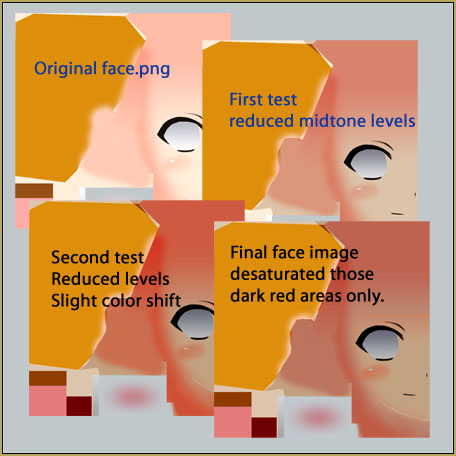
I next adjusted the levels a little darker and shifted the color to a more tanned-skin color… tried again… and found the skin looking good… but those strong red shadow areas were, indeed, glowing red on the model! … So, for the final adjustment, I desaturated just those glowing colors without shifting the open face colors, at all. … … Perfect!
Color shifts on the body, too!
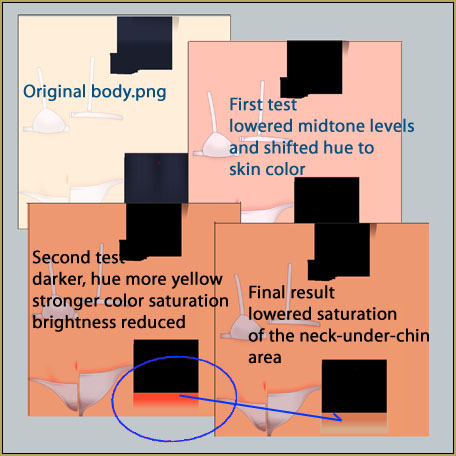
You can see that Crimrose has pale skin… and the transition into Raycast turns it white … So, in that first test, I simply adjusted levels to make it darker, and then shifted the over-all shade of the color to a more natural skin-tone. … The result in the First Test was still too pale. … So, I went overboard and REALLY darkened that body.png image… and in the Second Test, it looked great! … except that the bit of texture on her neck was glowing red… so, for the Final Test, I desaturated the color for that neck shadow. … Perfecto!
Aaahh… so nice!
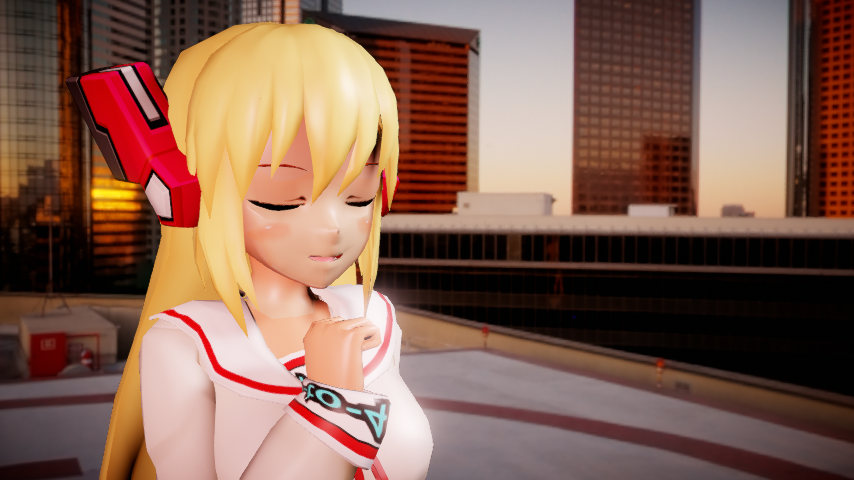
Keep the Faith!
So, what do you think? Does modifying your model so as to “look good” in Raycast count as Editing your model? … Not an issue with my Crimrose… I am allowed to edit as long as I credit… but in this instance, I do not think ANY model creator would mind that I altered her model so it can look its best in my animation.
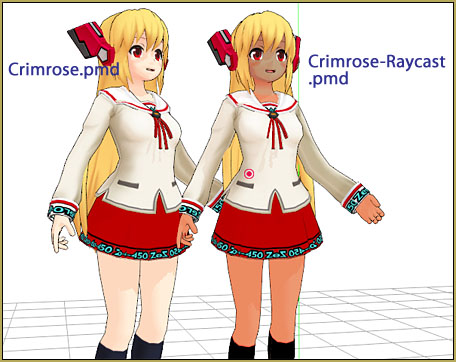
I collected all the final files together and SAVED my model in its own folder as Crimrose-Raycast.
Have fun with Raycast and MikuMikuDance!
– SEE BELOW for MORE MMD TUTORIALS…
— — —
– _ — –




When I put the ray on, it goes all green, including my model’s hair
I have a vampire model and I made a pose where he’s smiling. I need to fix the teeth a little bit because they’re so bright. I’ve tried adjusting the lighting but nothing seems to work. Good tutorial though.
yeah… do teeth HAVE a texture that cold be colored… in PMXE do the teeth have an attribute that could be altered?
What I’d recommend doing is using a custom Raycast material and editing the “occlusion” property to be something less than 1.0. Just edit the file while your model is loaded, with autoload effects enabled, and you’ll see your updated values. Good way to tune to the exact value you need.
Sorry for the late response. I am no longer having issues with the teeth.
I have a bit of a problem…I’ve got two models in mmd right now, and they have separate issues. One of them has glasses, and for some reason the glasses are showing through his face no matter which way his head is turned, as if all parts are in front of the face at all times.
The second model’s face is fine, but any other exposed skin is many shades paler in raycast and doesn’t reflect the light at all. It stays one static color regardless of how I adjust the light.
How do I fix these things? I have tried editing the texture for the second model, but that did nothing.
There are a few potential causes. First, make sure that you aren’t using any other effects, as they will rarely play nicely with Raycast. Second, make sure that all models are using main.fx in the Main render and an appropriate material (like material2.0.fx, the default) in the Material render. They should be hidden in the envlight and fogmap renders.
Getting raycast to play properly with alpha (like glasses) can be tricky, and doing the above might not make them behave properly, but it should keep them from showing through other models as if you have x-ray vision.
When I add the ray.x file it suddenly made the face of the model all green and along with a few of the models accessories. I’m confused and when I tried to drag around to look at it, the model was like the Windows 7 error screen you got when it duplicated as you dragged it. It was hard to see but, the green was very easy to spot. Help?
That sounds like you haven’t loaded the Skybox model as shown in that tutorial… the second point in the instruction list under the subhead: “How do I use Raycast?”. That model is in a Skybox folder in your Raycast folder.
Hmm, I don’t see how this is an issue related to sorting. However, I can answer some of that if you’re curious.
MMD doesn’t do any vertex sorting. It relies on manual sorting of materials and models. Materials are sorted by material order. Models are sorted via background->accessories edit and background->model draw order. (Why it handles .x files differently than .pmx files I’ll never know, nor why it uses .x files at all.)
There’s no way to change the draw order via MME and HLSL (short of writing everything to its own buffer and then sorting them, a ridiculously maddening task for which nobody has the video memory.) And since neither MMD or MME are open source, there’s no way to modify the code to implement vertex sorting.
You can always
– turn down the direct sunlight using (-) instead of (+)
– increase temperature
– decrease gamma (-)
also an easy way for environmental lighting is go to that tab in MME and set the environment lighting instead of putting directionallight.pmx
then adjust environmental diffusion and ssao and shadow and stuff
if it’s too porcelain like, go to material tab and select different materials, like skin and glass and metal
choosing beige option for skin helps the desaturation a lot and makes skin much redder
That’s awesome… Thanks!
I have also found that the light I was using, DirectionalLight, is the biggest offender. SphereLight, RectangleLight and TubeLight are less severe… nicer light.