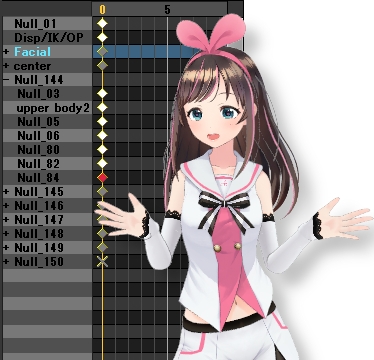
Many of the models that you download for MMD do not have comprehensive translated labels for things like bones, morphs and materials. It is really hard to work with a model when her bones are labeled: Null_82, etc.
The situation is even worse when all the morph labels are incomprehensible. Often you have to go through a bunch to find the one you want.
Fortunately, the PMXEditor has a very useful tool called the Batch Name Editor. This tools makes it really relatively easy to translate Japanese models’ labels into English (or any other language for that matter).
Translate Japanese Models using
PMXEditor’s Batch Name Editor
What this tutorial will do is to discuss the following:
- How to use the Batch Name Editor
- How to get translations done easily using Google Translate
- How to optimize translations
- How to customize the built-in translation list (_JP-ENConvert.txt)
- Best practices
IMPORTANT NOTE: This tutorial is written for PMXEditor EN v2.0. Older versions of the PMXEditor do not use the tool discussed in this article.
Do I have to translate the labels?
Frankly, no. If all you want to do is to run “canned” motions with your models you probably do not need a high level of detail. The alternative is that you can switch the MMD UI over to Japanese and all the labels will be clearly discernible.
But most of us probably do not want to have to learn to read a foreign language in order to be able to easily use a model.
Why do you want to translate the labels?
If you are posing models or developing original animation with them you will benefit from having the labels translated if you do not read Japanese. Especially with some of the more advanced shaders like Ray-MMD, it also makes things a lot easier if you translate the material labels into a language that you can read.
If I translate the labels will my model still work?
Absolutely!
MMD interprets a model in terms of numbers. It doesn’t care what the labels are on either the Japanese side of the UI nor the English side. So for example, an MMD model’s bone structure is interpreted by a hierarchy of numbers starting at 00.
Bone 01 in the KizunaAI model above is labeled “センター” on the Japanese side and if translated, this reads “center” on the English side. But MMD itself doesn’t read the labels, it just references the bone as null_01.
So if you look at the frame display behind KizunaAI in the at top of the article, bone Null_82 is actually her “右足” bone, which has not been translated yet on the English side. But MMD doesn’t care what the labels say on either side of the UI, all it interprets is the number of the bone.
How do you know what the bone number is?
The easiest way to find the number of an asset is to use the PMXEditor. But, this is irrelevant. All we want to do is to make sure that we know in a language convenient for us humans which bone Null_82, for example, is referencing.
Every one of a MMD model’s asset sets has its own numbered list and these can easily be viewed in the PMXEditor. You can even sort these lists if for some reason there is a need to do so.
Cautionary Notes
The only two list that you should not sort unless you know exactly what you are doing, are the bone and morph lists. The bone list has a specific hierarchy and you can cause MMD to crash if you mess up this hierarchy.
Note the the PMXEditor has a single command that will automatically sort out a model’s bone hierarchy in the correct order so that you do not have to do this manually. This is a function that you will want to use if you extensively edit and add bones to the model as it makes the bone list “logical“. This makes the model more efficient as it reduces computation times.
In order for your MMD model to “sing” properly its morphs must be compliant with the VSQ data standard. Once again here, the labels are not relevant but the hierarchy is; so simply unless you know exactly what you are doing, do not alter the morph hierarchy list (at least the top part of that list).
Using the Batch Name Editor
This editor is accessed via: Edit(E)>Batch Name Editor (N)

There are a lot of basic controls but most of them are redundant so this tutorial will only discuss those that you will normally use. It is really simple to use and it only takes a few moments to familiarize yourself with the controls.
Specifically the lists that we want to translate are easily accessible using the drop box:
- Material
- Bone
- Morph
- Display
How to use the Batch Name Editor
First select the list you want to translate. We will start with the Materials list, so use the drop box to select this and the fields will populate with the Japanese labels (and any English labels if these already exist).
The title row under the menu bar of the editor reads:
Index / JP Name / JP Replacement / EN Name / EN Replacement
This top row functions much like a spreadsheet (which is what this interface really is). You can only input data into the Replacement fields. You can enter data as single entries but for our purpose, it will be much more efficient to do this by entire columns.
The image below has KizunaAI’s model’s Material list already selected for translation. All you have to do is click on JP Name. This will select all the data in the entire column. Press Ctrl-C on your keyboard to copy all of the fields.
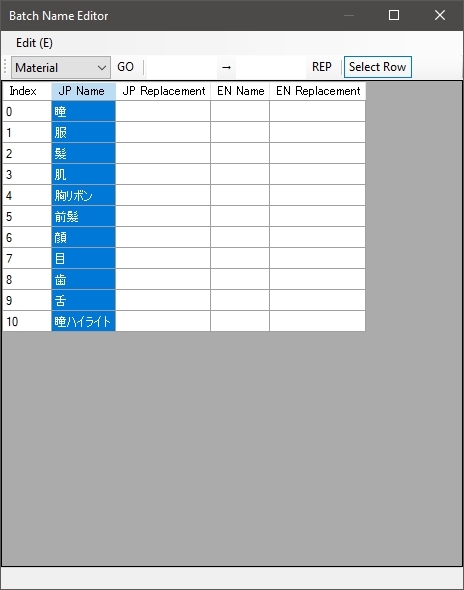
Open up your web browser and go to GOOGLE Translate. Paste the clipboard entries into the app and copy the translated text.

Paste the results back into the Batch Name Editor using Ctrl-V under the EN Replacement column.

Finally, press the GO button next to the drop box and confirm the changes in the pop-up dialog and the translated labels will be appended into the model file.

Now if you do not like any of the individual translations that GOOGLE Translate has offered, just type your preferred translation into the EN Replacement field next to the entry that you want to change and then press GO.

So for example I like to put a symbol code next to my materials so that at a glance I can quickly identify them by type. For example, all materials that needs skin tone specifications when using MMEs on my lists uses a hash-tag symbol as a prefix. So the finalized materials list on my model will look as shown below.

Ultimately, it is your personal copy of the model so do whatever you want. Your personal preferences will not affect the model’s functionality in MMD.
Special notes regarding the BONE and MORPH labels
You can use the same basic technique to translate all the lists but with the BONE and MORPH lists you will want to do one additional step. This is because the Batch Name Editor has a standard list of translation for common bones and morphs which will be different from the GOOGLE Translate terms. Plus sometimes the translations are wrong. So below is the GOOGLE Translate list inserted into the model verbatim.
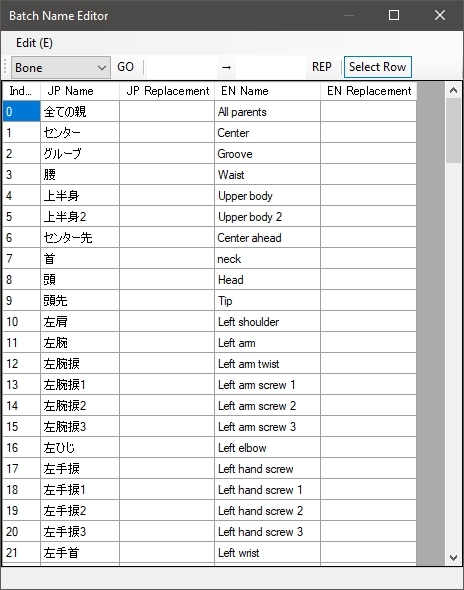
Under the Edit(E) menu is a command to access the PMXEditor’s translation list: Japanese -> English Name (Use Dictionary)(E)
Simply select that option, confirm at the pop-up and the dictionary entries will be listed in the EN Replacement field. Press GO to accept them.
Note that if you do not want to bother using GOOGLE Translate to do the translations, you can just use this command to do the translation for you. But the drawback is that if an asset is not listed in the dictionary the Batch Name Editor will default to using the Japanese text for the asset; which is counter-productive.


You especially will want to do this with the MORPH labels as GOOGLE Translate translated labels will vary widely from the MMD conventions. Especially for the common mouth and eye facials. It is an extra step but it will make things a lot easier in the long term.
Which list should you normally translate?
Only the following lists as these are the ones that you will normally see and need to access in MMD:
- Materials
- Bones
- Morphs
- Display
… and also this one (under the Info tab):

The Comment field is optional as you will only see this when you first load the model into MMD, but the name field appears in MMD’s model list so you really do want this to read correctly.
Remember to save the model after you make your edits; preferably under a new file name so that in the event that you made an error, you have the original model file as a back up.
I use this convention: kizunaai_EN.pmx
These are all the changes we just made for the KizunaAI model…
… which makes her much, much easier to use in MMD (for those of us who cannot read Japanese).


Editing the Batch Name Editor’s dictionary
We are just going to mention this for the sake of being comprehensive.
It is possible to edit this dictionary but if you are not careful, it is possible to crash the PMXEditor or cause the Batch Name Editor to behave incorrectly. If you are familiar with tinkering with programs it is very simple but honestly, don’t do this if you don’t know what you are doing.
The dictionary list is found in the _data subfolder and is named: _JP-ENConvert.txt
It can be edited using a text editor such as either Notepad or Notepad++. By default it already has 345 entries. You can edit the existing entries or append to the list. The format is straight forward:
- One entry per line
- Japanese text first, English text second
- Note that there is a space after the comma
全ての親, motherbone
グルーブ, groove
センター, center
Probably it is most useful to append this list if you edit or work a lot with Tda style models as many of their special bones and morphs are common to this style and these are not included in the dictionary.
The dictionary list by default is fairly comprehensive and does cover most of the common bones and morphs already. The method discussed in this article more than adequately covers for any shortfalls.
CREDITS
KizunaAI_ver1.01: (c) Kizuna AI (http://kizunaai.com/)
MMD 9.32 – Programmed by Yu Higuchi
PMXEditor EN v2.0 (ver 0.2.5.4) – Created by KyokuhokuP / Translated by Inochi-PM
pmotskin
full_simplesoftshadow
GIMP 2.10.6
IrfanView64
Disclaimer: The use of the MMD Kizuna AI model in this article in no way should be interpreted that this article has been endorsed by her copyright owners or her YouTube Channel.
The use of her image on this website is in compliance with the license included in the readme.txt included with her model. Further, her usage on this website is strictly for non-commercial and educational purposes only, as applicable under US Fair Use guidelines as we understand them.
To be noted as of this writing, the URL to the terms of usage page on the kizunnaai.com website as listed in the readme.txt issued with the model is not working: 404 Error (last checked on 07/20/2020).
The meaning of the language used in this disclaimer will be as interpreted solely at the discretion of the author of this article.
– SEE BELOW for MORE MMD TUTORIALS…
— — —
– _ — –










So does replacing all of the names in the JP fields to english break the model itself? I notice after doing this that I’m no longer able to use the “mirror” function correctly and it will only mirror the same appendage (i.e left leg to leg left) versus the intended action (left leg pos to right leg pos).
It absolutely does. Lot of functionality rely on bones in PMD/PMX models having standardized names. For example, if you try to load into MMD a model with Japanese fields filled by English names as you suggest, and apply a .vmd motion to it, you will find that the model does nothing at all, as the engine looks for bones with familiar names and does not find them. The “左腕” in the Japanese name field is the only way for the program to know that this particular bone should act as a “hand”.
How do I make this translate the names not labels? I’m alright with it losing compatibility with with MMD native animations. I just want EVERYTHING to be in English when I import it into Blender.
If I understand you right, you want English names in Japanese name fields. For that, you have to select *all* cells in EN Names column, copypaste them into JP Replacement column, and hit GO.
Thank you, thank you for this.
I’m porting several ‘vehicles’ found on BowlRoll to Poser-compatible rigged FBX using Truebones’ ($$) ‘PMX to FBX’ utility (*). Snag is models have _many_ non-standard bone names. They convert okay, but are then almost impossible to use in Poser. So, I’ve been individually copy/pasting names between PMX Editor and Google Translate…
Yeah, right…
This tutorial should greatly simplify that task.
*) Current version only converts hues, cannot yet port texture calls, which must be added in Poser’s material room by comparison with PMX material list. I’ve sent Mr.Bones the ~2018 PMX info, as looks like he was working from the older version, pre~2014…
Wow… great info… Thanks!