


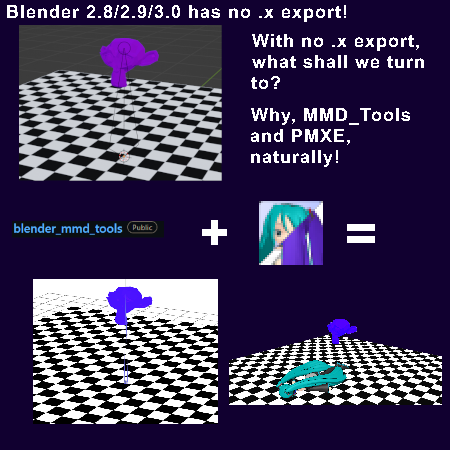
There’s no .x export in Blender 2.8/2.9/3.0… you cannot directly Export .x files in Blender 3! How do I export a .x file in Blender? Help me: I want funny monkey head in MMD.
They removed .x export in blender 2.8 and up
:(((((((((((((

This is the second worst thing to befall humanity ever since the fall of the vikings!
Trust me, I have a fair bit of frustration with this, as well. But I developed a technique to work around it, all thanks to those who are developing PMXE adding one function that makes this all possible…
My method to Create and Export .x files in Blender 3 using PMXE
Unlike the last article, I will be taking pictures and whatnot as I go along writing the article, mostly because I figured out some of the stuff only a handful of minutes ago which simplifies many things.
Do not be mistaken by the titles, this works for 2.8 and up, in case you’re running, say, 2.83 LTS, as long as the addon works.
It’s not the same old Blender… the old tutorials are out-dated…
Okay, so, back to focusing on the task at hand. You, using Blender, tried to follow the instructions for Blender here in LearnMMD, but many things have changed since then, including a massive re-write including the entire UI system. In fact, if I remember correctly, many parts of code were rewritten, meaning they had to rewrite and/or update a lot of the model export systems, and .x was left behind. As well as a lot of other features, such as the Blender Game Engine, them directing you to use Godot instead or whatever. Okay, I’m getting distracted.
All you need to know is that it’s an API-breaking update, so a lot of stuff broke.
If you’re curious, the latest version of Blender that has support for the old .x export add-on is 2.79 (Which is here), but modeling is way less confusing in the new ones if you ask me. In fact, 2.8 and upwards contain a lot of new stuff you might want to use. Way more intuitive. If you do decide to use 2.79 or older, this article will lose a lot of relevance, and you’ll have to translate back into old UI again. Otherwise, continue on…
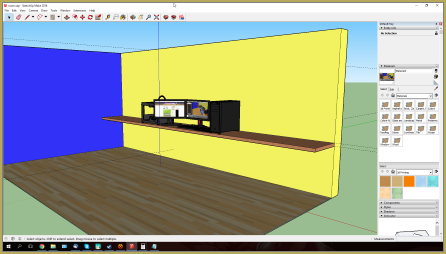
I’ll maybe re-do the entire LearnMMD Blender tutorial sometime later unless someone else does that task, but for now, here is a completed “”””stage”””” with one basic material and one textured material, viewed in Material View mode. I recommend you put that on, it’s on the top right among the spheres, so that you can see the textures and colours to work with.

The monkey head will be our basic material, and the chessboard underneath uses a texture. There’s no spheremaps or toons used, but the tool we will be using supports that, so I encourage you to experiment with it.
The tool I mentioned last sentence
Now enters the venerable MMD Tools Blender Plugin! WAIT… Hold on, says here it’s not maintained, and to get your add-on from HERE instead… And I am going to be fully and completely honest, I’ve kept using the same copy of MMD_Tools even across versions. Whatever, the new one smells the same, so go get the new one.
Sorry for the bunch of confusion. Nevertheless, whether you choose to use the powroupi or the UuuNyaa version, they should both work the same.
It’s already been featured here before, and there are already a number of articles featuring it. However, in a brutal act of sinister comedy, the newest Blender related article I could find came out but two months before the 2.8 update (Going by the past releases which the blender foundation keeps archived), but I’m pretty sure the old articles still hold water, you just have to work out where to find the same stuff in the new UI, but things may be different.
We’re gonna go through a quick recap to install the thing, this will work for Blender 2.8 to 3.0 at least, however it should work for later versions. But if you’re here, another 5, 10 years into the future… Why? And also, how did it go?
The easiest way for the UuuNyaa version could not be more simple:
- Open up the User Preferences menu (Edit->Preferences)
- If it didn’t land you there already, navigate to the Add-Ons menu
- Click install
- Navigate to the .zip file of the Add-on
- Click it, then click Install

Now this is all well and good, but if you’re using the older version, or something went wrong, there is a manual method I’ve been using.
If you NEED to, you can install it manually…
First, you need to get the plugin in a folder form. The UuuNyaa release has it in the .zip, and the powroupi one requires you to download the entire thing, then take out the mmd_tools out from that. In the end, your goal is a folder named mmd_tools with all of the plugin files inside.
After that, you need to go into Blender’s install folder, or if you got the portable version, wherever that is. (In case you were wondering, portable versions of programs “install” the same way as MMD, having everything you need in there to begin with.)
I use the Steam version, in which case you simply have to right-click it in the library, click Properties, Local Files tab and click [Browse…], however if you’ve installed it standalone, much like how MMD “installs”, it’s simply in the folder where Blender is.
Hold on, let me get some visuals here…

Excuse the general messiness, but in the end, all you need to do is to find the addons folder in your Blender installation, then put the mmd_tools folder inside there. You’ll find it in the folder with the version number, then continue down the path, going down Scripts and Addons. If you’re doing the manual method, you need to restart Blender to make sure it doesn’t bring up any errors.
When all of that is said and done, you can go back to the Preferences menu and enable the addon. If you can’t find it, make sure that the Community option is enabled in the filter, and search mmd in the search bar. If it’s still not there, you did something wrong. Also, when a Blender version updates, the addons don’t usually get carried over, but they make a new folder so you can easily bring in the addon from the folder of the previous version.
With the addon enabled, you should be seeing a new button in the sidebar!

Clicking it will reveal a very interesting menu, and while you’re free to explore it, we’ll focus on the relevant items as they come in, because quite frankly, I don’t really have the full idea over the tool itself.
Everything should be working fine, so…
Porting the thing over to PMX
That’s right, we’re going to turn it into a .PMX file.
This is where the fun begins…
So while previously I’ve been simply turning it into a PMX model without messing with the materials, then setting it up in PMXE, today we’re going to use the aspect of the addon that I haven’t touched before! I am absolutely sure nothing will crash and burn!
In the MMD_Tools tab thing, you will find the Operator, which lets you create a model. Click that, name it whatever you wish, and it’ll create an MMD root object with everything necessary for MMD to not crash and burn trying to load it. Now is most likely a good time to mention that you’re going to want to stuff all the unrelated items into a different collection and disabling it before proceeding… Next, with the root object selected, hit Attach meshes to model, and this will take all the meshes and put it into the growing MMD model.

no text B)
That should be that, somewhat. We’ll fix sizing issues later. For now, let’s make sure all the materials are in order.
However, by default, all the materials for all the meshes are there, they’re just not named, ordered or have any colours in them, however the UV mapping is still intact, so if you simply want the geometry over and fix the materials in PMXE instead, skip over to the Sizing part, as this next section will be about textures and materials, as a recap and to make sure people won’t flip and have to spend more time finding out why all their materials didn’t port over exactly. With that being said…
Fixing the materials
A skippable part, if you don’t mind doing some work later on.
When you have a mesh selected, you can navigate to the Material Properties tab, represented by a sphere with a 2×2 checkerboard pattern. In this tab (seen to the right), scrolling down, or with a high enough screen resolution, looking down, you’ll find the MMD Material and MMD Texture properties. Modifying these will change how it looks in the viewport, and how it is in Blender itself, so this is pretty convenient for our purposes.

We’ll do the textured material first. This material doesn’t have any transparent aspects to it, so we’ll leave the material as it is, unless you already know what you want.
In the MMD Texture options, the first option allows you to add an image file for your texture. I just use .pngs the entire time. Even in this article. Click Add, then navigate to the texture file you’re using. If you’re using, or you’re intending to use, spheremaps and toon textures, you may set those in too at this point.

The material should look noticeably different in Blender (Unless you don’t have material preview or rendered mode on, if so, put it on material preview), and that is because now, MMD_Tools is translating the MMD material settings into Blender, or at least it makes a valiant attempt. So modifying anything within the MMD Material or MMD Texture settings will affect your viewport and rendering.
However, if you’re fiddling with the materials on Blender’s side instead of via the MMD Material settings, it’ll change how Blender renders it, but not MMD.
…
Hey, did you get it yet?
If so, you can skip down to where we fix the size.
If not, keep reading as usual.
Now time for the monkey head. This one uses basic colouring instead of texturing, and this is our practice for texture-less materials.
Unless you’re going to eyeball it, you’ll need to copy over the colours before you fiddle with the MMD materials while it’s still the colour you want, because as soon as you start modifying the MMD material section, it’ll switch to the MMD shading, thus changing all your settings for the material including the colours. Alternately, you can move the setting window thingy with the rows of dots up to the normal material and use the eyedropper, since you can’t scroll while using the eyedropper tool.

Phew.
That should be the materials. Of course, there’s a bunch of stuff I didn’t mention, but essentially, this is how you configure the materials with MMD_Tools in Blender.
Keep in mind, though, that the rendering in Blender and the rendering in MMD is completely different, so no matter what, you may want to mess a bit more in PMXE after.
Now, let’s get to the fun stuff, shall we?
Fixing the size
Unless you’ve already done everything correctly and sized it all in relation to MMD, now is the time to make sure it’s the correct size.
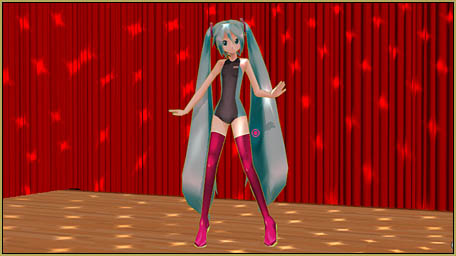
Another thing MMD_Tools can do is to import MMD models, with some extra settings to boot. According to the 1 MMD unit in real world units Chart, at least for the powroupi one, if you want to import MMD models accurate to MMD sizing, you need to change the scale value in the importer to 0.08, as one default Blender unit is 1 meter compared to MMD’s 8cm. No, seriously, one MMD unit is 8 centimeters. Funnily enough, assuming the Animasa model when they refer to the “official model”, the sizing for the model is accurate.
Now there’s a fun thing to wrap your head around if you ever start modeling.
Anyways, size accuracy. I recommend just using Animasa Miku, but if you’re modeling around a specific model, you can use that too.

Now, chances are that the imported models colours and textures WILL look wrong. However, unless you actually intend to use the model for anything other than sizing, this isn’t anything to worry about.
If you put the scaling to 0.08 when importing, then you might see your model being way too big. All well and good, just select your model and size it according to your wishes, then continue on.

With all that said and done, we’re finally at the home stretch! Or if you skipped to this part, welcome back!
Exporting to PMX
There’s this, and one drop by PMXE, and you have a .x file! Or, the tutorial ends with this if you want a .PMX file instead.
Select the model, and now click the Export button in the MMD_Tools tab. Make sure to set the Export size to 12.50 so that it scales correctly! (Assuming you use Blender’s default 1-meter units), then hit the Export button in that menu.

You can now open it up in MMD or PMXE. To get it into a .x file, open it up in PMXE, and you might as well do some last few adjustments to the materials there, to make sure everything works as intended.
From PMX, to X!
We’re finally here! It’s the moment you’ve all been waiting for! Where we finally get our .x accessory/stage file! Finally! After all this work! Are you ready, kids!?
In PMXE…
click file then click export
name the file as you wish but make sure to put .x instead of .pmd or .pmx
save the file
that’s it you’re done you’re a winner

whoopee
we won
victory at last
creds:
animasa miku
me (nordgeit)
blender (monkey head is basic mesh)
my folders
okay bye have fun
– SEE BELOW for MORE MMD TUTORIALS…
— — —
– _ — –
![]()


Why don’t you create a how-to-use MMD model in Godot? After all i’m making a Vocaloid fangame
Hello! … We DO have one article about printing 3D models of MMD models.
https://learnmmd.com/http:/learnmmd.com/3d-printing-mmd-models/
— Reggie
What if I have an FBX accessory item that I’d like to import into MMD? Is there a way to do that? :( I import the fbx, but it will not let me convert model from MMD Tools
Sorry for the incredibly late reply, haven’t checked this in a good while as I should have been doing
You haven’t been exactly detailed with the problem, but it shouldn’t be worse than importing the .fbx model into Blender, then run it through MMD_Tools… Though I suppose you’ve tried that.
To be honest, there’s not much I actually do know. Especially when it comes to importing models from elsewhere.
The mesh itself doesn’t seem to be much of an issue, but converting the armature seems to be an entire adventure I’m not prepared to give advice for.