


![]() How can I control the camera in MMD? How can I make an MMD followcam? What can I use IK bones for? How to make IK bones? What is follow cam? What is OP? What is camera tracking? How can I follow a model in MMD?
How can I control the camera in MMD? How can I make an MMD followcam? What can I use IK bones for? How to make IK bones? What is follow cam? What is OP? What is camera tracking? How can I follow a model in MMD?
Have you played with outside parent settings yet? What about camera tracking mode? Camera follow bones? Have you ever wondered what kind of creative things you could do with an IK bone? Have you been irritated at the limits of dummy bones?
A better MMD followcam
 If you’re unfamiliar with some of those things, you might want to follow the links to read up on them, because in this tutorial, we’re going to be doing some advanced work with them that will simplify our job as Director of MMD videos.
But you don’t have to follow those links, because if Teto and I do our jobs well, you’ll understand them all in a lot more depth by the time we’re done. If you have experimented with these, you may have been disappointed like I was. MMD followcams are a cool idea, but they’re way too jerky to be of much use in any but the slowest motions. Camera tracking is interesting, but it’s hard to always be stuck on top of the camera.
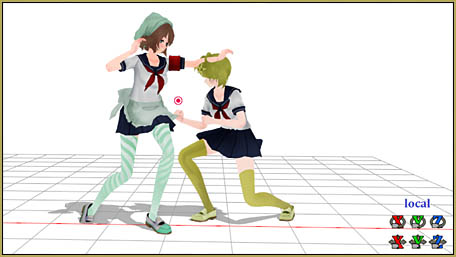
Teto’s been doing a lot of bone research lately. I didn’t think anything would come of it– she’s always coming up with crazy ideas with zero practical application– but she says that this one is different. It’s an advanced follow cam, using a homemade dummy bone that she brewed up. And she’s going to tell you how to make one and how to use it.
Making the advanced MMD followcam
You might not have realized it, but you can make your own dummy bones, and they don’t have to be anything like the simple, default implementation. Today, we’re going to make an IK dummy bone!
We’re going to make a weird kind of model. It’s not going to have any vertices or materials. It’s only going to be composed of bones. That’s okay! MMD is happy to work with this kind of model.
Making the model is very simple. It has five bones. And that’s it.
Motherbone: Just like any other model. Parented to -1 and located at 0,0,0. It should be a visible move bone.
IKY. Parented to the motherbone, and located at 0,0,0. This should be a hidden rotation bone.
IKX. Parent to IKY and located at 0,0,1. This should be a visible rotation bone.

Making IK bones
Next, we’re going to need an IK bone. Every IK bone needs a few things:
An IK chain. This is a chain of bones that are going to be controlled by inverse kinematics. Chains can be made up of a single bone or of many.
A target. IK bones work by manipulating their chains to try to get their target as close as possible to the IK bone itself. The names are a little backwards: with a leg IK bone, it’s trying to get the ankle as close to the position of the Leg IK bone as possible, so sometimes it seems like the IK bone itself is the target that the ankle is trying to reach, but when MMD asks for a target, it wants the ankle. Since it’s trying to get this target close to the IK bone, the target needs to be affected by the bones in the IK chain.

A loop. I’m not sure, but I think that it has to do with how many times MMD runs through a a code loop looking for the best solution. People tend to put a number like 40 in here, and it seems to always work fine without affecting MMD’s performance. But you have to put some number in this box, and it can’t be zero, or else MMD won’t know what to do.
An angle. Again, I’m not sure what this does, but you need one. However, if you don’t have one, PMXE will enter a number (like when you switch bones and then come back to this one). And those numbers work fine.
So in addition to our motherbone and our center, we’re also going to need an IK bone and an IK target:
IK target: Place this at 0,0,1 and parent it to IKX. Since there’s nothing useful you can with an IK target, it might as well be a hidden bone.
IK bone: Place this at 0,0,1 and parent it to the motherbone. It should be a move IK bone. Put a loop in (40 works) and give it the number of the IK target as its target. Then, copy the index of your center bone, right click in the IK’s link box, and select add from index. This tells it that you want the IK chain to affect the center bone. Repeat that with the IKX bone– now, we have a simple IK chain consisting of these two bones.
That’s it! A complete model, made in five minutes. Make sure to put your bones in the display panel, give the model a good name like “MMD followcam bone,” and save it. Time to start up MMD!

How the advanced MMD followcam works
There’s a little bit of set-up to the advanced MMD followcam, but not much! It’ll help if you understand exactly how the camera works.
The default MMD followcam works by both moving and rotating with the bone to which it’s attached. That leads to jerky, unpleasant camera movement. Instead, our advanced MMD followcam uses its IK bone only to get the angle to a particular model. So wherever that model is, or wherever the followcam is, it always points at that model. And we can still move the MMD followcam independently.
It does this by using a very short IK chain to change only the angle of its IKX bone. Then, when you use MMD’s camera follow on the IKX bone, the camera only changes its angle with that IK bone and not its position. If you want to move the camera’s position, you do it by moving the motherbone, which drags the camera along with it.

How does it know where the camera should point? We tell it, by registering an outside parent to the camera’s IK bone. So wherever that outside parent moves, the IK bone moves, the IK target tries to get close to the IK bone, and the camera points at the outside parent.
Setting up the MMD followcam
First, we want the camera right on top of the target bone, and not at an offset. So let’s enter some numerical values for the camera. We want it located at 0,0,1– the same as our IK target– and with a distance of 0. If we forget to do this, the camera will wiggle about as the IK chain swings around.

Second, we need the IK bone to follow the right model. So register an outside parent for it. I’m going to register it to Teto’s head so that the camera tracks that. Registering an outside parent is easy. Select the thing you want to register, hit the OP button on display settings, and enter the parent model and bone in the pop-up. Just close the pop-up afterwards– there’s no okay button or confirmation, MMD just does it. Don’t worry about the whole frame register part of the dialog.

Okay! Let’s give it a shot!
You might notice that there’s a problem when the model moves through the camera, or around it in a circle. The camera flips upside-down. The IK bone has a lot of choices in how to reach a particular angle, so let’s tell it how we want it done. We do that by entering some angle constraints in PMXE. We want our center bone limited to motion only in the Y axis– negative 180 degrees to positive 180 degrees, full motion. And we want our IKX limited to motion in only the X axis. With negative 90 degrees to positive 90 degrees, the entire structure can point in any direction without rolling or flipping upside down. Now, iIt’s impossible for it to flip upside down.

Save the model and reload MMD. Better?
Moving the camera
Of course, to keep the MMD followcam working well, you don’t want to move the camera directly. You need to move the motherbone instead. The camera will still focus on our model while it moves across the stage. There’s only one problem: it’s awfully hard to know where to put it when we’re in model mode!
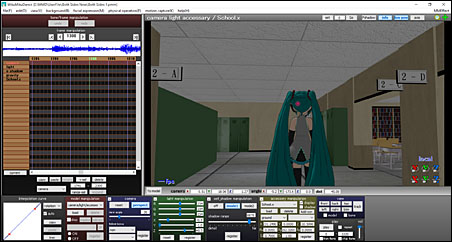
There’s a solution. Select view->Camera Lighting Tracking. Now, our camera will update even in the animation view, and we can control our motherbone’s position just like we would our camera’s position. Easier, to my mind, since we don’t have to wonder which distant point we’re orbiting.
Create a few pans and take a look. What do you think? It’s a lot better than the basic MMD followcam, but it’s still jerky sometimes.
Softening movement with physics
 Back to PMXE. Let’s make just one more bone:
Steadicam: Parented to IKX, located at 0,0,1.
Then we’re going to need a few rigid bodies. These are just abstract bodies, so check all of the non-collision groups. Make one a bone-type body attached to your IKX bone, and the other a physics-type body attached to your steadicam bone. Then connect those two bodies. Positioning all of these is simple, since both bones are at 0,0,1, right on top of the two bodies they represent.
We’re going to need allowance for our steadicam to rotate. Give it -180 to 180 degrees rotational limits in the X and Y axes. We don’t want it to roll, so leave the Z axis settings at 0 to 0.

Finally, let’s give it some resistance so that it will actually absorb some shock. We can do that by adjusting the move and rotation fields of the body attached to our shock absorber. These fields are really attenuation. They act like air resistance, slowing our body as the center bone drags it around. I used values of 0.99 for both, which is pretty high. That will spread any motion over several frames.

Go back to MMD and change our camera’s follow bone from the IKX bone to our new shock absorber. Take a look: now, our camera gets pulled along by our bone structure, softening any sudden motion or rotation. How’s it look, Teto?
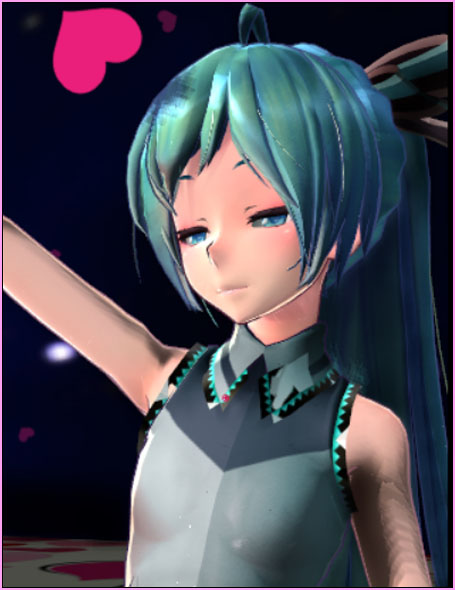
The video needs some work, but our camera is tracking perfectly, without much jerk, even when Teto is dancing as hard as she can. Perfect!
Credit your sources! remii made Tda Little Devil Teto. Check out his nico nico user page! I tricked her out with Brian Narita’s hoodie and AmiAmy111’s heart shoes! Check out the youtube page for its credits!
Comments, 26/08/16
After a bit more experience with this– well, frankly, the physics are a mess. Unfortunately, physics in MMD are just too jerky. Or else, I don’t know how to do them well.
But being able to make an IK dummy bone isn’t just for camera control. It’s also a great way to, say, control a two-handed sword, without constant animation headaches. And the IK portion of this system works pretty flawlessly. It’s how I animate the camera now, exclusively.
I’ve learned a bit more about IK bones since writing this. Angle and loop are definitely important, but neither is very intuitive. For uses like this, I’d recommend angle values of 180. Angle can impact IK bones even in the presence of IK constraints, but a value of 180 should give your camera free rein. Loops of 40 are perfectly sufficient.
– SEE BELOW for MORE MMD TUTORIALS…
— — —
– _ — –
![]()


Yo, is there anywhere I can just download this? The tutorial is far from clear on what bones I need to make it and is very confusing.
I don’t know if there’s anywhere you can download that– my goal was to help people figure out some different things they could do with PMXE. However, if you want, there’s a pretty fancy orbit cam at https://www.deviantart.com/vasilnatalie/art/Download-OrbitCam-for-MMD-699863350 .
Thank you very much !
I will give the download a try first, but I will come back and try to understand your comment and the tutorial you did. I think the comment would be enough for what I need, but it’s always good to have a working example too look at.
Hi !
Yesterday I found this tutorial and thought, this could be what I want. Well what I want to set the camera to a fixed point in my stage and don’t move it away from there. Only move the angeles to always focus on the model. I think, with this it should be possible.
But I don’t really understand it. I think I did the model with the PMXE like descriped. But it would helped me a lot more, if there was a screenshot for every step, because english is not my native language and it more easy at the beginning to follw stricly on what I see than read it and try to make it and be unsure if I really understood it.
Ok now to what I did:
After opening PMXE there was a lonly bone called center and I left it there without changing.
Then I put the descripted 5 bones into it.
1) motherbone at 0|0|0, parent -1 (like the center bone, too)
On the upperright there are some buttons and I deactivated them and only activated: MV and VIS and Enabled (of course, so I don’t repeat Enabled).
2) IKY at 0|0|0, parent 1 (motherbone) and ROT
3) IKX at 0|0|1, parent 2 with ROT and VIS
4) IK target at 0|0|1, parent 3 without any button (except enabled)
5) IK bone, parent 1 with MV, IK, VIS,
Loop = 40, Angle given by PMXE = 57,29578
Linked to IKX and center (should it be motherbone instead of center ?)
And limited angles like you descripted in your comments.
In MMD I loaded a model in the center of the stage, loaded my ‘camera model’ at the center, too. Gave the model a motion and set the OP of the moter bone to the wrist bone of my model. But what do I have to register now ? I did not manage it to look to the middle of thze model. Please give me hints. Thank you !
You’re trying to make something different than I was making in this tutorial. You’re better off starting fresh. If you have any knowledge of IK bones, that will help.
You’ll need four bones: a move/rot motherbone, a move/rot camera bone, a camera end bone, and an IK bone. Camera bone gets parented to motherbone, camera end bone gets parented to camera bone. IK bone stays parented to -1.
For the IK bone, it should control the camera bone. Try loop 40, angle 180. Give it the camera end bone as a target. Position it on the same spot as the camera end bone. Enable angle limits and limit the camera bone to -90 to 90 in X axis, -180 to 180 in Y axis. That should be all you need, but I’m working off the top of my head, so forgive me if I get something wrong.
Once in MMD, there are a few things you need to do. You need to set the camera to position 0,0,0 with distance 0 to start. You need to set it to follow the camera bone of the dummy bone you just made. And then you need to place the IK bone. Wherever you place the IK bone is where the camera will point. So you can OP it to a model if you want. You may have to adjust the rotation of the camera to start out with, depending on which axes you’ve laid your dummy bone out on. (A good way to lay it out is with camera in the positive Z axis and camera end even further in the positive Z axis.)
If you want a working example, but one that is much more complicated than you need, check out https://vasilnatalie.deviantart.com/art/Download-OrbitCam-for-MMD-699863350 . If you can figure it out, you shouldn’t have any problems making a simpler, angle-only dummy bone.
Sorry, first answer was not appending here. Thank you again. The example link is nice but very compley. Now I better try what you told me. :-)
Yes, sorry, very complex. If you can’t figure it out, that’s ok. If you can figure it out, then you know about as much about MMD bones as anyone :)
Try deleting everything except the center bone, Sun, Satellite, Focus, and Satellite end, then disable all of the bones’ appends. Then try it out in the transform window, rotating Sun and moving Focus. You should see the Satellite bone stay pointed at the Focus bone. The Sun bone itself isn’t even necessary other than to move the Satellite, and you can make Satellite a move bone. The important part is the IK bone (and Satellite End, to give the IK a target) that controls the direction that Satellite points.
Can I insert images here ?
So I can show what I did and ask my questions to it.
I could not make it work like it should :)
Well, probably the best way to talk more is either via email (see https://learnmmd.com/reggie-replies/ for contact info) or to contact me on DeviantArt ( https://vasilnatalie.deviantart.com/ ). If you have a DeviantArt account, of course, that’s a place where you can host images for me to look at.
Thank you again !
But today I found the Spotlight 2.0 effekt and looked how the spotlight as model works. It is the same like a camera, so I removed the materials and use this fake bone model now and it works. I think it is exactly what you wrote above. only the bones have other names. But if there are questions again, I try it on deviantart. I think I have an account and if not, I will make one :)
Cool. Feel free to contact me if you got problems.
I don’t understand a lot of things in this guide, many of those don’t work as they are supposed to. Can I count on help after over half a year from update of this guide?
Well, you may ask, and we’ll see from there. :D
I’ve had to figure out a lot of stuff by myself, even after studying the links from the beginning of the article. I still don’t know why in the picture there are 6 bones, even though we were supposed to make only 5. I’m also not sure why we need IKX bone, why can’t the target bone be the one rotating, but unable to move.
I’m not sure if I did all the steps right, but it seems theoretically correct, based on the motion in MMD, however I didn’t get that “camera flipping upside-down” whlie trying it out.
And now I’ve been stuck on the part where I’m supposed to restrict the angle. I have no idea where to put the numbers.
I might’ve figured out what was the meaning behind camera flipping, but how am I supposed to restrict Y from -180 to 180? If it really is about entering the numbers into “Axis Limit”, then there’s just 1 place, right? Is putting 180 in the second field really sufficient?
It’s true. this tutorial can be tricky at times (and no, I don’t see the advantage of an IK bone over a simple moving bone in this case either). What is important, though, that you don’t have to follow it to the letter. Once you understand the principle behind the followcam idea, you can build your own one… or even several, each one most suitable for the task you’re solving when making a particular video. I’ve constructed my own one a while back, even before this guide was published (it didn’t have an IK bone, instead it was a chain of bones allowing to take care of each degree of freedom separately). Don’t do what other people did, do what works for you best.
As for restricting the angle, I suppose you mean these fields:

I’m happy that I got the idea, but I’m so inexperienced in MMD that every detail hurts me. I can’t do anything alone without learning the basics, I’m too stupid for being completely independent.
The picture you showed me works only for IK bones, but according to the guide, IKX and IKY weren’t supposed to be IK bones. And even if they were, I wouldn’t know what to link them to.
Meanwhile I bumped into another obstacle, namely about that steadicam. I don’t understand how I’m supposed to “connect bodies.” I tried omitting that, but when I opened MMD and did as previously, the “steadicam” wasn’t steady, it was in fact moving slowly, even if a model didn’t move an inch.
*shrug* More the reason to refrain from physics part, that one is tricky beast and not really needed for a beginner user. Still, if you want to understand it better, start from this tutorial. Namely, to join bodies you use the Joints tab.
Ah, got it. You’re asking about rotation bones. You can do one with these controls:
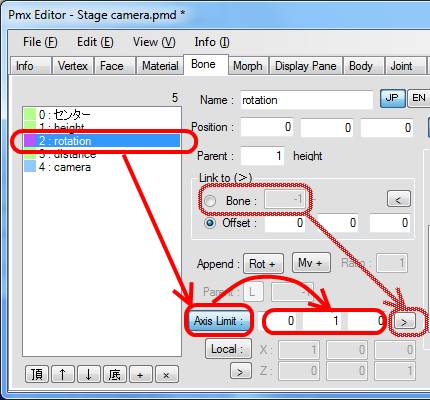
The X,Y,Z parameters are vector for the rotation axis… or you can use the “>” button, if the bone has a child bone instead of offset.
THANKS