![]() How can I use Blender to make a model for MMD? How do I make my selfie model from scratch? Is it possible to make an MMD model from the sketches I draw?
How can I use Blender to make a model for MMD? How do I make my selfie model from scratch? Is it possible to make an MMD model from the sketches I draw?
THIS is a MULTI-PART Tutorial on its OWN PAGE.
Below is PART 1…
CLICK to go to the full tutorial.
Making Your First Model Part 1 – Franken-Reference
Wait, what?
Did you know that in Blender . . . you are allowed to trace?
Yes! Seriously, you are allowed to trace and no one will get mad at you!
Why trace, though? The intellectually honest answer is that I can’t draw. The intellectual answer is that every artist has a unique style. If you want to make a model based off of a specific character by a specific artist, you would want to capture the essence the best that you can. So, with that excuse in mind . . . you can proceed to tracing!
Once you figure that out, your first instinct may be to scour the web for images to trace. But there’s a problem . . . People rarely make orthographic drawings of their characters. Even when you find a model sheet illegally uploaded to Pintrest, there are quite a few issues.
If you’re curious, this is the finished model I made using the Starfire reference images.
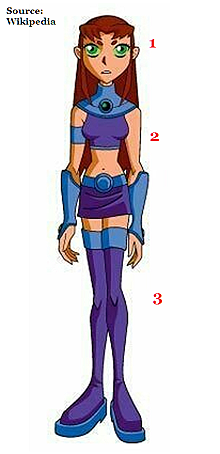
Luckily for this article, going from up to down the problems get more severe.
The first problem is the face. It’s slightly askew in a way that you don’t notice until your mirror modifier isn’t lining up properly with the features on the other side. In Blender, you are able to rotate the reference image around and scoot it from side to side. Hopefully with enough scooting around, you can get the face to at least look decent with the mirror modifier! (Don’t try faces without the mirror modifier if you value your sanity!)
The second problem is the arm. Now, if you think before you start and open up any image editor, you can fix this problem. Just copy an arm and rotate it until it’s sticking out. There are two reasons to do this. The first is that weighting an arm that close to a body is a painful experience that ends with skin ripping from torsos to follow the arm as if it were a magnet. The second reason to rotate the arm is that if the arm is not properly positioned, canned motion data will not work properly.
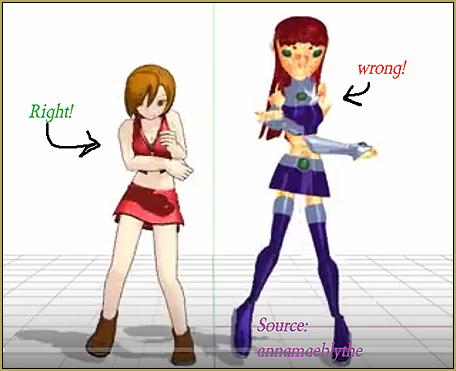
Yikes! That’s actually kind of scary!
The third problem is the most . . . problematic. There’s no right way to approach this problem – each way to do it will just be off. My solution was just to just put a pretty severe thigh gap, but that made the legs even thinner than they should have been. . . and even worse, the legs no longer matched up with the reference image! The other option would be to use an image editor to shimmy the leg around before loading the reference into Blender. Then the legs would have the right thickness, but her hips would be displaced quite a bit… unless you made her bowlegged so that her legs curved in towards her hips!
And then there are just overall problems. Because I don’t want to share a file that was illegally uploaded to Pintrest, you just have to take my word on this one . . . The side view and the front view barely lined up. I used the bust to line up the body . . . and then the face was off. That would just take more scooting about to fix it, but that’s an extra step I just forgot to do. Instead of lining it up, I just eyeballed how far her features jutted out and then used those to shape her profile.
And worst of all, everything is so imperceptibly askew that you don’t realize there’s a problem until you see that your model is just slightly thicker or thinner than she should be.
So . . . What do we do with this information . . . ?
You make a franken-reference! What’s that? Oh, it’s a word that I thought up to describe a reference image that you use several different images for. I’m going to make a model of Camila Melodia by Yesi-Chan. Why? Partially because Camila has a very pretty design, partially because it will be a good challenge, and partially because “UTAU Culture” makes me think that I can get away with doing it.
Let’s start by taking a screenshot of the default Miku model in front view and side view. Why? Remember earlier when I said that having the limbs in the wrong places messes with the motion data? There’s an easy way to fix that in “Transform View” in PMXe . . . However, getting to the point where you can
use it can be extremely painful if you put the arms too close to the side . . . and it’s hard to exactly judge the perfect placement of the arms once you get there. So it’s better to start out right!
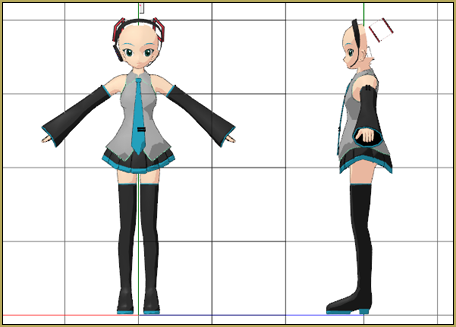
Now, for the fun part! We’re going to pick out different images of Camila from Yesi’s deviantArt. . . Specifically her UTAU and VOCALOID folder.
And guess what . . . Everything is askew! We have no good views of her rump! The plan would fall apart if we weren’t willing to break, twist, and overall rotate the images.
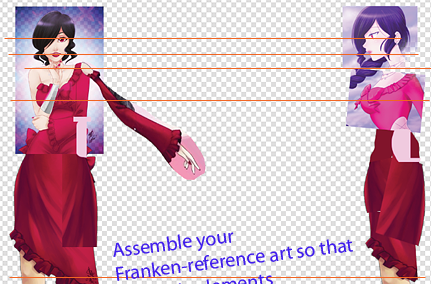
When making your reference image, it’s a very good idea to make sure that each part is lined up – especially when the images you are using switch between styles at random.
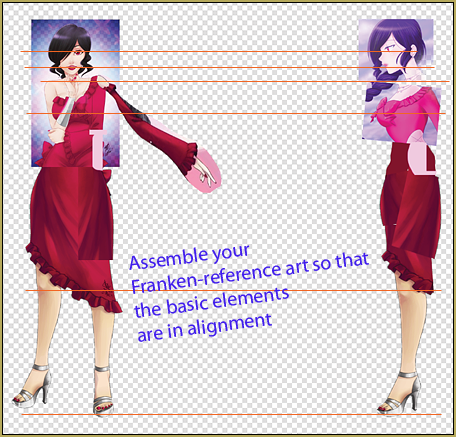
Because this was a bit of a frustrating endeavor, I didn’t document each step . . . But I will talk a bit about what I did!
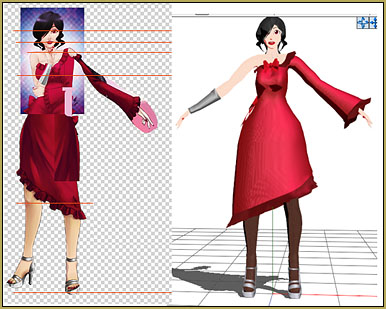
The first thing I want to point out is the asymmetry of the front view. Why is that? Simply put, I abuse the mirror modifier. As long as one half of it is good, all of it will be good. I flipped her bottom half so that the leg that the side I would mirror would be straight and facing forward.
The second thing I’d like to point out is the arm. I copied it from a picture where the arm was laying flat to the side as opposed to up in the air. Because of that, the arm is misshapen. However, the most important part of that arm’s existence is to just tell us where the arm should be so that motion data will work well with the model. As long as I don’t trace the arm exactly.
It would have been much preferable to use an arm that didn’t have a sleeve, but I couldn’t find an arm without the sleeve that wasn’t bent.
If I were to tell you I were to trace this picture, it would be easy to imagine a misshapen model with three arms. However, I made notes to myself about what I would ignore. For example, I’m going to ignore every arm I didn’t paste down. That would leave me with only one arm which I will mirror to make two arms.
The second thing to point out are the pink blobs. Those are where the side cutout hits. I left those there on the off chance I include the side cutouts. The blobs I deleted are more important, though. When lining up the front view and the side view, I made marks where the eyes, nose, and lips lined up. That way, I could be sure I wouldn’t have another awkwardly proportioned Starfire on my hands!
If the image looks like a mess . . . That’s because it is. I was copying, pasting, mashing transform, rotating . . . A whole lot of steps to get me to somewhere that was halfway decent. You might notice that I copied parts of the skirt and pasted them where they didn’t belong to give her a fuller or more symmetric look. Even if I had documented everything, every “franken-reference” would be its own journey and telling you my journey wouldn’t help that much.
This took hours to do – so you may be wondering . . . Why not just draw the reference image in the first place?
My answer to that is that . . . I probably should have! But if I had, this article wouldn’t exist for people who are just as bad at art as me.
Next time… I actually start modeling in Blender!

CLICK to go to the full tutorial.
– SEE BELOW for MORE MMD TUTORIALS…
— — —
– _ — –








My left ik bone won’t rotate and I can’t fix it
How do you get this app?
Are you talking about Blender? Try https://www.blender.org/download/