


![]() How can I make UV morphs in MMD? What can you do with UV morphs? How can I make four-way UV morphs in MMD?
How can I make UV morphs in MMD? What can you do with UV morphs? How can I make four-way UV morphs in MMD?
4-way UV morphs
 Have you seen some models that have morphs that change their textures? You can make those yourself. And once you know how to, you can get creative with them!
Even if you don’t want a four-way UV morph, that’s the only thing that the PMXE interface wants you to make. Don’t worry, we can get tricky with them later. Let’s start with a basic four-way morph.
Preparing your texture

You probably only have one texture for your material, but if you want a four-way, you’ll have to find three more. Once you do, edit your texture in an image editor like GIMP so that each image takes up a quarter of the screen. You can use a larger final texture if you want, up to 4096×4096 pixels!
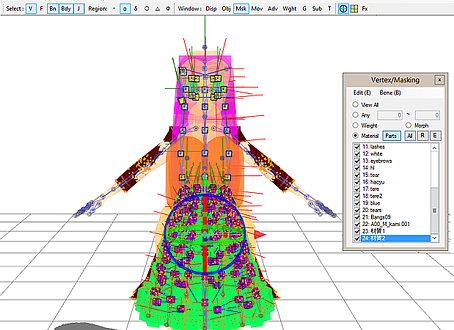
Select your vertices
Unfortunately, PMXE won’t let you create UV morphs in multiple materials at once. That’s okay, we’ll see how to join them later. So you probably will want to mask by a single material. Then select all the vertices you want affected by the morph. You can always edit it later.
The UV Morph Creation Interface
From PMXE’s 3D window, select Edit-> UV Morph -> Create UV Morph. That’s a complicated window, but don’t worry, most of it isn’t important.

For whatever reason, PMXE won’t let you create UV morphs without a texture loaded. I don’t know why– it should just load the texture. But click the Load Texture button and select the model’s texture. You can use a different picture, but it will replace the texture on that material with the image you use.
PMXE expects you to only want to create a four-way morph. The first texture is your default, and the last morph, PMXE will name automatically, but it still needs two names. Click in the Morph Name panel of the window and enter a name, then hit return and enter another name. I’ll just use red and yellow for my names right now.
Then hit the Create Morph button. Click on the confirmation dialogue when you’re done and check out the morphs in the tabbed view!

Tabbed View Morphs
Take a look at the bottom of your list of morphs. PMXE created three new morphs: two UV Morphs named red and yellow, and a flip morph named UVSkinFlip.
UV Morph Tabbed View
Select red or yellow and take a look at the window. That list to the right is the list of all of the vertices affected by the morph; each one has two components: a U, or X coordinate shift, and a V, or Y coordinate shift. Red moves all of your UV coordinates 0.5 units to the right– halfway across the texture. Yellow moves them halfway down the texture.

Select UVSkinFlip and check it out. It’s a different kind of morph. In its window it refers not to vertices, but to other morphs– to red and yellow! In the group impact box, it says how much to use of each. So UVSkinFlip just applies both red and yellow morphs fully, giving you the lower right-hand corner of your texture space. Except– flip morphs can cause problems with loading MMD models! That’s okay, because group morphs work the same way. So for right now, delete UVSkinFlip. We’ll remake it later.
Undoing UV
The four-way UV morph creation screen alters your model’s UV mapping to use only a fourth of the space. I hope that’s what you wanted, but if not, you can always change it back.

Open the Object Edit panel from PMXE’s 3D view (View->Object Edit, or F4, or click the Mov button on the top bar). Switch to the UV tab of the new Object Manipulation panel. Click on the Change button and select Scale. In the fields immediately below, enter 2 (for scaling horizontally) and 2 (for scaling vertically) then click the Value button. Now, your UV coordinates are shifted to double of their previous values– taking up the full texture space.
Making a Dial from a Switch
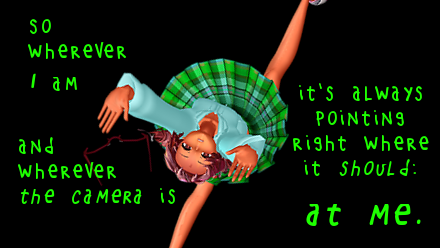
 Some kinds of animations are like switches– they should either be on or off. Most four-way UV morphs are like that. They should either be registered to 0 or to 1. But with some texture editing, you can use them as dials instead– smoothly interpolating across a texture. By creating a single wide texture, I did that to Teto’s kimono, which I can now animate using the UV morph.
Since I don’t need vertical UV shift for this effect, I just deleted my yellow morph (and the UVSkinFlip morph that references it). PMXE only lets me make a four-way, but I can still edit or delete the morphs after creation.
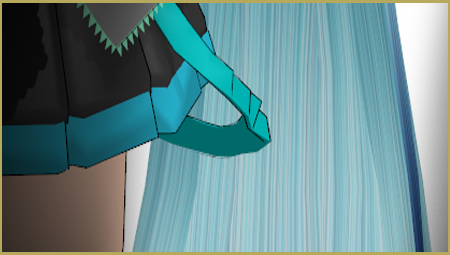
If you do this, you’ll probably want to arrange your UV map a little more carefully than I did– look at those sleeves, uggh! I think I forgot to disable physics when I did a transform earlier.
Editing UV Morphs
There’s other things you can do with UV morphs if you want to get fancy. You’ll still have to start with a four-way morph. But then you can edit it.
Morph Edit
You can edit morphs with a graphical interface by selecting a morph in the tabbed view, right clicking on it, and selecting Vertex/UV Editing Morph. This will take to a morph editing view where you can use the Object Edit controls on selected vertices to edit their final, morphed UV coordinates. Try using the Object Manipulation panel to scale your morph. On the Morph Edit panel, hit the Reflect button, then drag the slider across to see how the morph has changed. If you’re happy, hit the Update button to update the morph to your edit. Click Cancel to get out of the editing screen when you’re done.
Manual Edit

You can also manually edit the values on the tabbed view. Select the morph, select an index (representing a vertex) and change the values in the Vertex/bone movement/speed impulse/UV fields.
You can edit multiple vertices at once (for instance, to change all vertices to different numbers– for instance, to change your morph to be a quarter shift rather than a half shift, with values like 0.25, 0.

There’s a bug in PMXE where it won’t permit numeric entry with multiple indices selected. You can get around this by copying a number and pasting it in when you have multiple indices selected, rather than entering it manually.
Export to .csv
There’s one more way to edit UV morphs (or any kind of morphs), which is to export to .csv, a spreadsheet-friendly file format you can edit in a program like Excel. (Or in a text editor, if that floats your boat.) Select a morph, right click on it, and select Save as CSV, then give it a file name and save it in the following dialogue. You can edit this file to your heart’s content– you should see that it contains all of the morph information, although not as helpfully labelled as it might be. To get this info back into your model, right click on the morph list, select Load from CSV, and navigate to your edited .csv file. This will create a new morph, so you may have to delete the old version.

Grouping UV morphs
What if you want to make a UV morph that affects multiple materials? You can create UV morphs for each material, then use a group morph to call them all at once. Right click on your morph list and select New->Group. Hit the + button to create a new index entry, then enter the number of a UV morph you want included in the Target Index field. If you want the morph to scale differently than the group morph, you can enter a Flip/group (impact) entry different than 1. Add as many morphs to the group morph as you want. You can even hide the original morphs, although that requires using a different program, or editing the morphs as .csv files.
Remember when I said to delete UVSkinFlip? Here’s where we can recreate it– with a group morph referencing both red and yellow UV morphs.
AddUV
AddUV is a feature very rarely used in MMD. It’s only ever used by MME, AutoLuminous is the only effect that I’ve ever seen that uses it, and I’ve never seen a model that uses addUV in a fashion expected by AutoLuminous. If your model uses addUV, you can create addUV morphs from regular UV morphs.
Creating an AddUV morph
To create an addUV morph, select an existing UV morph. Right underneath the Panel field on PMXE’s tabbed view, you’ll see a drop-down list. Select UV1, then click the << button to the left of the drop-down, to change the UV morph to an addUV1 morph. Or select UV2, UV3, or UV4.
.ZW Components
AddUV morphs are a little different than regular UV morphs. That’s because .pmx models have only two components for regular UV– U and V, duh– but four components for addUV. Don’t be fooled by the name. AddUV is a way to encode extra information in each vertex, but it has very little in common with regular UV. You could use it as UV, but why? You already have UV!
So an addUV morph is going to have two extra components beyond the x and y coordinates. I call those extra components z and w components. If you need to edit these meaningfully, PMXE is not a sufficient tool, and you’ll probably have to export to .csv to edit them. (Although you could always copy/paste fields from another exported morph into these fields in a spreadsheet.)

Mip-mapping Errors
Have you ever seen a weird model glitch at the seam that disappears when the camera gets close? Those are mip-mapping errors. Have you ever heard to use thick margins on your textures? That’s to prevent mip-mapping errors. You might run into mip-mapping errors even without using UV morphs. But using UV morphs makes them more likely.
When MMD reads a texture, it does some automatic blurring based on how distant the textured face is from the camera. That’s a good thing, because it prevents moiré. But if your camera is distant, and your texture contains really dissimilar colors, sometimes this blurring can lead to color changes near the borders. Since the size of the blur depends on the camera distance, you’ll see this at distance, but it will disappear when you get closer to inspect.

Just understanding the issue should be enough to help you come up with ideas to fix it. If you’re running into the problem, consider scaling down your UV coordinates to create a healthier margin for your textures, so they don’t get blurred pixels from differently colored areas of the same texture. You might be able to rearrange your textures to fit better inside a smaller area. Blender is a great resource for UV editing for this purpose.
Keep the Faith and credit your sources! I’m using my own Tda 0401 Bliss. Shoes and kimono are edited from work by Espirea! Tentacle is based on work by Mehmet for the Bad King Monster Brush Pack: (badking.com.au/site/badkings-mega-monster-brush-pack) (! Also featured are my own glasses, bicycle, and teddy models!
– SEE BELOW for MORE MMD TUTORIALS…
— — —
– _ — –
![]()

Hi, I hope i don’t bother but i’m new at pmx/mmd so I’m not expert with models ^^ i have this problem when I edit a face and want to keep the original morph, I click on open -> duplicate -> update and it says that ”There are no offset targets, please remove them from the list” idk what to do :/
Question, Is it possible for me to copy a facial morph from one model and paste it on another? If so then how can I do this
Yes and no. Technically, there are Cut and Paste commands in Morphs pane that read the list of moved vertices for a morph and can impose it on another… the problem is, it only accounts for vertices’ numbers and not their actual meaning. So, if you have two forks of the same model with one, say, modified to have hand IK bones (but *not* one having a cape and another a coat, as that will shift some vertices’ position in the list), then you can easily transfer morph edits from one copy to another. Trying to do that with different models, though, you’ll most certainly get a moving piece of shoulder instead of lips.
When I load a texture into the UV Morph creation window, the rest of the box stays greyed out and I can’t edit anything. Any idea what I’ve done wrong?
I made an eye texture morph for an Animasa Miku, but the new texture I added as the morph seemed to set to her default eye texture. How can I fix this?
I’m not sure what it means to set to her default eye texture– how is that different from not working, period?
There are a number of potential issues. First, check the texture referenced by the material and make sure that it’s the texture you want to be using. Check the morph data for the morph you created and make sure that it’s actually doing something. Try editing the morph, changing UV values drastically, and seeing if that works. Try it in both MMD and PMXE.
If all else fails, send us an email with the model file (and texture files) attached. See https://learnmmd.com/reggie-replies/ .
Hey ! I really need help importing a UV morph into Unity, im having trouble using mine which changes eye colors to use as animation in Unity or even in blender :(.
I also created a motion file-vmd with the animation and tried to import it into blender (via mmd_tools) or Unity (via MMD4Mecanim) both failed.
You should probably be looking at documentation for mmd_tools, Unity, and MMD4Mecanim. There’s no guarantee that UV morphs will be supported by Unity or MMD4Mecanim. If you’re passing models through Blender, be aware that UV morphs are really a .pmx format specific thing, and that any model editing in Blender will destroy them for even .pmx exports.
I know that blender (mmd_tools) import UV-Morphs and you can edit them direclty through mmd_tools but i dont know how to use them for animation as they dont show up as a normal shape-key, for unity i dont know if it supports uv morphs but what do you mean by ” be aware that UV morphs are really a .pmx format specific thing ” ?
I haven’t got any help on this on multiple forums of Unity blender or mmd, and haven’t seen this in any tutorial or guide :(
> you can edit them direclty through mmd_tools
Well, no. Not unless that’s something that’s present in an earlier version and support has been dropped. mmd_tools support for UV morphs is actually one of its weakest points right now, and the instant you so much as separate a model into materials, UV morphs will be destroyed. You can’t edit them with the current, powroupi branch of mmd_tools.
> i dont know how to use them for animation
Go to the mmd_tools tab of the tool bar, expand the morph tools section, tell it to list UV morphs, select a morph and right click on it for tools for animation in Blender. I’ve never fully animated a model via only Blender, so I can’t explain further, but this should give you the tools you need to animate a UV morph for a .pmx model imported by Blender.
> what do you mean by
Unity imports models as .fbx files. .fbx files don’t know what a UV morph is. Even in Blender, there’s no such thing as a UV morph. There are similar techniques, but they’t not identical. And even when Unity imports a .blend directly, it imports it, basically, by converting it to a .fbx file. There is no way to tell a default Unity install about UV morphs. You have to code that in. Of course, Unity is powerful enough that you *can* code UV morph-like stuff. But there’s more than one way to create that kind of functionality in Unity.
Now, MMD4Mecanim doesn’t read .blends. It doesn’t read .fbx. It reads .pmx and converts those into a format readable by Unity. It converts the model so that Unity can recognize it. But does it convert UV morphs into something Unity can handle? I don’t know. It wouldn’t surprise me if it didn’t.
Okay thank you very much for your help its very easy to understand and to peform :)!
Do you know any good guides or tutorials for recreating a “UV Morph” in Unity because im totally new to this and would like to learn these kind of things in Unity aswell .
* Forgot to write.
> Go to the mmd_tools bar..
You can add the UV morph to the keying set or insert single key frames but since you cant toggle it from 0 to 100 or anything like that you cant use it. You can only [Edit,View,Clear,Apply] and rename it, thats why i asked how to use them but i guess you cant use them then for animation
> Do you know any good guides or tutorials for recreating a “UV Morph”
There’s more than one way to do it. For most UV morphs as are used by MMD models to switch textures, animating the texture offset would be sufficient. For better functionality, I would probably try and do that in the shader, using UV morphs stored as textures (using, say, Red and Green to represent U and V movement) and a material property that I could animate to specify the strength of the UV morph. For full functionality, using any number of UV morphs in concert, you’d want to evaluate before the shader, but that would rarely be necessary.
I’d recommend http://catlikecoding.com/unity/tutorials/rendering/part-1/ to learn about coding shaders for Unity (which is actually very similar to creating or editing effects for MMD.) For the fully-functional version, I would look up procedural mesh tutorials, which will involve setting the UV coordinates of a vertex in the game code.
> i guess you cant use them then for animation
I wouldn’t give up so soon. I would be surprised if you can’t (otherwise there would be no reason to even import them in the first place.) Try asking on the mmd_tools github page. Powroupi (developer of current fork) is very helpful and friendly.
Oh, and just a few more second thoughts.
mmd_tools now supports importing animations from MMD. So you might try creating a simple .vmd, including the animation of a UV morph, then importing it into a model in Blender. That should let you know whether mmd_tools is capable of driving UV morphs, and if so, it should give you a way to figure it out, to reverse engineer it.
The other thing is that it sounds like you’re using MMD4Mecanim, and I’m sure some readers (myself included, learning it is on my to-do list) would love to know more. If you find any good tutorials, I’d love to hear about any links, and if you ever feel like writing any guides yourself, I believe LearnMMD would love to host them.
> you might try creating a simple .vmd, including the animation of a UV morph, then importing it into a model in Blender
I already tried that it ignores the UV morph (for example switching eye colors) and just imports normal movement’s or anything else you did in the motion file.
> The other thing is that it sounds like you’re using MMD4Mecanim
Yes i am using MMD4Mecanim. There are many tutorials which go into basic stuff but i haven’t found any which explain everything in detail so far
(Most of the up-to-date tutorials are connected to the so popular VR chat importing stuff , so they only explain what is neccessary for VRchat). I think going step by step with MMD4mecanim is a great way to build up knowledge.
At last.
Thanks for the help i’ll definetely try out the recommendation of yours :).
One last thing.
> I wouldn’t give up so soon. I would be surprised if you can’t (otherwise there would be no reason to even import them in the first place.) Try asking on the mmd_tools github page. Powroupi (developer of current fork) is very helpful and friendly.
I found a comment on his github adressing this :
powroupi commented on 15 May 2017
Currently, we can import UV morphs and preview in blender via mmd_tools (“Morph Tools” panel), but my method is not ideal and is a little limited (no support for multi mesh objects).
Maybe, we should store UV morph data in UV2+ fields as you said, but blender has a limitation that we can not create more than 8 UV maps which means you can only create 7 UV morphs in one mesh object. That’s why I store UV morph data in the root object at the moment.
And it is another challenge to animate UV morphs. Blender provide some methods to animate UV, such as “UV Project” modifier or keyframe the offset of texture mapping…, but I don’t find a good way to apply on PMX UV morphs.
Actually, it is possible to import UV morph motion in a dirty and laggy way since we can keyframe UV points via Python script, just like what I did in “Morph Tools”, but that would not be playable.
Okay, thanks for letting me know. You’re right, it doesn’t sound like mmd_tools can do a lot with UV morphs currently.
Just wanted to let you know, MMD Tools should now support UV morphs.
When I tried to manually edit the facial in morph edit, I adjusted the texture so it was perfect, but then the program said that there was no change made and it would not save. Do you have any idea why?
Were you editing a
UV morph, or creating one? It won’t recognize UV changes when creating a new morph or when editing a vertex morph. You have to first create a UV morph and then edit it for it to recognize the changes.
I edited a uv morph I already created. The texture was not in the right place when I created the morph so I went to edit it like you said to in the tutorial but it says no change was made. I am however using the Japanese version so I may have pressed the wrong button or edited it in the wrong screen.
I don’t know, it could be a version issue. I did double check to make sure that it was working for me, and yup, it definitely is. For me at least. I’m using eoscustom3d’s translation at https://eoscustom3d.deviantart.com/art/English-Pmx-Editor-v1-1-542100208 .