

![]() How do I make my models move in MikuMikuDance? Why does my model move so slowly? How do I keep my model from moving until I want her to?
How do I make my models move in MikuMikuDance? Why does my model move so slowly? How do I keep my model from moving until I want her to?
Learning to make your own motions is a big part of learning MMD! The more you learn, the easier it becomes and the more you will want to do… and the more you do, the more you will learn: practice, practice, practice…
MMD First Steps…
Make your own motions from scratch!

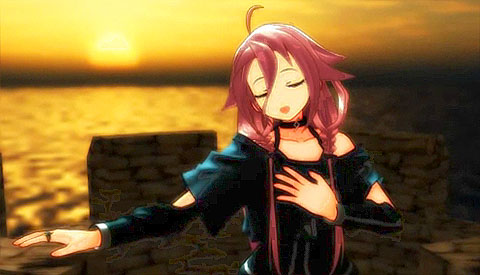
When you first load your model, she will be in the standard pose as shown in that image of Miku.
Poses…

breaks the ice!
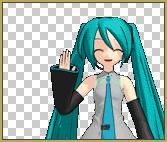
That initial pose is an “inspiration killer”… I mean, you have a shining idea in your mind’s eye as you open MMD… you load that model… she looks so frozen… and suddenly the task looks to be overwhelming! … The easiest way to “get over it” is to load a pose onto that model, right away. I have a few ready-made poses that I keep in my Pose folder inside the UserFile folder. You can download the “Reggie’s Little Pose Collection” from the Downloads page if you want to have the same pose I show you here… I call it the Livelier pose. … Ahhh; she looks so much more at ease!
Motion Basics…
Each motion you create will have a set-up, a duration, and an end/or set-up for the NEXT motion. … and you need a plan!
For this demo, I am going to ask Miku to notice we are here, look up at us, turn her upper body towards us and then give us a little wave.
Timing…
Every animation “move” is based on timing… generally, MikuMikuDance animations are set to “move” at a frame rate of 30 frames per second (30 fps)… the YouTube standard frame-rate. Under the VIEW menu, check the 30fps max setting.
When making a new motion, I usually use myself as the model… I pantomime the motion to see how I move and how long I take to make that motion.
For this motion, I want Miku to look up in surprise, rotate her upper-body towards us, raise her right arm, and give us a quick wave with that right hand… and I want that hand to have the fingers move from a closed hand to an open hand for the wave.
In pantomime, the whole motion takes about three seconds… 90 frames. The “look up”: a little less than a second… call it 20 frames, as that motion is about done, the body starts to twist towards us… and as it does, the right arm starts to come up… and most of the last second is the wave, itself.
So, now I have a notion of how this is going to work… how it’s going to look.
ADVERTISEMENT
Make your own motions…
Starting in Frame Zero… ?

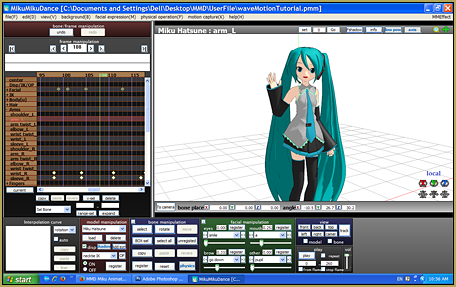
CAMERA…As I get into this test, and while in Frame Zero, I first went into camera mode and registered a camera position… looking down onto the model, a little bit… and kind of close-up.
A little pause before the first move… For this test, I want to move the motion-start out away from frame zero… so that I build-in a bit of a pause as the opening moment… I imagine that I am watching my finished video… and I’d like the viewer to have a second or two to “take in the scene” before the action starts… keep your viewers in mind as you make your own motions… I have already placed Miku in that Livelier pose in Frame Zero… so now I will do a V-Select to capture all the diamonds in Frame Zero and Copy… and then paste ’em into frame 40… so the model will stay still from Frame Zero to frame 40, a fat-second’s pause before the action starts.
30-Frames Per Second…
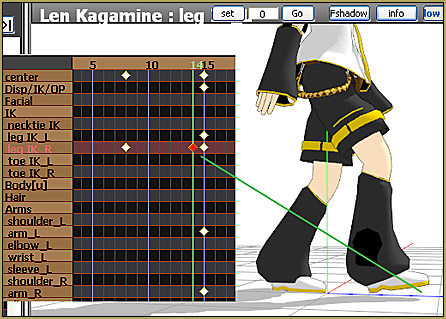
I want Miku to look-up towards us, in surprise… in less than a second… call it 20 frames… so I move out to frame 60 and position Miku’s head to face us. … a split-moment after her head starts to pivot, I want her upper body to turn our way… and finish that turn after the head has already focused upon us… so in frame 50 I Register the Upper Body position, so it doesn’t move until then… and then in frame 70 I rotate the upper body and register… and then I go back to frame 60 and fine-tune that head motion to see that it is still facing us… and then go to frame 70, again, and see that the head is till facing us… be sure to register every move.
Try it out… push PLAY!
I entered a range of 0 – 100 in the windows under the  Play button and pushed play… the motion is there… but dead-looking… to spark-it-up, I used the interpolation curve… which now makes the head and body motions “snap!”… I found that only the head-motion in Frame 60 needed the curve to be as extreme as that!
 For the upper-body, I decided on this curve to soften THAT motion at frame 70.
Now when I push play, the action is more life-like.
Build the arm motion…
To set-up the arm motion, I went to frame 65… and registered each of the right-arm bones… and I also reloaded the hand-pose, too… and registered to lock-in that hand pose (The hand pose in that Livelier pose is the RHpointRelaxedRD pose in the Reggie’s Hand Pose folder you can download from the Downloads page.)… so that the hand and arm will not have moved, yet in my animation. … Doing this in frame 65 means that the arm motion will start before the upper-body motion is complete (in frame 70).

Again… the raising the arm motion will take less than a second… so I am allowing 20-frames… move out to frame 85 and position the right arm, elbow and wrist into the first wave position… and also load the RHspreadHaltRD pose data to that right hand.
Now when I push play, I see that the arm  motion starts way too late… I had done my set-up in frame 65… so I went there and selected all those diamonds and did a Copy/Delete and then experimented to find the right place to paste them back in… and I settled upon frame 58 as the spot to paste ’em.

used for Elbow R and Wrist R, Frame 85
Now when I push Play, I like the timing of the action… but it has that “dead” look, again… I have to add the interpolation curve to the elbow and wrist diamonds in Frame 85.
Making waves!
I decided to make the wave motion by rotating the Elbow bone. As I did my pantomime, I see that I do not use my wrist, like I’d thought… but simply rotated my forearm to make the wave. It also seemed that I wanted three waves… and I could do two of them a second… so 15-frames per wave-cycle… so 7-frames out and 8-frames back for one cycle … rotating the elbow on the local X-axis… with just a little left/right on the Z-axis. … but when I tried it, that way, the motion didn’t look right… so I made the wave motion by rotating the Wrist R with the Y axis, instead.
I add the three wave-cycles… To do the first one, starting from frame 85, I moved 7-frames and rotated the wrist to the left… went back and copied the Wrist start position from frame 85… and went out 8-frames past the latest motion and pasted that start position… one cycle done. … Then I highlighted the diamonds of that cycle and pasted ’em in two more times… now I had three cycles… three waves of the hand. … After pushing play, I saw that I needed the interpolation curve… I used what-I-call the Natural Motion curve… eases into and eases out-of a gentle motion. … I applied that curve to each diamond of the wave motion.
Motion EXPAND… to speed-up the wave!
Now the whole animation is starting to look good… but I feel like that hand-wave motion is a little too slow… I used Range Select to select all of the diamonds in my wave motion… 85-135… and, seeing the diamonds were indeed selected, I clicked EXPAND, right there by Range Select… and entered a value of .8… so that motion duration would be only 80% as long… but when I pushed Play, that wave was now too fast… so I did a Control-z to undo the .8 Expand… and I expanded by a factor of .9, instead… looks good.
Adjustment…
So… now I am getting close to finishing this little motion… but I see that Miku’s wrist moves through her sleeve. I scrolled through the motion looking for a worst case… and then I fixed the sleeve. I decided that, rather than shorten the sleeve and look for that as a single “fix”… I’d include the sleeve in the motion… so I made the sleeve oscillate with the waving wrist motion. … it works.
So now I am going to add a few frames to let her hand and arm relax… so in the final frame of my animation, so far, frame 125, I am going to register the position before moving on to the next one… register arm, elbow, wrist, and reload the saved hand-pose so everything is locked-up. … Now move out another 30-frames and rotate the arm and elbow into a relaxed position… and load a new hand-pose… RHrelaxOpenRD… add the Natural Motion interpolation curve to the arm and wrist diamonds… … my animation is now out to 155 frames… so I am setting the Play range as 0 – 200… and it looks nice.
FACIAL Sliders…
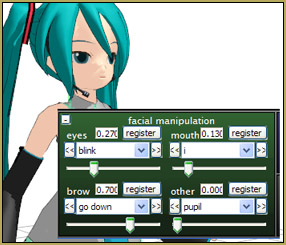
I went to Frame Zero and set up an average expression for Miku… a little blink, mouth open just a little “i”… and eyebrows down to look normal.
Then when she turns, her eyes light-up and she grins… so copy/paste those new facials out to about frame 55… so nothing happens to her face until after frame 55. You have to paste ’em into frame 40, too… since we had facial data in that frame.
At frame 55 I also set the Grin at zero and 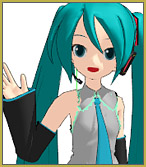 registered… then moved out to frame 65 and opened the eyes and increased the grin… and registered the “a” without changing it… registered it, again in frame 90… and then did a little lip-flapping motion using the “a”… taking about 25 frames.
I set the Play range out to 260… 0 – 260… I added a little arm relaxation action… and called it finished.
Have fun with MikuMikuDance!
– SEE BELOW for MORE MMD TUTORIALS…
— — —
– _ — –
![]()


I need some help with this but how did you make the cloth covering the model’s hand move along with the hand motion? (I’m using Len’s model that comes with MMD).
and also, how did make the animation after the waving look fast and smooth? Mine is slow for some reason.
The fast and or slow motion is totally dependent upon the number of frames you use between the diamonds. For a faster motion, use fewer frames between your registered positions. Another thing often reported is how an arm that needs to move quickly in frame 40 starts moving slowly right from frame Zero. If you need for the arm not to move, copy that bone’s previous Diamond (probably in frame Zero in this case) and then paste it where you want to see the bone start to move.
Yes?
— Reggie
Hi, I followed your instructions and things are working way better now. Thank you very much for helping. Although I didn’t notice the sleeve fix reply until I’ve finished it so it was already too late, heck I don’t even know how you’d adjust the Sleeve bone to be shorter, maybe there’s a tutorial for something like that? Again, thanks for helping.
Here’s the final result if you want to see it:
https://imgur.com/a/ITDi2Z6
I saw the video… that’s perfect! Great that you made that little video! You will find the sleeve in the list of bones, next to the arm, elbow, and wrist. You will use the XYZ rollers to slide the outer edge of the sleeve so that the sleeve moves out of the way.
Have you tried the little “Happy Hands” meme? It’s a nice introduction to downloading and using motion files.
Have fun… ask questions… glad to help. Send me links to your videos!
— Reggie
Hello! Those original models often have long sleeves that cover the hands… and the hand will flex and poke right through the side of the sleeves. What I do is, in Frame Zero, I put a pose onto the model and then flex the elbow or the hand to get the hand to poke through the sleeve. Then I adjust the Sleeve Bone to make the sleeve shorter to solve that problem. Most motion files you will download will never have the sleeve adjusted…so scroll through the motion until you see the sleeve problem and, in that frame, fix the sleeve, Register, and Then COPY that diamond and paste it into Frame Zero. That fix should work for the entire motion file. ALSO, When you adjust the sleeve and Register, Copy that new diamond and then click Reverse and see that the other sleeve will jump to the same dimension as the first one you adjusted.
Yes?
— Reggie
can someone help i did everything right but when i load a wav file it wont play
Please tell me what yo udo and what happens when you do it…
If you “Render to AVI”, you must have the video start from frame zero or else there will be no audio recorded.
— Reggie
I’m very new to MMD, and I know this is a stupid question but- how do I even MOVE the head or bones?
1) Select a bone. Easy way – just click on it.
2) Click register (in the purple panel) to remember the initial position.
3) Skip few frames to the moment where you want the bone moved.
4) Actually move the bone. Easy way – press one of colored X/Y/Z buttons in the lower right corner and drag the mouse to see the bone moving. Alternative – type the exact angle into x/y/z fields below.
5) Register again to remember the final position.
6) Go to step-by-step instructions page where you can learn about this and many other useful things.
I have problems with the facial animation
I registered the blinking and then the happy eyes, and when I played the animation, the two facials kind of combined themselves
this is an example, but I have problems with all the facials
Well, yes, that’s what they do. Facials in MMD do not recognize each other’s state, and will try to move vertices assigned to them regardless of whether any other facial already moved them. So, if you want two facial in succession, you turn on one, in a couple of frames turn it *off*, and then initiate another. On the other hand, sometimes you can combine effects of different facials (you know that you don’t have to turn them always to 100%, don’t you?), getting some “undocumented” results.
Aye thank you this whole time ive been using other peoples motions alwasy curious how to do it myslef, i will say this was a bit confusing but it put me on the right track to figuring it out
i like it but MMD I LIKE
I tried to load a motion in my model but all it says is “This file has not cammera,light,shadow data.”And yes the incorrect spelling and grammar in the quotation is really shown in the message.
What should I do?
Leave it be. I figured it out hahaha.
Yes… You cannot load a model motion data onto the Camera… it has to be a Camera motion file or else you will get that message.