Skip to content
Learn MikuMikuDance – MMD Tutorials – Free 3D Animation Software

Learn MikuMikuDance – MMD Tutorials – Free 3D Animation Software

Download Free Animation Software – Let's Learn How to Do Everything!

  • Step-by-Step MMD instructions
  • DOWNLOADS
  • Troubleshoot, Fix MMD
  • Site Contents
  • Reggie Replies Q&A
  • Homework!
  • What IS MMD?
    • Download MikuMikuDance Newest Latest Version of MMD
  • “HOW TO”
    • Raycast RAY-MMD Effect Tutorials
  • BONUS PAGES
    • Why convert PMD models to PMX?
  • HALL of CHAMPIONS
  • Tutorial Categories
  • About
    • Privacy Policy
  • Toggle search form
  • MikuMikuDance Tutorials MMD Tutorials on LearnMMD.com MMD Tutorials
  • Model eye-mesh texture VS Photographic eye-mesh in Blender.Blender
    Photos make realistic eye textures for your MMD models Blender
  • The Making of “Viva La Vida MMD” by Zazi The Angel "the making of" my video
  • Once there was a war… the making of my “Paint it black” MMD video "the making of" my video
  • How to use Raycast MMD MME Shader Effect Advanced Shader Technique
  • Beamman’s MME SelfFreeze Effect for MikuMikuDance 7.39 MME Effects Tutorials
  • MMD The Zombie Song meme
    I’d never eat your brain – The Zombie Song download links "the making of" my video
  • What!
    How to Load Models, Motion, and Music Data into MikuMikuDance ARIZONA

Using Texture Transparency hides MMD model problem areas

Posted on October 3, 2017July 7, 2024 By Senshi Sun 2 Comments on Using Texture Transparency hides MMD model problem areas

A feature article by LearnMMD's Senshi Sun!How can texture transparency make my model look better? Is there a shortcut to making my model’s clothes fit better/look better? Can I make my model’s skin invisible in places where it looks weird against the clothing? How do I make a part of a model’s texture be invisible?

Texture Transparency hides MMD model problem areas…
Fixes Clipping In the Shoulders!

For me, the shoulders are one of the most difficult areas to get right on a model. Due to the shape of the mesh in that area, simply removing parts of the mesh that are problematic can result in mesh being cut from the neck hole. Certain types of clothing make the problem worse.

When I was making a model with a hospital gown, I ran into a problem. The mesh for the gown and the shoulders didn’t line up, meaning the neck hole would have gaps in it. There had to be another solution, a way to remove the mesh at specific points rather than relying on the points on the model.

The answer was to use texture transparency to make the troublesome parts of the model look invisible.

Note that I am assuming you know the basics of PMXE and how to use your image editor of choice… like GIMP, Photoshop, etc.

Step 1: Examine the Texture

The first thing you have to do is figure out which part of the texture you want to hide. Depending on how the model maker set up the texture, it could be easy or hard to find the area. In my case, I was working with a TDA texture, specifically body00_MikuAP_b.tga
It looks like this:

The original body00_MikuAP_b.tga texture image.

This file probably looks different than yours. I modified the model’s skin tone to make her look sick.

Can you tell where the shoulders are on this model? Neither can I! The texture is very compact, so it’s harder to tell exactly where the seams are.

I decided to experiment with the texture image to discover what went where. I overlayed a couple of gradients over the basic texture to see where the seams are. You could probably also use a grid or checkerboard image to do this.

My first step in creating a texture transparency was to locate the areas I wanted to fix.

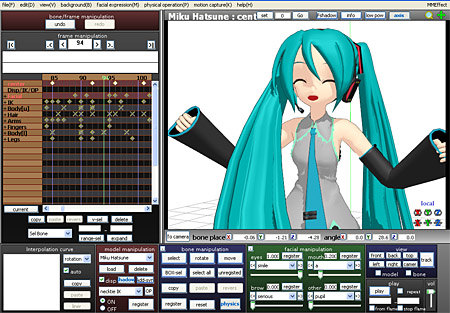
… and when I opened the model in PMXE I found…

Puttnig that gradient on the texture helped me to locate the areas I wanted to modify.

Okay, it’s between the body and the elbow.

Step 2: Mark the Area

Once you figure out where the area you’re working on is, make a new layer. Draw on the area in an obvious colour. My texture is pale, so I’m using black. Don’t try to erase the texture yet. You might have selected an incorrect area.

When I tried the texture with the black masking, I saw…

My first attempt at masking for texture transparency showed me a couple of errors I had made... but I was on the right track!

That’s not quite right. I had accidentally selected the knees… and not all of the area I want to remove is blacked out.

Trial and error... keep at it until you are masking the right areas! ... and then create the transparent areas and save as a PNG.

Erase the area where you don’t need the texture removed and re-load the texture. You can keep trying until you get the area right. Be as specific as you want. It can take many tries to get this right. It took me, like, nine tries, adjusting the texture each time, until I was satisfied.

Step 3: Make it Transparent

Now you can make the final texture image with the transparent parts. I made it transparent using a layer mask in the image editor. This means that I can edit the transparent area. Save it as a .png file. The original file was a TGA file… but TGA files do not use transparency, so if you save it as that file-type, it won’t work.

Try it out in PMXE…

Double-check that the proper areas are transparent.

A test in MMD should confirm it looks good. You can change the transparency to .99 too. You can also delete the vertices that are obviously hidden by transparency to make the model easier to load.


Miku: Hey, my feet have been feeling odd since you made my shoulders transparent.

Me: Let me take a look…

Whoops! ... We accidentally masked a part of Miku's foot.

Me: Oh, yikes! We’re definitely going to need to fix that.

I could edit the texture again to put the part of the foot texture that I removed back, but I’m lazy. Instead, I split the feet from the body mesh and replaced the texture with the hole in it with the original texture.

Is this the best way to solve this problem? I’m not sure. In fact, I suspect this article has made LearnMMD’s more experienced PMD editors very, very sad. It’s really just a bodge, an improvised solution. For me, it works.

Keep the Faith! Hospital Miku is made with Simple Gown and TDA Miku Base. I used information from bandage’s Use the PMXE Transform Window to edit your MMD models! and bigperryman’s PMXEditor Quickly Edits MMD Model using Downloaded Parts, among others, to make the model.

Have fun with PMXE and MikuMikuDance!


– SEE BELOW for MORE MMD TUTORIALS…


— — —


– _ — –


Visit the LearnMMD.com Homepage! Plenty of Mikumikudance instruction and info!

More MMD Tutorials...

Reader asks how to create MMD artwork... stuff like posing, camerawork?

A reader asks... Is there a tutorial on how to create MMD artwork, like those you ...read more

Learn MikuMikuDance in Small Steps! New LearnMMD Video Series

Learn MikuMikuDance in Small Steps. Where can I find easy-to-follow MMD instructions on YouTube? How ...read more

Apply Multiple Effects on an Entire MMD Model Using M4Layer Effect

How can I apply multiple effects to an MMD model? Can I use more than ...read more

MMD Plugin Manager... I Found a Treasure!

What sorts of MMD Plugins are there? MMD Plugin Manager? MMD Plugins. Plugin MMD. More ...read more

2023: Hatsune Miku is 16 Years Old by design and in reality!

Finally, in 2023, Hatsune Miku is 16 years old! When did Miku make her first ...read more

SEARCH LearnMMD.com... it's Easy!

Search LearnMMD.com to find your answers! With the posting of this article, LearnMMD.com has 758 tutorials ...read more

MMD Tutorials, PMDE/PMXE tutorials, Senshi Sun

Post navigation

Previous Post: Proper Computer DPI Scaling Setup Stops Text Cut Off in PMXE
Next Post: I’d never eat your brain – The Zombie Song download links

Related Posts

  • Running MikuMikuDance in Linux using Wine and DXVK Linux running MMD
  • MME Lighting Effect, PanelLight by Soboro, is easy to use!
    Add MME Lighting Effect illuminates model against dark stages MMD Tutorials
  • Use the PMXE Transform Window to edit your MMD models! Accessory Manipulation/Adjust
  • Beamman’s Water v5 Effect needs Editing before you can use it! Beamman's Water v5
  • Animation Fade helps MMD scene transitions Animation Shortcuts
  • Download instant fight scene motion by Mahlazer Animation Shortcuts

More Related Articles

AsciiArt Miku. AsciiArt for MikuMikuDance. ARIZONA
Using Raycast MMD like a pro! "the making of" my video
Kasane Teto with Beamman's Simple Magic Explosion2 positioned behind her Beamman’s SimpleMagic creates Explosions, Fire-Balls and Swirling Flames! Beamman's SimpleMagic
Free Download MikuMikuDance MMD Reader writes: i don’t know how to do mmd :( MMD Tutorials
New Interpolation Curve Video was fun to make! "the making of" my video
Weight Painting MMD models in Blender with MMD Tools Bandages

Comments (2) on “Using Texture Transparency hides MMD model problem areas”

  1. Antoine says:
    August 24, 2018 at 6:47 pm

    How come when I load all the parts to the PMX editor and then save it, it turns all white in MMD?

    Reply
    1. KillerBeer says:
      August 24, 2018 at 9:12 pm

      You must gather all the parts (and more important, all their textures) in one folder before assembling.

      Reply

Leave a Reply Cancel reply

Your email address will not be published. Required fields are marked *

Download the latest version of MikuMikuDance!
See the MMD Step-by-Step instructions page!
Learn how to make your own MMD motions!
LearnMMD.com
  • Gotta Sing... Gotta Dance! LearnMMD's Video Dojo Expo-3!
    Gotta SING… Gotta DANCE! LearnMMD’s Video Dojo Expo-3! CONTESTS
  • Making stages/accessories for MMD using Sketchup Google SketchUp and MMD
  • Save to the Desktop with ALL FILES selected.
    Opening Japanese Models in MikuMikuDance – Sometimes they don’t work! Applocale / 7-Zip
  • RAY-MMD: Haku’s crazy light show [PART 2] MME Effects Tutorials
  • Different MMEffects for different feelings
    Give MMD Pictures Different MMEffects For Different Feelings BigPerryman
  • How to sign up and Upload to Piapro! HollyLawliet
  • Rendering in 4K video at 60FPS with MMD 4k video
  • Are you running the Latest Version of MMM? MMM Tutorials

Copyright © 2022 Learn MikuMikuDance – MMD Tutorials – Free 3D Animation Software and Instructions..

Powered by PressBook Premium theme

Go to mobile version