


This article will be a quick short one. Since there is a plethora of KanColle and Azur Lane character models available for MMD nowadays, let’s have some fun with at least one of them. In this article I will choose one of my favorites, Bismarck Drei by Hinoichi, but you can choose one of your own faves for this exercise.
Ray-MMD Demonstration…
“Battle stations … all hands on deck!!!”
These girls are anthropomorphic manifestations of historical WW2 warships and the common design is to have an anime style girl character to which is attached the fighting gear of the ship she represents. Which means that being a ship, these girls can walk on water. So prop-wise there’s not much to scenes featuring these types of models. You just need a big body of water and a sky box. Fortunately, Ray-MMD comes with these and we will just make use of those.
Anyway, anchors away! Let’s go to sea with one of these girls, or rather MMD.
Stage 1: Setting up the girl
These types of MMD models either come with the girl and her gear as separate models or they come as a single model. If the full kit is two separate models, just load these and attached the gear to the girl. Usually, you will use the OP function to do this. Our model, Bismarck Drei, comes as a single unit so I just loaded her after running her through the PMXe for label translations.
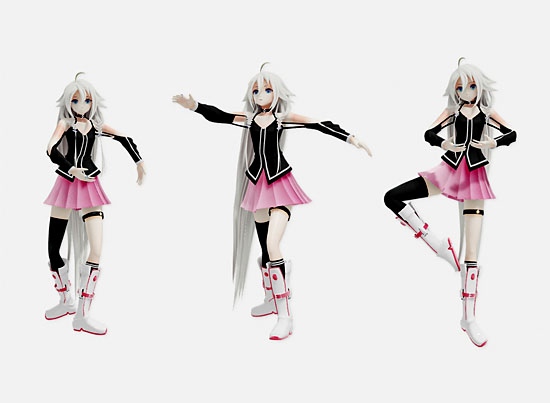
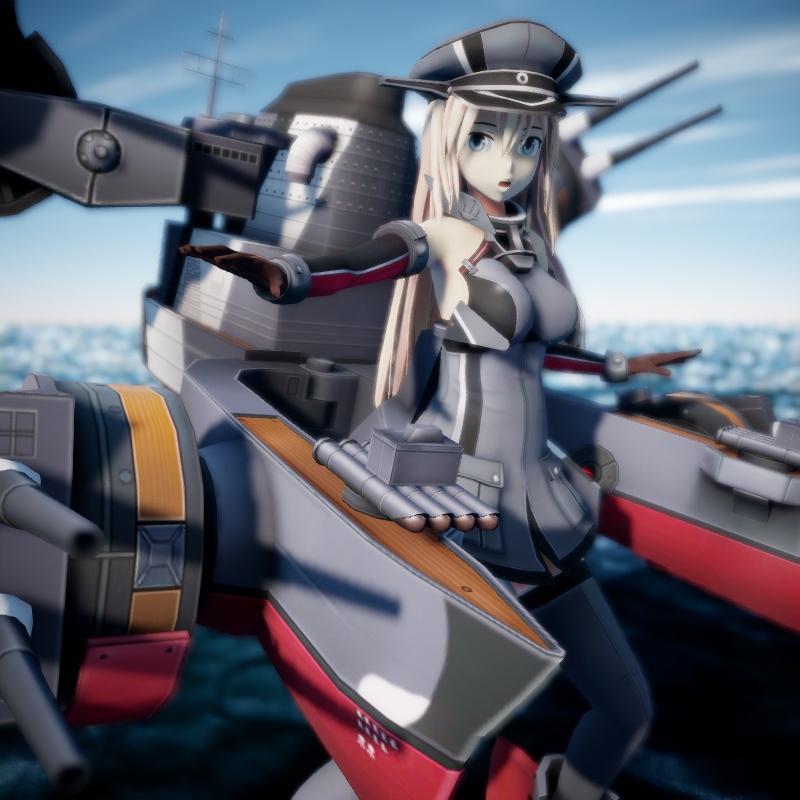
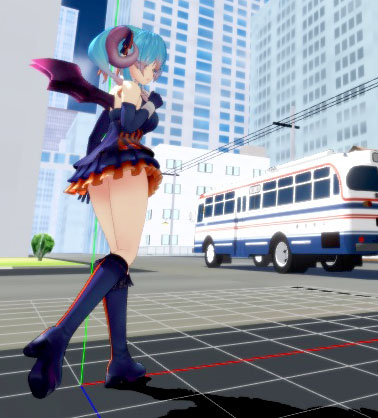
It is best to pose the model at this point, but it can also be done later in the workflow. I personally prefer to do the posing and set up before adding effects, so this was done as shown below. I just referenced some images of her online and cobbled together something that makes her look battle ready.

Stage 2: Setting up the staging
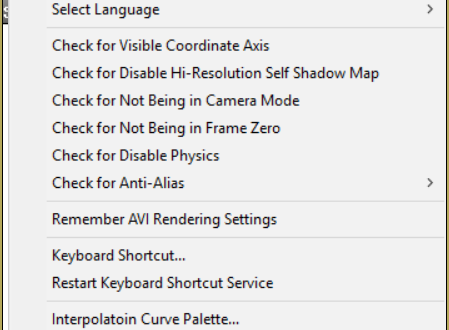
The next step is dead easy. Just load the Time of Day sky box and look in the programmable sub-folder of the materials folder for water.pmx and load that as well. Turn off MMD’s ground shadow display and then go over to the water.pmx facials and set the scale to 1.0. This should fill up the ground plane with a big grey slab; this is the foundation for our “ocean”. By this point, you should have something that looks like the image below.

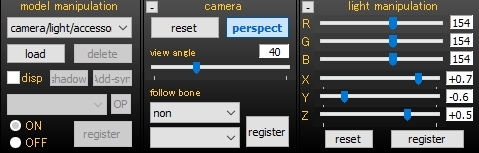
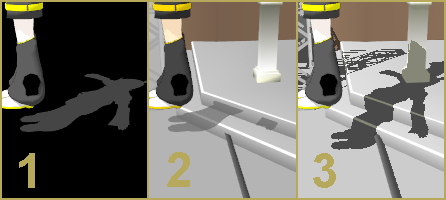
Stage 3: Configuring the primary light source
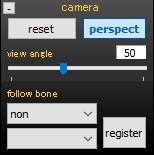
Try not to use the default lighting set up. That generally is not the best option. Move the light around until you get some even lighting on the face and a good play of shadow and light on the mech gear. Our set up is shown below. Also, play around with the camera settings and see if you can identify some good POVs. Nothing done at this stage is set in stone, you just want to create a decent set up to work with.
Stage 4: Setting up Ray-MMD
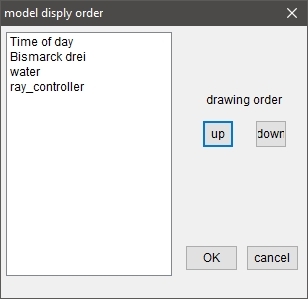
Load ray.x and ray_controller.pmx; then do a quick draw order sort.
Add the following .fx files to the models:
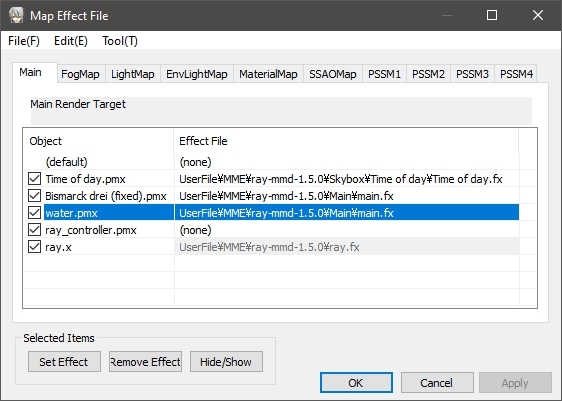
Note: You don’t have to add the main.fx file to water.pmx for the water effect to work. The advantage of adding it is that the water surface does take better advantage of the global lighting set up, but it does also darken the water surface. You might want this for a “deep blue sea” type of look, but even without it, the water looks pretty convincing.
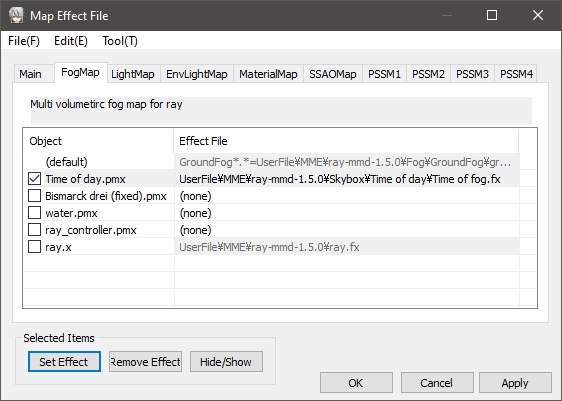
Note: The fog effect is optional, but it does help make the horizon line blurry, hiding the area where the water and the sky meets which helps the scene look a little bit more realistic.
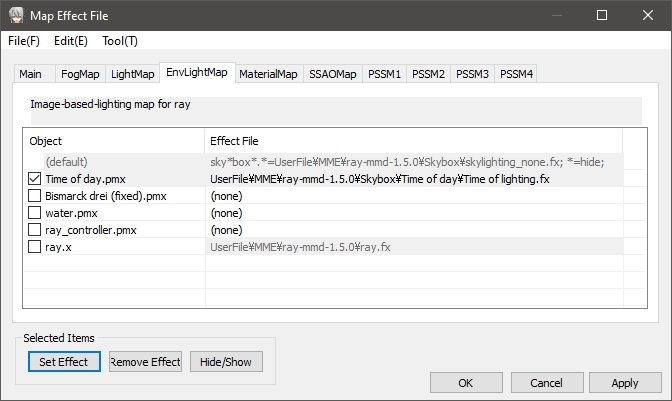
Note: Adding Time of Lighting.fx is mandatory.
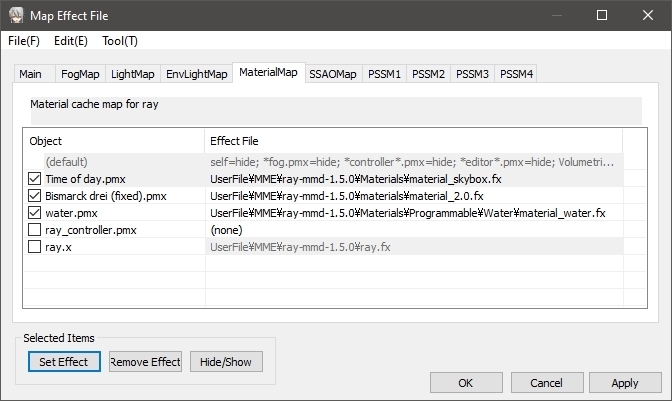
Note: Make sure you add all of these .fx files to the listed models. The sky box especially must have materials_skybox.fx and not material_2.0.fx.
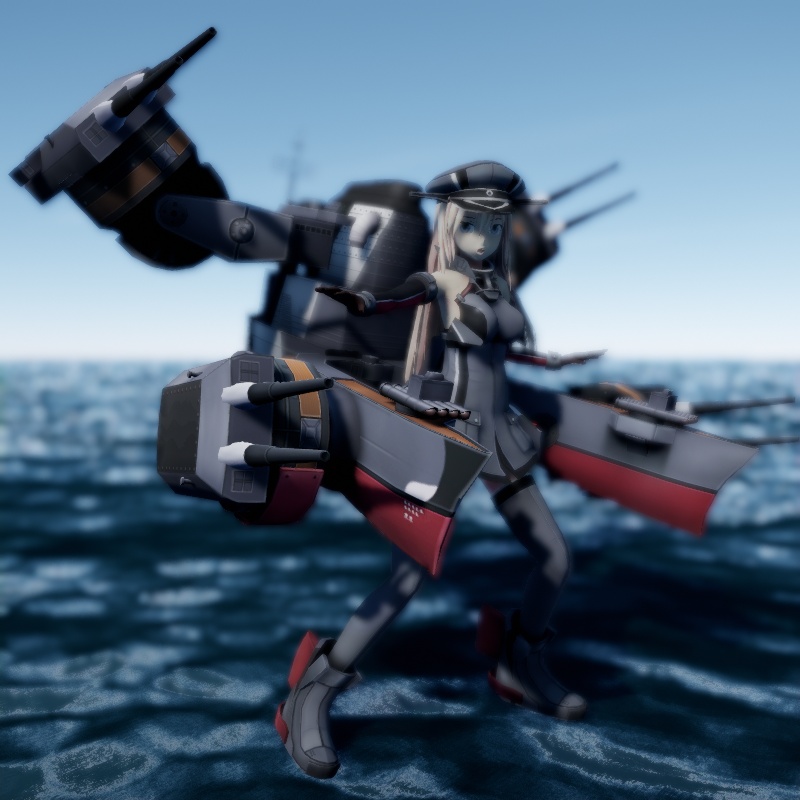
Once all these steps are done your scene should look similar to what we have done so far. Please note that at this point, no adjustments have been made. Note also that the blurring is caused by my RayMMD set up having the Bokeh Depth of Field option enabled. What is important at this point and what you want to pay attention to are the color levels. Does everything look like they all belong in the same scene?
Stage 4: Getting the best POV
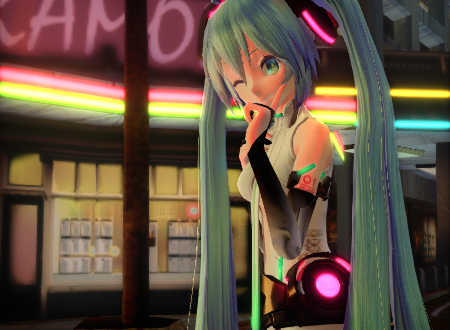
At this point, before making the final adjustments to the RayMMD components, it actually makes good sense to set up the best camera shot. Especially, since we’re doing this exercise for a single shot, we can afford the luxury of tailoring our settings specifically for the final image. If you’re doing this for a motion performance, you will generally need a more generic approach. Anyway, this is our POV set up. We did it this way as we really want that gear of her’s to grab the viewers’ attention.
She’s blurred at the moment due to the Bokeh DOF effect settings still being at their default values. But this is not an issue as everything can be accounted for using the RayMMD controls.
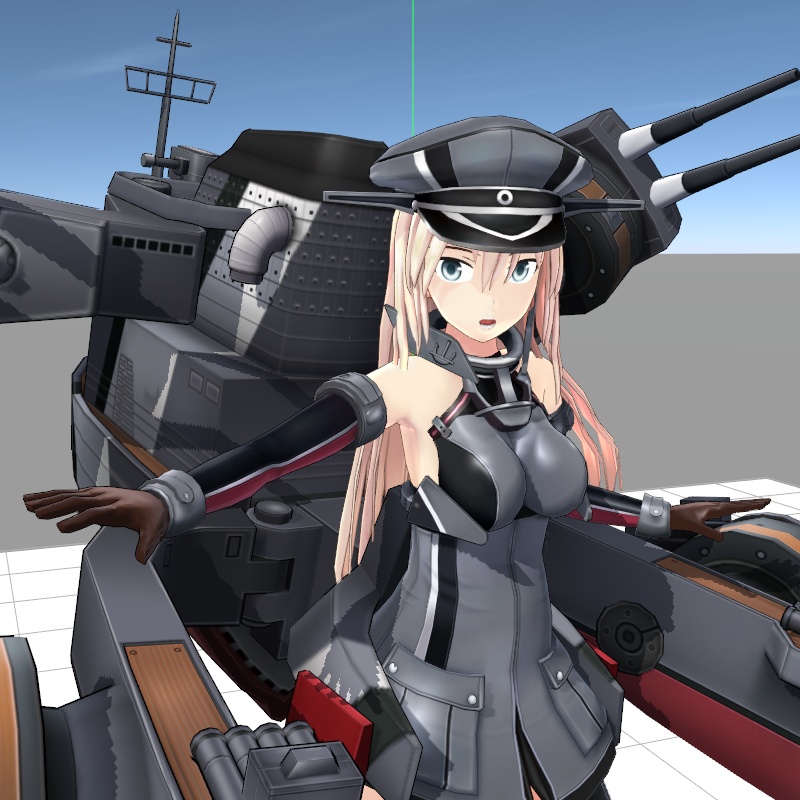
Stage 5: Settings adjustments – initial pass
This next point is very important: for the purposes of illustrating this article, most of the imagery was cropped to fit a 800 x 800 pixel frame. The final render which is linked to the last image, is the intended purpose of all the adjustments made and there is actually quite a significant visual difference. When you view the final image, you will fully understand the point being made here.
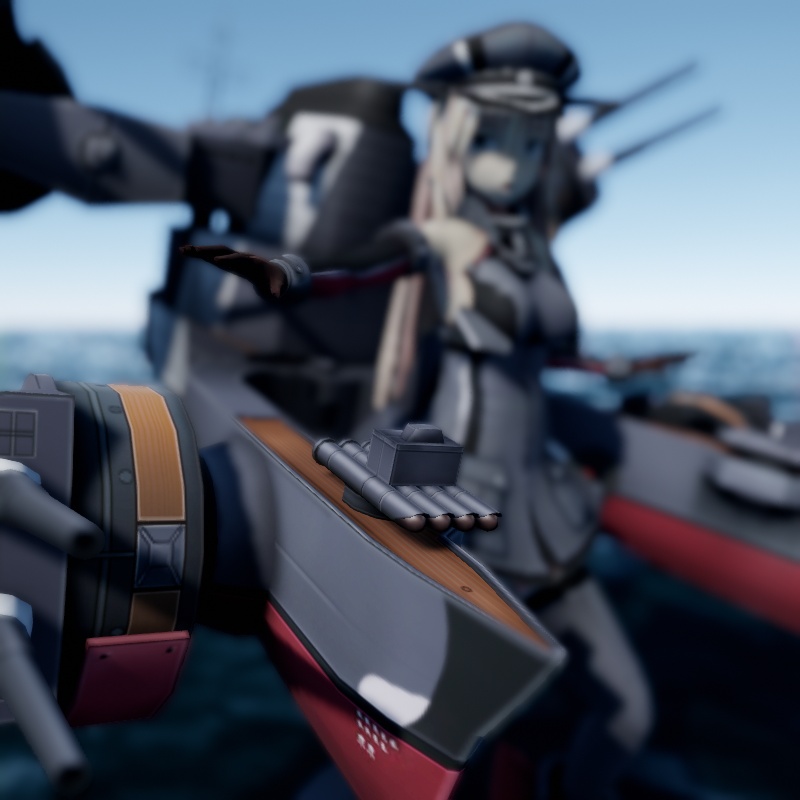
In any case, the next image was made with some of the adjustments but we still have not applied any material specifications to the Bismarck Drei model. The strategy here is to make sure that we are getting a good play of shadow and light on the model. We also adjusted the DOF settings. The field of focus is deliberately very narrow so that some parts of her gear is slightly blurred, especially at the front and the back. Bismarck herself primarily is clearly defined except her extremities. This blurring is deliberate, since this is a static image, we wanted some blurring to suggest “movement“. This approach is a nice trick for action type imagery. But we can make the image even more dynamic in appearance by further tweaking the global light settings using the RayMMD controls.
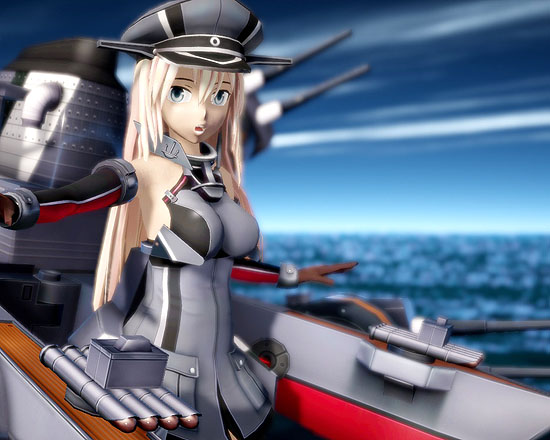
Stage 6: Settings adjustments – final pass
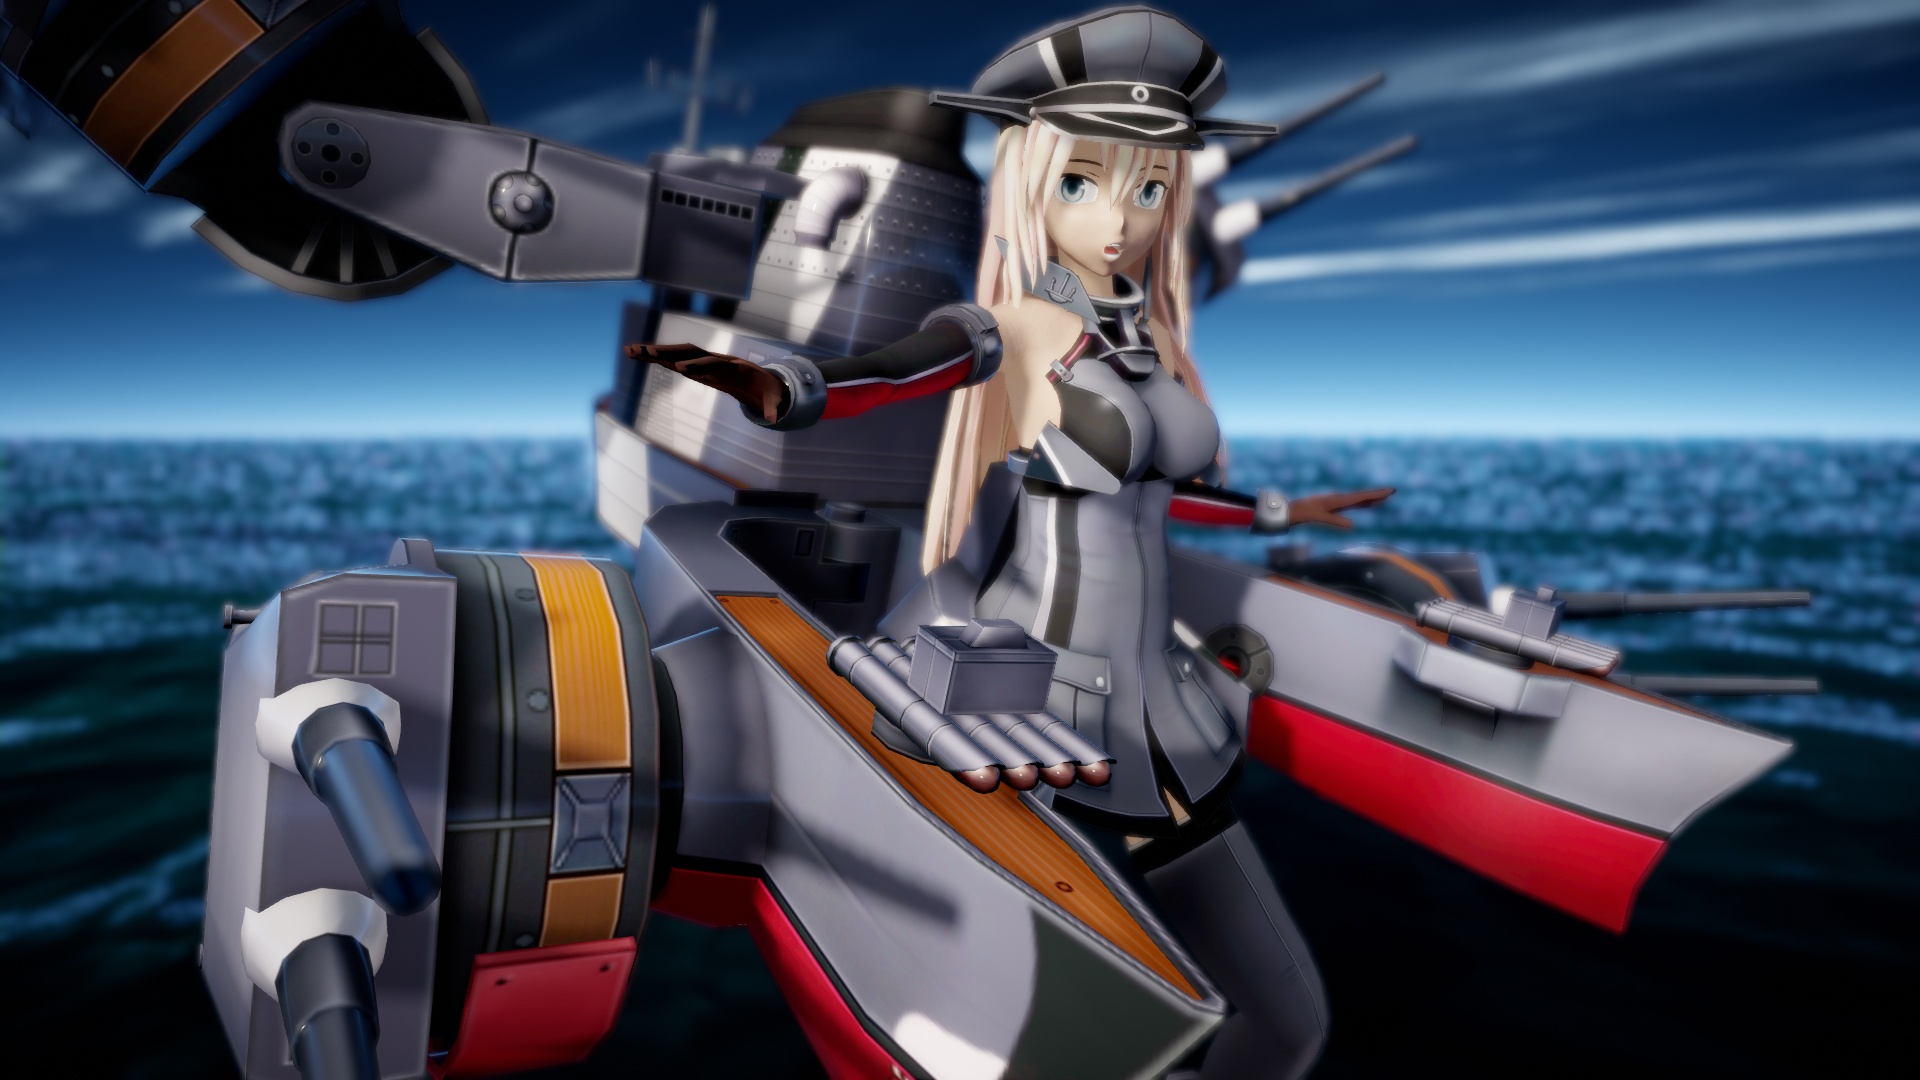
The next image shows results of the final adjustments after material effects were added to Bismarck. If you click on the image below, you can see the original 1920 x 1080 pixel full screen render in all its glory. The impact of the full size image is quite different from the 800 x 800 image shown below as you get to see the “whole” picture. All the settings, as there is a long list can be found in the appendix section under the credits below.
Thanks for reading. We hope you found some useful information in this article. If you have any questions, please feel welcome to post these in the comments section below.
CREDITS
- Bismarck Drei by Hinoichi : www.nicovideo.jp/watch/sm24863745
- Character is from the Kantai Collection video game franchise
- Pose data for Bismarck can be found here: pose download
- MMD 9.32
- RayMMD 1.5.0
Note: The header image actually uses the same set up but with Bismarck (slightly re-posed) and the camera rotated 180 degrees. To even out the lighting on Bismarck, a fill light was added.
Appendix
Materials settings for Bismarck Drei:

Time of day
RayleighColorV- 0.60
RayleighHeight- 0.65EnvDiffLight+ 0.25
EnvSpecLight+ 0.05
EnvSSSLight+ 0.40Cloud+ 1.00
CloudTurbidity+ 1.00Ray_controller
SunLight+ 0.12
SunShadowR+ 0.45
SunShadowG+ 0.45
SunShadowB+ 0.45
SunShadowV- 0.25
MultiLight+ 0.25BloomThreshold 0.50
Exposure- 0.20
Vignette 0.75Fstop+ 0.41
FocalLength+ 0.13
FocalRegion+ 0.03Contrast+ 0.10
Saturation+ 0.30
Gamma+ 0.15
Temperature+ 0.21
BalanceR+ 0.40
BalanceG+ 0.35
BalanceB+ 0.30
Have fun with MikuMikuDance and Ray-MMD!
– SEE BELOW for MORE MMD TUTORIALS…
— — —
– _ — –
![]()


hi can someone teach me or tell me how to “extract the spotlight” from raycast to make it a lone effect(tho ofc credits would still be on the original effect)? cause u see my intel cannot handle raycast or something similar so when I saw this video on YT (https://youtu.be/jpMiUVtN3oI) it kinda gave a hope for “high quality renders” or simply just something better but the thing is IDK how to do it :< so what else could be better than asking the site where I've learned almost everything about mmd? >︿<
Wow… amazing light effects, all right. When that red light is placed behind the window, the resulting “light and shadow” is wonderful. “extracting the spotlight” is way above my paygrade… maybe a reader can help you… Me?, I have no idea.
— Reggie
(And Thank YOU for the compliment!)
hi me again! I figured that I don’t need to extract the spotlight itself! Since it is on a separate file. Tho idk if this is because of my device but when I tried to do what s/he did on the video the light doesn’t really show but then I thought that maybe extra editing is needed. So I’ll just hope that I’ll figure w h a t to edit exactly to make the light appear without raycast itself. Tho I think it is something similar to how others edits other effects (⊙o⊙)
okay nvm everything I said here, I just got a reply from the video creator. “The lighting requires bits and pieces of informations that are from different files within the raycast system. In other words, it’s basically attached tightly with raycast itself. I had to bring the necessary infos that it needs into its codes so that it’s no longer require other parts of raycast to be able to function”
I’ll keep dropping every information I’ll have here so if someone knows how to do them– they might help
OK… thanks for all that info! … There are some subjects that are so “expert” that they pass WAY above my level/ above my pay-grade. Best of luck with your endeavor, here.
No metalness and no roughness material, the model seems poor.
The hull-mech gear is made from a hi-tech lightweight polished poly-carbon material. If it was all metal, it would be too heavy to be lugged around by a pint sized anime girl, don’t you think?
And that, btw, isn’t that far of a stretch. Modern warships are built largely of these types of materials for a variety of really good reasons.
Ray-MMD 1.5.0 – 11.1.2018.
Ray-MMD 1.5.2 – 13.3.2018.
I think you got ’em all… Thanks!
No probs. Just wanted to put than in there for newcomers to the site.
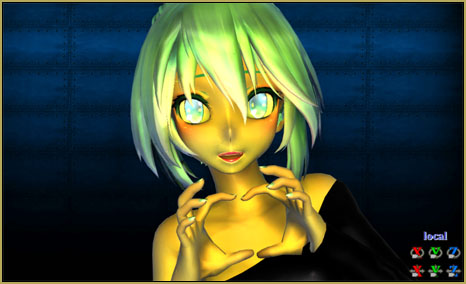
Im doing a night setup. I got the day to look like night (like in the first picture). What settings are used in the material water fx file, to get the water that black like in the first picture? With the sun at that position the water is just bright blue. Ive tried all sorts of configs but no difference. Is that photoshop?
Can anyone recognise what shaders are used for face skin in these videos? It’s all the same face skin shader and looks amazing. I really want to combine that with Ray-MMD…
https://www.youtube.com/watch?v=o4JlkwtnKXY
https://www.youtube.com/watch?v=33rBNRnR_2M
https://www.youtube.com/watch?v=9KYMqWqkLfI
Query the creators of those videos… just ask the makers.
… and remind them to KEEP THE FAITH-MMD
It seems everyone who is Japanese, doesn’t have to properly credit sources when on youtube, but we westerners have to… hmmm… Well that’s exactly why I completely changed my descriptions, to be just like the Japanese descriptions.
Keep the Faith-MMD. … We “in the West” DO list all of our sources and give credits for everything we use. Artists create the items, make them available to us for free… and the only pay they get is the recognition for having done so. Please always list your credits and sources in the written description of your animation. Doing so make them searchable… putting your credits in your video makes them NOT searchable. … so someone wanting to see an example of Beamman’s Self-Burning effect, for example, will never find your video.
I did, but no reply…
It’s the same with the Shininess of the leather
https://i.ibb.co/RccSw0N/mpv-shot0003.jpg
https://i.ibb.co/Tr0rwqh/mpv-shot0005.jpg
https://i.ibb.co/BsyNN76/mpv-shot0007.jpg
I managed to find a similar effect in Ray but I don’t know how to apply it to Leather fx…
Anyone know is it possible to add shininess to Leather?
These are my shots:
The effect
https://i.ibb.co/G0M9RwF/1.png
and Leather that looks flat without it…
https://i.ibb.co/z5K7Wp6/2.png
Hi, It’s me again. Can someone please tell me how to increase self shadow resolution for my new video? I would record a Version 2 then…
https://www.youtube.com/watch?v=9zf78AVdSbo
You can somewhat improve the shadow quality by turning on Fshadow option in the upper right corner. It increases the processor workload, though, so you only need it while doing the rendering. There’s also the “self-shadow manipulation” panel available in the screen mode; you can adjust its settings to make best results for a particular scene… there’s *no* “best” setting for this one, and depending on distance/position of a viewed part of the scene, you may lose the shadow completely, so tread with caution.
I see, thanks! I’ll try it out. Yeah, my FPS is ~3 while nearing the end of working on a project… But I’m totally fine with it as long as there is at least 1 FPS so that I can start the rendering to video. I use UT Video Codec and its really amazing. It doesnt take long to render actually, only 10 minutes usually. Then I just use some nice settings in handbrake, like CRF 18 and it’s done! Now I’m exploring and googling how to get reflecrions on my turret while it has the shiny map on it… I just now tried BeamMans water but it is just a small circle… Do you know how to initialize reflections? I see them all over youtube on stages but I googled and googled and didn’t find a thing regarding Ray-MMD and reflections…
Beamman’s Water should be resized using Si attribute in the Accessory Manipulation panel. As for reflections in Raycast – sorry, I don’t know, I haven’t used it myself. For my purposes, it’s usually enough to have either Beamman’s Mechanic_Mirror, though it’s not *really* reflection, or WorkingFloor, which *is*, but not for custom surfaces.
Thank you. I actually found them! In the raycast conf file. They are called SSR – Screen Space Reflections. And they look amazing! I put them on the highest setting (128) and they look so real. I just need to do some minor camera edits and my new video will be done. I have been working on it for the past 2 days and 2 nights without sleeping. I think I really outdid myself on the shaders tuning, everyone looks like a real person going to jump out of the screen. And I recreated the environment seen in the following image.
https://upload.wikimedia.org/wikipedia/commons/b/bf/Bismarck_reconnaissance.jpg
And I even found normal maps for hair and a super quick tutorial how to edit their settings! Already finished with that actually. This are the hair shaders I always wanted.
https://bowlroll.net/file/113622
https://www.youtube.com/watch?v=p0HbqgqMRqg
I have another issue… I see Godrays have disappeared in the recording in both my new videos! For the latest one, I have especially set the sun so that it is behind a character and in MMD there were nice long warm white Godrays all over the place in most scenes where a character is in front of the sun… But in the recording they are completely disabled. What should I do? I googled but found no answers…
https://www.youtube.com/playlist?list=PLcBohLVMfp45Rx7WAwknopRbHY5HaRaFo
Sorry, you’ll have to wait for someone else to answer this one.
I have googled some more questions but nothing so far…
Please point me to:
1.) How to enlarge the waves a lot?
2.) How to edit material fx maps? I want to edit the rough metal fx map and add a very dark tone to it because I would love to paint the Tirpitz / Bismarck ship models to black like in the following screenshoot. The rough metal fx map is the only map that works well on the ship without changing the textures. So I just want it very black. It’s logical to me that if since that map is already transparent and has a nice tone to it, that tone can be darkened a lot, which will look amazing when I add reflections to whole ships.
https://steamcdn-a.akamaihd.net/steam/apps/552990/ss_74d38b6465819f6434df80505fc1a74edfff7fde.jpg?t=1580499431
Thanks in advance!
Just open material_water.fx (or any respective .fx file for other materials) in a text editor like Notepad++ (standard Windows Notepad may have troubles with Japanese characters in comments; while Raycast is purely English, you better get used to seeing *lots* of Japanese while dealing with MMD/MME). They are, in Raycast’s case, just sets of various constants that actual effect uses. You can change those constants to see what looks they produce and what is best for you (just keep backups of everything you edit!). For waves’ size, I suppose, waveHeightLow and waveHeightHigh are instrumental.
There’s a line of tutorials specifically aimed at effects’ modification through .fx files editing; you may find it useful.
Epic! Thanks! Finally I’m gonna get me some big waves like in a real ocean.
Hi, I have some questions
Where can I find the model draw order sort menu?
Is it possible to add that beautiful water effect to the ocean stage?
Is that water moving like in Assassins Creed Black Flag?
For .pmx, “Background->Model draw order”. For .x, “Background->Accessories edit”.
Thanks! Can you please tell me how to remove the huge white ball in the sky? I can’t see the sky because of it.
https://i.ibb.co/cDs1yBn/Tirpitz-3.png
https://i.ibb.co/DCkS0Tp/Tirpitz-2.png
https://i.ibb.co/0286P9R/Tirpitz.png
https://i.ibb.co/McrHrnr/White-ball.png
I accidentally removed the image links… Here are new links. I don’t know why that white ball/sphere is following me since I started with Ray…
https://i.ibb.co/30wvWjF/Tirpitz-3.png
https://i.ibb.co/SwXNfj4/Tirpitz-2.png
https://i.ibb.co/0mSYVg7/Tirpitz.png
https://i.ibb.co/RDSc7L6/White-ball.png
All your links show “Image not found” to me…
At what step specifically that ball appears for the first time?
I managed it. I didn’t know materials_skybox.fx has to be used instead of material_2.0.fx because I was only focusing on a prior guide. I apologize.
I have another issue, please help me out… I can’t load main.fx to this accessory. When I try, it turns black! So I just use material_2.0.fx on it. But I feel like the item is missing something. Is there something special that needs to be done to this stage? Thanks in advance.
https://www.deviantart.com/wampa842/art/MMD-Mountain-stage-download-365653159
Well, it is supposed to turn
into a newtblack at this certain step but it will get better as you progress.It looks to me that you just started to explore Raycast and already dive into it headfirst. That’s admirable attitude, but we have whole two pageful of Raycast tutorials, some basic ones and some (like this one) assuming a degree of experience. Maybe if you read more of them first, you’ll get answers to questions you don’t yet know you have :D .
Thanks! I saw your reply just now. We have a timezone difference so think the site says different time to me than my system? It’s 7:30 AM now. I pulled another all-nighter again. I think I mastered how Ray-Cast basics work at least to be able to work with out-of-the-box materials and technology it has. I love it!!! I would really love if you guys would check out my video! I want all of you to see it. I put a link in the Prinz Eugen Tutorial.
https://learnmmd.com/http:/learnmmd.com/ray-mmd-technique-of-battleships-and-fleet-girls/
We also have THIS PAGE with all of the Raycast tutorials listed in chronological order… from our “First Encounter” with basic (and questionable??)instructions up through Trackdancer’s latest notes. Maybe you will see something that helps.