Skip to content
Learn MikuMikuDance – MMD Tutorials – Free 3D Animation Software

Learn MikuMikuDance – MMD Tutorials – Free 3D Animation Software

Download Free Animation Software – Let's Learn How to Do Everything!

  • Step-by-Step MMD instructions
  • DOWNLOADS
  • Troubleshoot, Fix MMD
  • Site Contents
  • Reggie Replies Q&A
  • Homework!
  • What IS MMD?
    • Download MikuMikuDance Newest Latest Version of MMD
  • “HOW TO”
    • Raycast RAY-MMD Effect Tutorials
  • BONUS PAGES
    • Why convert PMD models to PMX?
  • HALL of CHAMPIONS
  • Tutorial Categories
  • About
    • Privacy Policy
  • Toggle search form
  • Older MME Shaders rival Ray-MMD Raycast results and are easy to use! Material Shader
  • Sweet MMD Meme “Hello_How Are You” MMD Memes
  • Adult Shader on a LAT model – it’s possible! Adult Shader effect
  • Free Download MikuMikuDance MMD
    Reader writes: i don’t know how to do mmd :( MMD Tutorials
  • Most important MikuMikuDance instruction: Track your sources! Keep the Faith-MMD Credits/Sharing
  • Creating Hand IK Bones with the IKMakerX PMXE plugin Bones
  • A girl named Miku Hatsune… Random Thoughts & Visions
  • PMDE Q&A – Making clothes follow model motions Fixing Broken Models
You can enlarge or reduce and Accessory by adjusting the Si value in MikuMikuDance.

Use Accessory Manipulation fields to position/adjust Accessories

Posted on June 3, 2012August 1, 2015 By Arizona 2 Comments on Use Accessory Manipulation fields to position/adjust Accessories

How do you use the x, y, z, and Rx, Ry, and Rz windows in the accessory manipulation panel in MMD?  How do you change the size of a stage or accessory in MikuMikuDance? How do you make an accessory transparent in Miku Miku Dance?A Feature Article by contributor ARIZONA on LearnMMD.com

Coordinate Coordination: The Sequel.

Have you ever wanted to use just one section of a stage as a backdrop? So you think to yourself “Do I really have to move ALL my models to that section?” Well, actually, you don’t have to. You can move and rotate the entire stage and save the dummy bones for your other props (Please see some of our other articles for dummy bones). This is a very similar exercise to using the Center Position Bias but there are some twists … and it requires a bit of creative visualization.

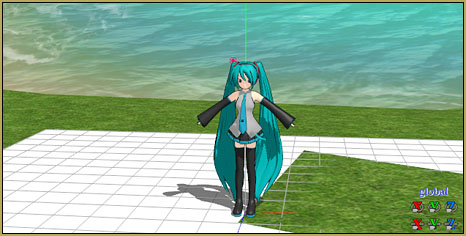
The accessory manipulation sub menu (or panel)You can resize and adjust the position of your stages and accessories without Dummy Bones!  (Nel Akita v13 by Mio-nee, Miku’s Dance Studio by Trackdancer) is what you use to load all your accessories, stages, effects etc. It’s the one that disappears when you load a model and reappears when you click on the arrow button and choose “camera/light/accessory” option in the model manipulation panel.  It has 11 fields and 2 check boxes. What I most want to focus on are the X, Y, Z, and the Rx, Ry, and Rz fields. The first thing we need to do is show you how to visualize these planes.

Hold out your hand in front of you, about eye-level, with your palm down and your fingers straight. Next imagine the knuckle of your middle finger is the center of your stage. Now this is important, imagine the beam of a laser pointer targeted straight down on the center of your stage (knuckle). This would be your display coordinate axis. Actually, if you do have a laser pointer, go get it and we can use it to do something other than teasing the cat.

Keeping your hand in this position, slowly move your hand in a left/right side-to-side motion. The laser beam would travel across your other knuckles and the back of your hand. This would be your positive and negative X axis.

Go back to your original position and move your hand in an up and down motion; all the while, keeping the beam focused on your center knuckle. Do the "Coordinate Hand Jive" to help visualize the effect of the the various Accessory Panel controls.This would represent your positive and negative Y axis.
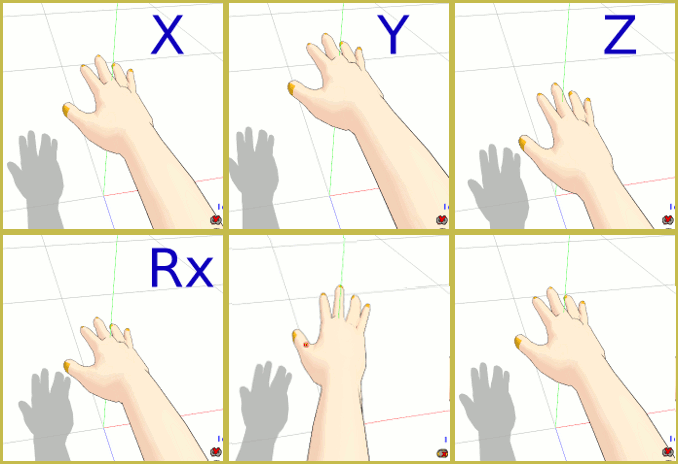
To represent the Z axis, you would move your hand in a forward and backward motion. The beam would travel up your swearing finger and across the back of your hand toward your wrist.
To help you picture the Rx, Ry, and Rz axes, you’ll now have to imagine your center staying in its original fixed position (Think of it as a fulcrum on a teeter-totter). The “R” in all these axes names means rotate. Just stick with me, it’ll become clearer.

With your hand out again, keep and imagine the center point totally still. Move just your wrist up and down  like a see-saw and you get the +/- Rx axis plane.

Now back to the original position, this time twist just your wrist from a right side to left side, you might need to move your forearm and elbow a bit to keep the center axis centered. This would be the pos./neg. Ry axis.

If you just twist your wrist in a thumb up/pinky finger down and vice versa rocking action then you haveYou can enlarge or reduce and Accessory by adjusting the Si value in MikuMikuDance. the coordinate values for Rz axis plane.
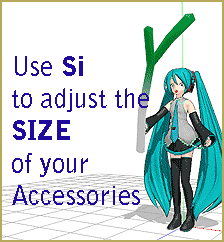
The Si (Size) field changes the size of the stage. By entering a numeric value in that field you can make the stage or accessory as big or as small as you want. This is invaluable with sky domes! Notice the size of the actual model is unchanged; they just appear to be smaller or larger than their surroundings.

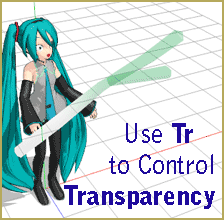
The Tr field adjusts the transparency of a stage or accessory. 1.00 is the default and highest value you can add, in other words, opaque. At 0.00 the stage is invisible-totallyAdjust the Transparency of your Accessory by adjusting the Tr value. transparent.  So, by entering any 0.xx value you can get the level of transparency you may want.
Add-syn allows you to, temporarily, remove an accessory. This could be useful for editing your scene.  Right click it once and the accessory will disappear. Click it again and it’ll reappear. It isn’t completely deleted; it is just out of your way.

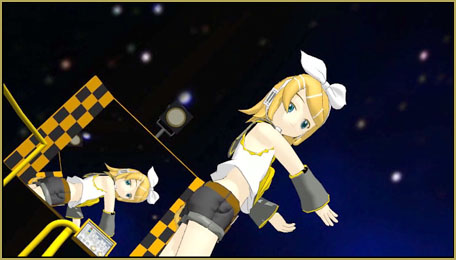
The most important thing to remember is that you are adjusting the accessory- not the plane the model stands on. If you’ll notice in the illustrations only Miku’s studio is manipulated. Everything in MMD is (initially) set in relation to the display coordinate axis. Dummy bones and Mother bones can over ride this and give you options.

Have fun with this.


– SEE BELOW for MORE MMD TUTORIALS…


— — —


– _ — –


Visit the LearnMMD.com Homepage! Plenty of Mikumikudance instruction and info!

More MMD Tutorials...

Switch Models without Physics Glitches

How do I change my model mid-animation in MMD? How do I switch models in ...read more

More on Accessory Manipulation in MikuMikuDance

How do you get a model to grip accessories better in MMD? How can you ...read more

Using The Dummy Bone for MikuMikuDance

How do you use the Dummy Bone in MMD? What is the Dummy Bone in ...read more

How to Switch Models and Stages in MikuMikuDance

How do I switch models in the middle of a video in MMD? How do ...read more

Nekomimi: Getting Catty Miku Miku Style MMD

How do you attach accessories to the model in MMD? How do you attach the ...read more

Keyboard Shortcuts Aplenty in MikuMikuDance 7.39 by ClintImTired

Keyboard Shortcuts in MMD 7.39 is a favorite topic of ClintImTired ... a young fellow, ...read more

Accessory Manipulation/Adjust, Nuts & Bolts Tags:beginner, mikumikudance, modify accessories

Post navigation

Previous Post: Organize Your MMD Model Collection, Track Your Sources
Next Post: Load Camera Motion Data VMD files using the File Menu in MMD

Related Posts

  • Move the whole Model with Box-Sel in MikuMikuDance Functions-Copy-Paste-Expand
  • Extreme S Curve 02.
    Using the Interpolation Curve in MikuMikuDance. ARIZONA
  • ZERO-GRAVITY Day on the beach in MMD!. Use Gravity Settings and Noize to make winds blow.
    Using the Gravity Settings in MikuMikuDance ARIZONA
  • Download and Install MikuMikuEffect (MME) To Use Special Effects Nameplate effect
  • Position stage near MMD coordinate axis center-line Accessory Manipulation/Adjust
  • Visit Krystal-Sakura on Deviant Art to get "Sparkly Eyes" for MMD 7.39
    Change a Model’s Eyes Using MMD Eye Packs in MikuMikuDance NOKO2

More Related Articles

Delete Miku and Learn About the Sample Dance Stage Lights Dummy Bones
Keyboard Shortcuts Aplenty in MikuMikuDance 7.39 by ClintImTired Accessory Manipulation/Adjust
When MMD 7.39 crashes you lose any unsaved changes. Save Often! MMD Crashes when Rendering to AVI Making Videos - Rendering to AVI
Download MMD Pokeball Accessory and Learn Accessory Manipulation Accessory Manipulation/Adjust
The MMD Physics Engine keeps Skirts from going through legs! MMD Basics
The FILE Menu Options MENU Option Descriptions

Comments (2) on “Use Accessory Manipulation fields to position/adjust Accessories”

  1. Pingback: 基本的な使い方 [MMD] – Site-Builder.wiki
  2. yukiokeitaro says:
    January 12, 2014 at 10:58 am

    i need to know how to fix the physics of a model ?
    o.o

    Reply

Leave a Reply Cancel reply

Your email address will not be published. Required fields are marked *

Download the latest version of MikuMikuDance!
See the MMD Step-by-Step instructions page!
Learn how to make your own MMD motions!
LearnMMD.com
  • MMD smoke clouds are easy to make with Beamman's Breath effect.
    MMD Smoke Clouds and a Smoke Filled Room… Beamman's Breath Effect
  • MME: Less is More… Select only those that you need. Cook Torrence effect
  • Different MMD models react differently to pose and motion data MMD Basics
  • Graphic Design Skills enhance MMD Pictures MMD Basics
  • MMD Stages Source Featured
    Great MMD Stages Source: Deviant Art MMD Basics
  • Move the 3 .dll files from the MME Download folder into the main MMD Folder.
    Download MME v037 in English MMEffects for MMD MikuMikuDance MMD Tutorials
  • Using The Floor Light Art Effect in MMD. ARIZONA
  • Recent MikuMikuDance Updates may become collectible, who knows?! Download MikuMikuDance

Copyright © 2022 Learn MikuMikuDance – MMD Tutorials – Free 3D Animation Software and Instructions..

Powered by PressBook Premium theme

Go to mobile version