


![]() How can I use MME? How can I use effects for MMD? Can I hide MMD models from my mirror? Can I keep MMD models from casting shadows? How to edit effects for MMD? How to write new effects for MMD?
How can I use MME? How can I use effects for MMD? Can I hide MMD models from my mirror? Can I keep MMD models from casting shadows? How to edit effects for MMD? How to write new effects for MMD?

Maybe you’ve had some time to play with MME effects for MMD. There are a lot of great effects than can breathe dramatic new life into your renders. But, as with everything else, there’s a lot under the hood. Understanding some of that can help you render the exact scene you want, and it’s a great way to learn more about shaders if you’re interested in modifying them or writing them from scratch.
Mapping effects
Open up MMD and click on the MME button in the upper right corner of your screen. Select Effect Mapping. Hopefully, you’ve done this a million times, but in case you haven’t….

A window titled Map Effect File pops up. From here, you should see all of your loaded models. You can set effects for any of them by right clicking on a row and selecting Set Effect (and then, of course, navigating to and selecting the effect you want in the following dialog). Or, you can hide a model by clicking a row’s checkbox. By right clicking on a row and selecting Subset-Extract, you can break a model up into its component materials, allowing you to set a different effect for each material, or to hide individual elements.
Render targets
Notice how all of these options are listed in a tab titled Main? That’s important. What MME is saying is that it’s going to render these models, using the shaders specified, to the main render target. Which is to say, to your screen.
If you haven’t loaded any other effects, there won’t be any other tabs, so OK out of the screen to apply your changes, then try loading an accessory-based effect. I’m going to load WorkingFloor2.008.

Now, open up your effect mapping panel again. Look at the top. Do you see that there’s a new tab titled WorkingFloorRT? RT is for render target, and this new tab is a new, off-screen image to which MME is going to render, using different shaders and different models. When it comes time to render to the main screen, MME is going to use the new shader loaded onto WorkingFloor.x to draw that model (which is just a plane that you can open up in PMXE if you want). WorkingFloor.fx looks at an off-screen render target to decide what to draw. Unsurprisingly, it looks at WorkingFloorRT to figure out what to draw.
Hiding off-screen render targets
The important thing to understand is that you can modify the shaders and display options for these extra render targets the exact same way that you can modify the shaders and display options for the main render target. For example, try unchecking a row in your WorkingFloorRT tab. Do you see the model’s reflection disappear? It’s no longer being sent to that renderer. When Working Floor looks at the render target to decide what to draw, it doesn’t see that model. (And, importantly but very technically, that model isn’t even writing to the depth stencil buffer, which the renderer uses to make sure that things in front get drawn instead of things in back.)

Working Floor is just an example. Most accessory-based effects load new render targets. Hide a model from AL_EmitterRT and AutoLuminous will no longer know that model exists, and so it will stop glowing. Or hide a material from all of the render targets that Excellent Shadow creates and your light won’t know that your material exists– it will no longer cast a shadow.
If you’re having problems hiding something, double check which render target you’re hiding a model from! Each of these render targets exists for a reason, and each of them does something slightly different from the last.
Modifying off-screen render targets
Mostly, there’s a reason that effects use specific shaders (like WF_Object.fxsub) for their off-screen render targets. These shaders are modified from the defaults, because otherwise, why even bother with a new render? For example, WF_Object.fxsub renders objects from a different perspective. So, mostly, you won’t want to change these. If you do, notice that the load dialog only shows you files of type .fx unless you tell it otherwise, and many of these effects have a different extension, like .fxsub.
But there are times when you may want to make changes. One of the problems with effects like WorkingFloor is that they don’t use the shader you’ve used on your main render target– your screen. But sometimes, there are alternatives to the default shaders. For instance, if you use Adult Shader, I’ve created an alternative Working Floor object using the Adult Shader pixel shader, and if you want, you can download that, and apply WF_ObjectAdultShader.fx to an object in your WorkingFloorRT. It replaces the existing WF_Object. There are other effects that work like this as well. Some effects, like HgSAO, bundled into NCHL, actually include a few optional .fxsub files.

Let’s get technical
This is getting into code now, and most users aren’t going to be interested in it. But modifying effects for MMD is a great way to spruce up your renders and it’s a great way to learn some programming, a skill that is useful in an increasing number of fields.
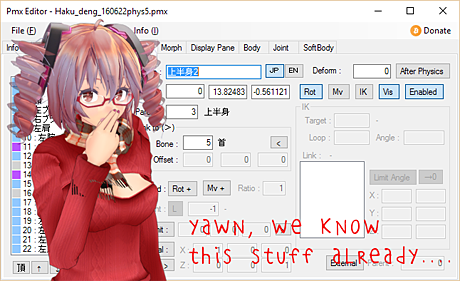
Try opening up WorkingFloor.fx now. Any old text editor will do. Look for these lines near the beginning:
#define OFFSCREEN_FX_OBJECT “WF_Object.fxsub”>
…
texture WorkingFloorRT : OFFSCREENRENDERTARGET <
string Description = “OffScreen RenderTarget for WorkingFloor.fx”;
float2 ViewPortRatio = {1.0,1.0};
float4 ClearColor = { 0, 0, 0, 0 };
float ClearDepth = 1.0;
bool AntiAlias = true;
string DefaultEffect =
“self = hide;”
“*.pmd =” OFFSCREEN_FX_OBJECT “;”
“*.pmx =” OFFSCREEN_FX_OBJECT “;”
#if(XFileMirror == 1)
“*.x= ” OFFSCREEN_FX_OBJECT “;”
“*.vac =” OFFSCREEN_FX_OBJECT “;”
#endif
“* = hide;” ;
>;
sampler WorkingFloorView = sampler_state {
texture = <WorkingFloorRT>;
MinFilter = LINEAR;
MagFilter = LINEAR;
MipFilter = NONE;
AddressU = CLAMP;
AddressV = CLAMP;
};
That might look like gibberish, but we can go through it. Learning how to create High Level Shader Language (HLSL) effects is like learning a new language. You read it even though it doesn’t make sense, then you read it again and again, and eventually, it starts making sense, first one line, then a week later, the next one. You can do it without a teacher, but teachers sure help.
#define is a preprocessor directive. Essentially, this line is saying that any time the shader reads the word OFFSCREEN_FX_OBJECT, it should substitute the words “WF_Object.fxsub”. You’ll see this technique many, many times in reading effects.
texture WorkingFloorRT : OFFSCREENRENDERTARGET is the beginning of a definition of a render target. Note that it’s type texture— this render target is read by the shader in the same way that it would read any other texture! The following lines describe some of its parameters: that it uses the same view aspect as the screen, that it should clear to transparent black every frame, that it should clear its depth stencil buffer every frame, that it should anti-alias the texture the same way it would your screen. Then, it tells MME how to actually draw to this render target:
“*.pmx =” OFFSCREEN_FX_OBJECT “;”
That shouldn’t be so mysterious anymore. MME is saying, look at all of the models, and if any of them are named anything (* is a wild card), with an extension of .pmx, it should apply WF_Object.fxsub to that model to render to the new render target. And WF_Object.fxsub isn’t much different than, say, AdultShader.fx— it’s just drawing to a different “screen”, one that will go through another stage of processing before it makes it to the visible screen.
There’s one more thing, which is that WorkingFloor.fx needs to know how to read this new render target. So it sets up a sampler to tell your video card how to read it– to average the colors between pixels when it looks up UV values, to not bother interpolating between mipmaps, and to use the edge of the texture when it looks up a UV value greater than one or less than zero.
And that, in a nutshell, is everything you need to know about render targets!

Keep the Faith and credit your sources! I used my own Tda Tutor Teto for this tutorial, dolled up in a dress based on meshes by Kanahiko-chan!
– SEE BELOW for MORE MMD TUTORIALS…
— — —
– _ — –
![]()


I just started and I need to ask a really dumb question (cus I gotta start somewhere)… How do I load an fx. file into MMD?
Also, I noticed there are some shaders only compatible with either 32 bit or 64 bit; how do I find out if a certain shader is compatible to my version of MMD?
Sorry, thanks
There are two basic types of effects (it’s more complicated than that, but let’s start with something simple): those that come with an .x accessory of the same first name, and those without. Former ones are loaded in the Accessory Manipulation Panel, and they usually affect the whole view (SSAO would be a typical example of that). Latter ones apply directly to a particular model in the MME’s Effect Mapping panel (like AdultShader).
As for 32/64-bit issue… well, if there’s no separate versions of the effect on author’s page, the rule of thumb is to assume that it is compatible with both until it starts to give you trouble :D. (Of course, there might be *various* reasons for why the effect gives you trouble, so you’d have to process each case separately. More usually than not, the reason is *not* 64-bit compatibility.)
Thank you!
Okayy… I’m alright with loading .x files. But HOW do I literally ‘load’ a .fx file when it doesn’t come with a .x accessory? (Sorry for my slow understanding, it’s all new to me except the downright MMD basics >. File tab> Open> *file*] which gives an error… Dragging the file directly into my MMD window doesn’t work either o_o
(Something went wrong with my comment o.o)
Correction:
…MMD basics) I’ve tried going MME > File Tab > Open > * file* which gives an error … (cont.) though I’m probably doing it wrong. 0_0
I think, if I understand your issue, you want to load a .fx that doesn’t have a .x with it. You click on that MME in the upper right of your screen, then click on Effect Mapping, highlight the model upon which you want to apply the effect, click the Set Effect button, and navigate to your .fx file… yes?
Ahh I see~ O.O I got it! THANK YOU! <D
Err…there’s no MME button anywhere I can see o.o
This tutorial looks helpful, though :)
Now if only I could find that button…
You have to download MME separately.