


![]() Reggie (this site’s owner) recently got a new Win10 PC and has been trying out RAY-MMD on it. He said that reading my previous tutorial on it was helpful but I could see he was struggling a bit. But that’s fine. RAY-MMD can be overwhelming to a newcomer (to the effect) and the last tutorial I wrote on it wasn’t exactly for beginners. This one, here, will be.
Reggie (this site’s owner) recently got a new Win10 PC and has been trying out RAY-MMD on it. He said that reading my previous tutorial on it was helpful but I could see he was struggling a bit. But that’s fine. RAY-MMD can be overwhelming to a newcomer (to the effect) and the last tutorial I wrote on it wasn’t exactly for beginners. This one, here, will be.
RAY-MMD: A method to get great results fast and easy!
Download the latest version of Ray-MMD from Git-Hub. (Scroll down a bit, there, to find the Download button beneath the sample pictures.) This tutorial uses Ray-MMD 1.5.0
If you follow along with this tutorial, it will show you the basic nuts and bolts to getting really nice results very quickly. Even if you do have some  experience with the effect, you might pick up some useful pointers. However, in the interest of keeping this article from being too long, I won’t go into detail of where to find files. These are all in the folders included with the download and you will need to know where stuff is to use the effect effectively. That said we are using assets from the default download unmodified. They are more than sufficient for the beginner user and then some.
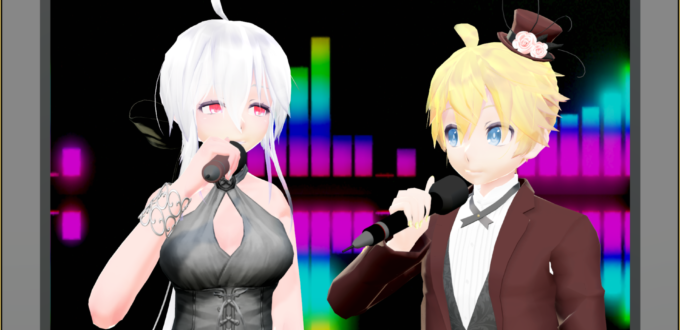
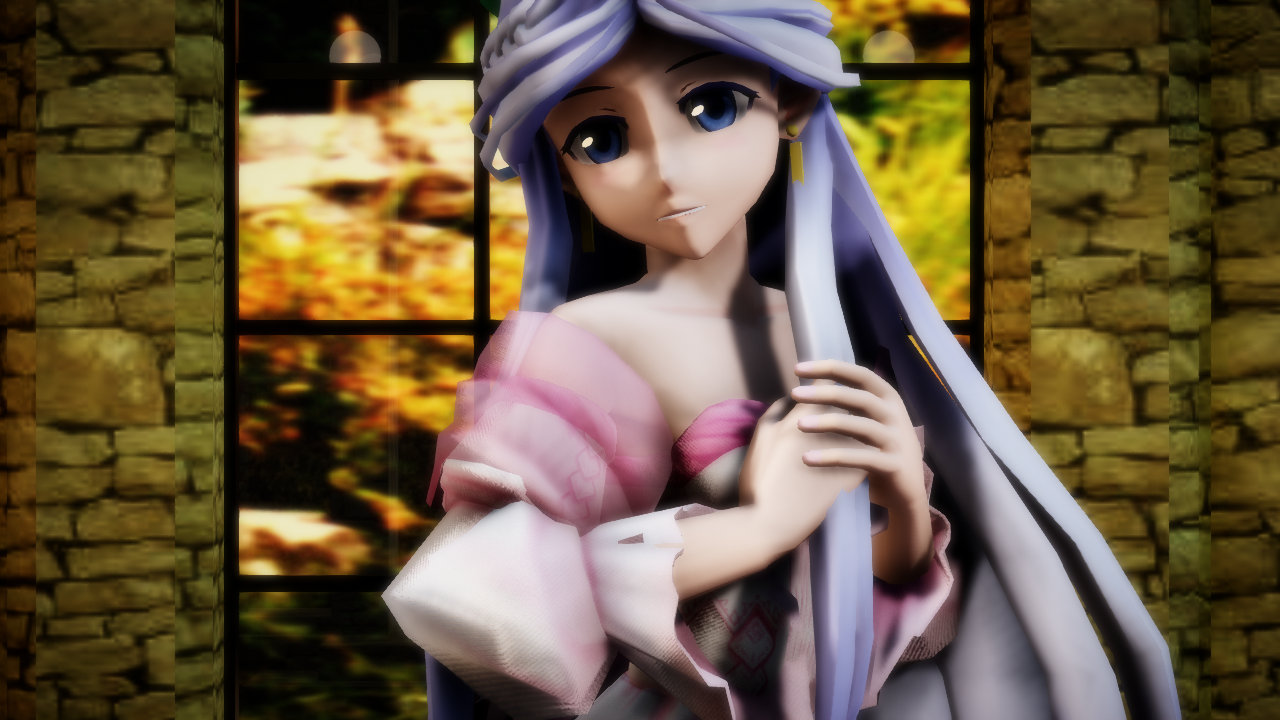
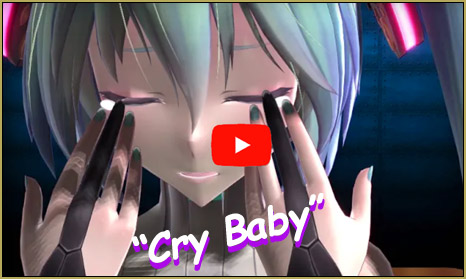
Also, instead of just for making pictures, this tutorial is about using the effect for making videos. By way of example, we will be doing something like the video below. It took me only about an hour to set up (but only because I was trying stuff out). The resources I used are listed below if you want to replicate the process but in principle, you can use your own choice of models. Anyway go watch this first, at least some of it, to get a good idea of what we will be doing and the kind of results that you should be able to get too after reading this article.
RESOURCES
Rayneshia model: 3d.nicovideo.jp/works/td3660
Gothica2 stage (includes the motion): https://www.deviantart.com/trackdancer/art/MMD-Gothica-2-Stage-Scarborough-Fair-motion-469487234
You will also need RAY-MMD 1.5.0 (as mentioned above) and the Diffusion effect.
A modified version of the MirrorWF effect comes with the stage and is used for the window at the back of the stage. Follow the stage set instructions for setting this up.
As for the music you can buy it off iTunes or a similar service. We do not condone distributing copyright protected content illegally.
Why this set up?
If you are using the same model and stage just follow the instructions included with the stage to get everything set up. You can use another model if you prefer another performer, but you will be on your own for the materials specifications.
As for why these models? Rayneshia because the motion was designed specifically on her; but the motion will work well on other MMD models but preferably one with a similar style of dress. The motion specifically is set up to cater to models wearing this type of dress (a hoop style ball gown).
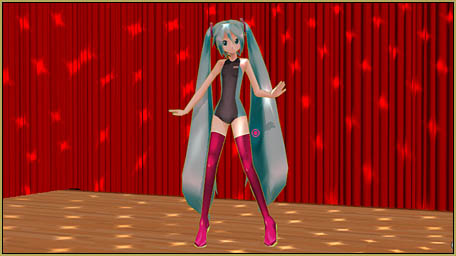
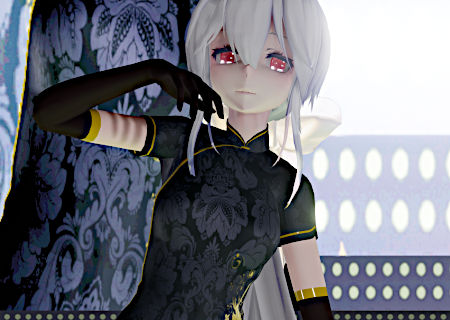
As for the stage choice, well simply because it is specifically designed for just the type of awesome visuals made possible in the video. See exhibit A below if you have any doubts.

Do note that this stage’s components are loaded as accessory DirectX .x format models. These types of models are supported by RAY-MMD but may require extra steps to achieve desirable results. If you do choose to use another stage, as a beginner, it is probably easier to use a PMX format stage.
First load a sky dome
Actually, you can load the sky dome after everything else has been set up as in this exercise, you will never see the sky dome but it is still needed for RAY-MMD to work correctly. By sky dome, we do not mean just any sky dome but one of the ones included with RAY-MMD. The reason for this is that it is required for the lighting calculations.
Specifically, for this set up we will be using Helipad Golden Hour because of the type of lighting environment that we wanted to achieve; early evening, see the background outdoor scene in Exhibit A above. This scene is actually a flat photo taken on a bright sunny day, but just simply by using the correct sky dome and lighting set up we were able to easily achieve that glorious renaissance painting late afternoon type effect. Note also that the term “sky box” used by RAY-MMD is termed “sky dome” by me out of habit since essentially, they are the same thing.
However, the sky boxes included with RAY-MMD are not the same as other sky domes used in MMD. They are specially coded for use with the calculations required by the effect. If you see videos on YT that says you can use RAY-MMD without a sky box, that is pure misinformation. You can, however, actually use other sky domes with RAY-MMD but there is a method to it which was touched upon in my previous tutorial on this effect; regardless, you do need a sky box/dome with the effect.
But for now, just use the one specified here: Helipad Golden Hour
Next load the RAY-MMD components:
- ray.x
- ray_controller.pmx (here after referred to as a widget)
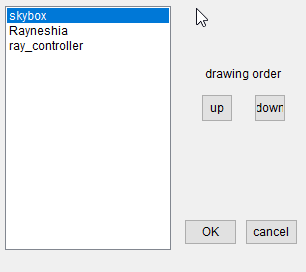
Before specifying any materials it is imperative to sort out the model draw order. This is actually really important but for now, just use the values I used.

Note: Gothica2.x should be above Gothica2_acc.x and not as shown here. Yes, even I mess up at times. Actually, I mess up a lot…
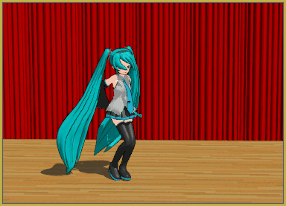
So once that is all done let’s have a quick look at how things should look before any of the RAY-MMD components are added and specified. This is followed by an image of the kind of results that we are trying to achieve.


With these out of the way, let’s get to the fun/tedious part: specifying the materials and lighting to get the kind effect that you see in the images and video shown here. Do note that for this tutorial, we are using the lighting set up specified by the camera motion that comes with the Scarborough Fair motion. You can change this if you want, but just go with it for now. It is similar to the default setting.
The important takeaway is that MMD’s global light setting works with the RAY-MMD effect; in fact these dynamically control the direction of the sun. Remember what I said about RAY-MMD sky boxes being “special“?
Oh, before I completely forget, turn off the default ground shadows. RAY-MMD probably does this but to make sure, manually check to see that it is OFF. In fact, in 99% of the time, you want this off and use an alternative method for the ground shadow as the default MMD ground shadow isn’t very good.
View(V)>Display Ground Shadow(S) set to OFF (unchecked).
Materials Specification
This is where the “magic” happens; well at least about 90% of it. To give you the reason why I used what on what would be a tedious and pointless read but I have reproduced the values I used so you can use the same ones. But I will explain the general principles then I will explain how to set up the values used for the other 10% which is controlled via the ray_controller widget. This later binds everything together to get the results we wanted.
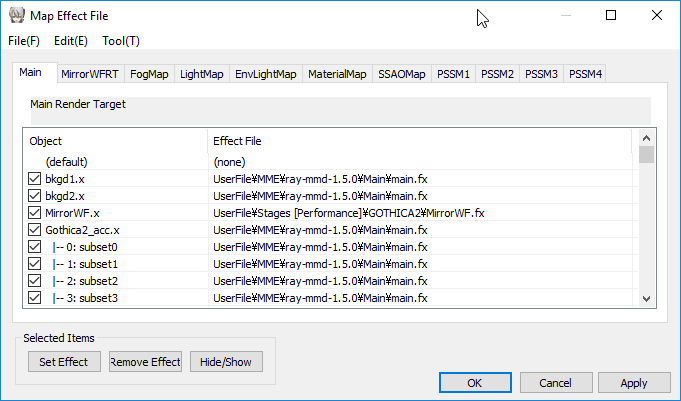
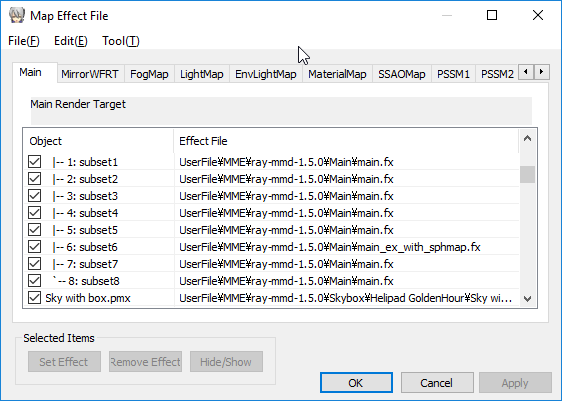
The first thing you want to do is to load the environmental light maps that RAY-MMD will be using to illuminate the world scene (stage) and the performing model. Simply apply the “Sky with lighting.fx” file to the sky box in BOTH the LightMap and EnvLightMap tabs. Use the effect contained in the same folder as the Helipad Golden Hour sky box!
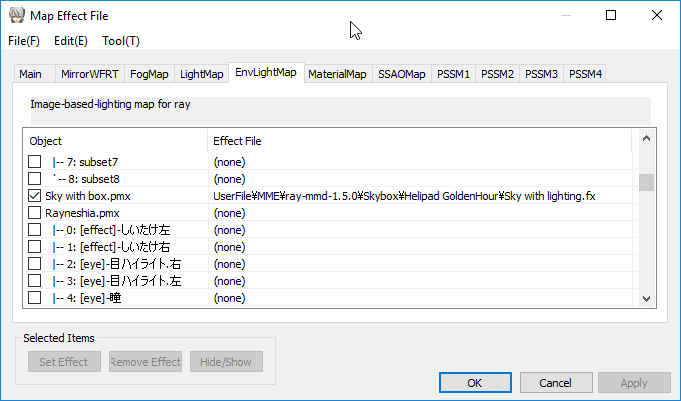
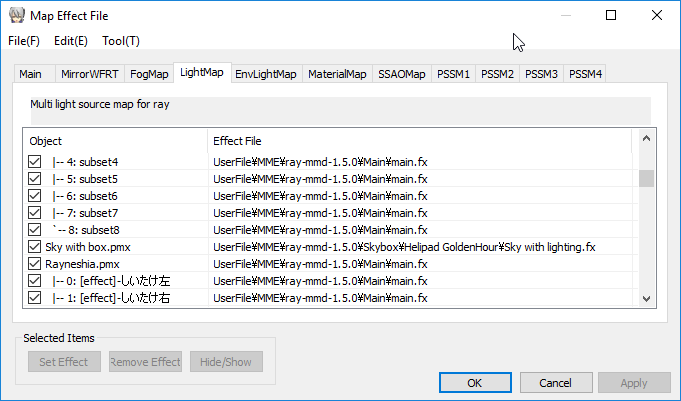
Next under the Main tab apply the main.fx file to all the components that RAY-MMD will be affecting. Note that the screen captures shows the components expanded; by default they may not be. You only need to apply the effect to the top level. DO NOT, however, apply this file to the MirrorWF model or the sky box. These have their own default effects already applied when loaded that should not be changed.
Let us look at how the stage was set up with the effect; especially how we made the light stand metallic (they were to begin with but the effect emphasized this) plus how to “light up” the lights. Previously, you would need to use Object Luminous to do this but this can all be done using just RAY-MMD.
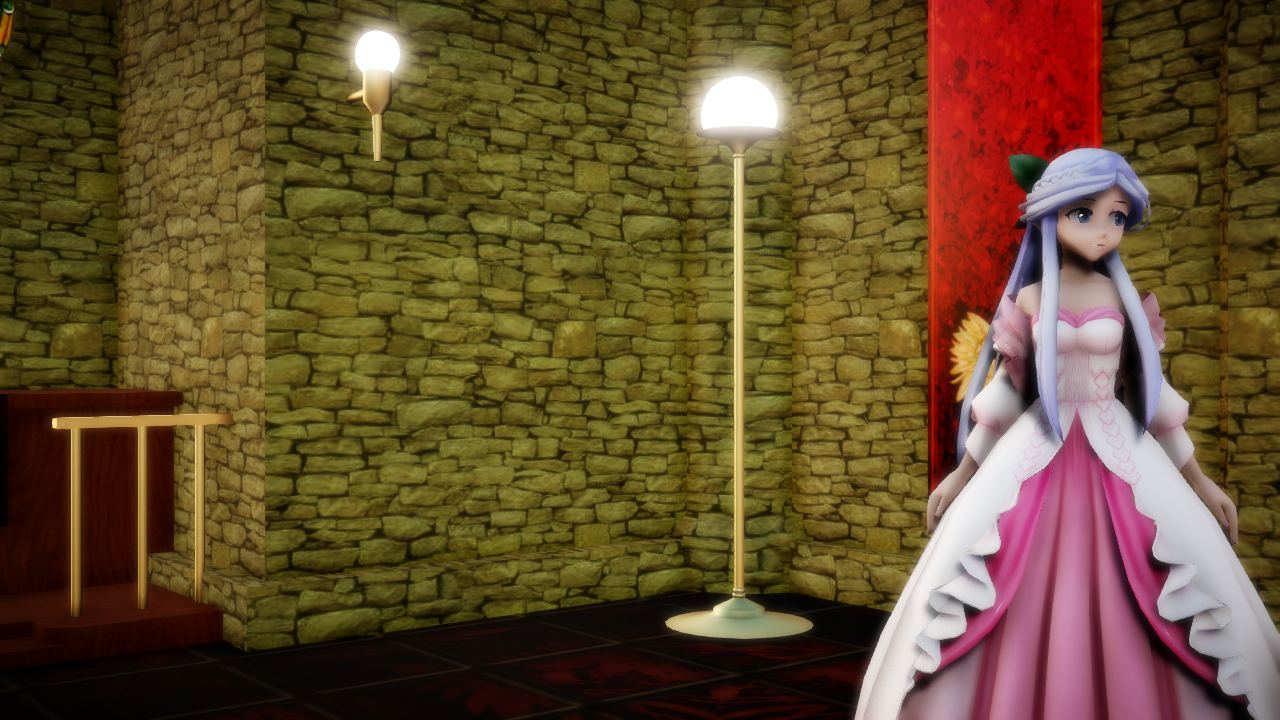
To make the metals on the light fixtures metallic we simply applied the material_worn_gold.fx to the material subset. It is that simple. To light up the lamps, we added an emissive material to it: Emissive/Fixed Color x1/material_white_x1.fx
The lights actually does give out light! Well at least in terms of the lighting calculations so it is really neat. This can be seen having an effect on Rayneshia’s hair. You don’t see it on the walls so much as a lot more work needs to be done for that to happen and I didn’t want to bother. But even then, the illumination does have a visual effect, even if not immediately noticeable (just look at the wall areas further from or shielded from the light sources).
Shading Rayneshia…

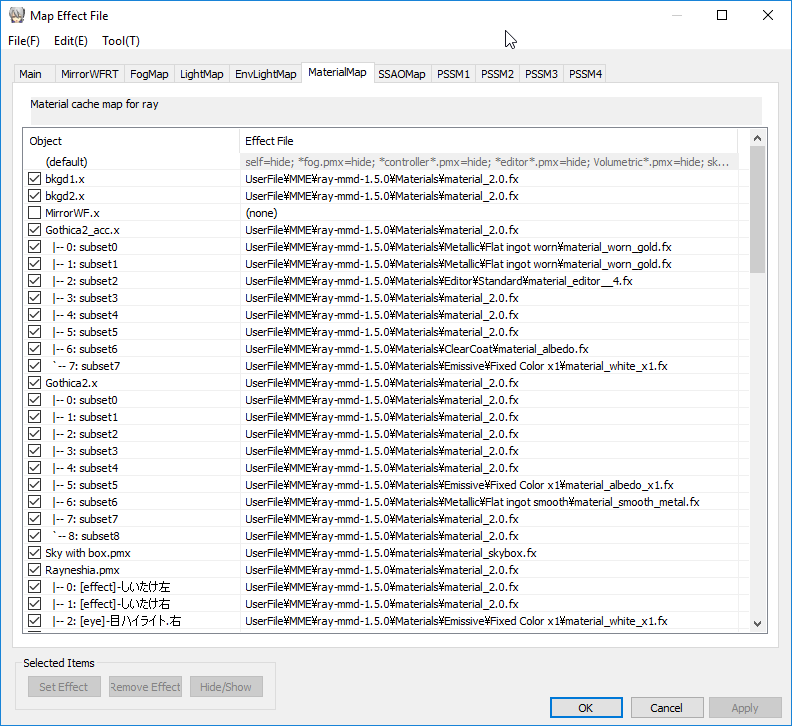
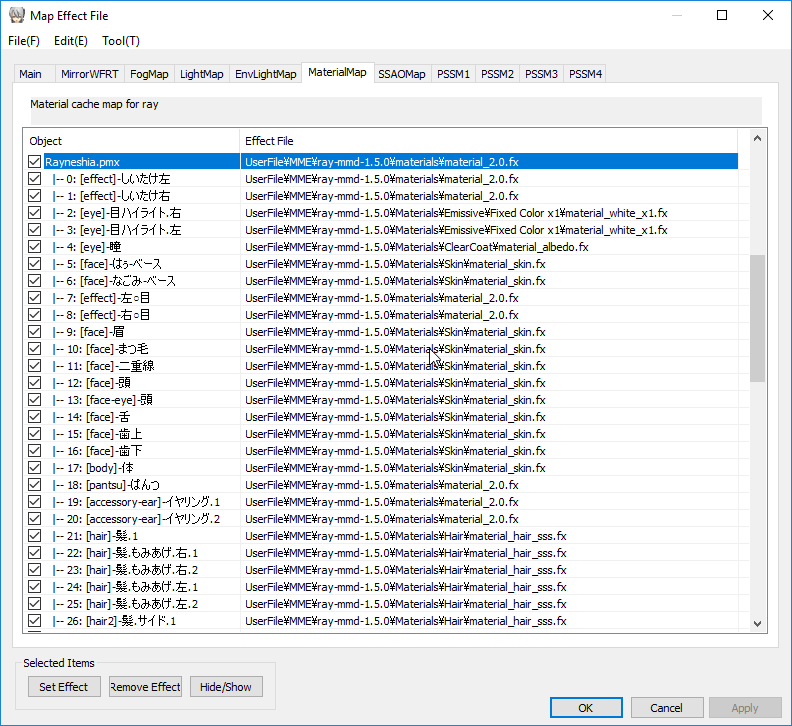
Rayneshia has 74 separate material subsets and that’s too long a list to even try and show here so we will take a different approach. Fortunately, her model does not use even a single sph/spa map which makes things a lot simpler plus all her materials are listed in English also.
First apply the default material to her if this was not already automatically applied: material_2.0.fx
All skin and torso areas uses: material_skin.fx (or one of the variants if you want her to have a ruddier complexion).
Her hair should use one of the hair materials. We used: material_hair_sss.fx as this looked best on her.
Her clothing simply used: material_cloth.fx with the following exception. Part of her under skirt we wanted to emphasize. This is material number 53. In the ClearCoat folder, find the material_albedo.fx file and apply this to that. This will help build the form of her dress visually. It just adds a little shine to it (and takes away the texturing which you can only see close up and doesn’t really apply to the fabric she is wearing anyway).
Add this same file to her pupils (material number 4) to make her eyes come alive and to emphasize this add from the emissive materials folder material_white_x1.fx to her highlights (materials number 2 and 3). This is the same material we used to light up the lamps above.
Finally, you can do whatever you like with the large rose accessory on the back of her head. I just used the material_cloth.fx.
So in actual fact, it is really simple to make her look gorgeous.
Note: If the model you use does have materials that uses SPA/SPH files, under the Main tab, substitute main.fx with main_ex_with_sphmap.fx or else RAY-MMD will ignore the SPA/SPH file. Be cautious though, this method can make things extremely (too) shiny. If this happens, just use the main.fx file instead.
The Finishing Touches…
OK, you won’t see what I captured in the video and screenshots here until you do the last part: specifically setting certain values with the ray_controller widget. These are the only settings you need to set:
“Eyes” controls:
- Sunlight- : 0.75
- SunShadowV- : 0.60
- MultiLight+ : 0.35
- SSAO+ : 0.40
- SSAORadius+ :0.40
Note that these controls are used to set the nature of the lighting and shadows.
“Brow” controls:
- Vignette: 0.75
This is a global effect. It adds a black vignette border to the whole screen helping to give it an “antique” look and helps to frame the scenes.
The controls in this section are a mix. Most of them control the BLOOM effect which was not used here as in general, this is not generally applicable to natural light indoor setting as demonstrated here. If your set up has a lot of stage lighting, the BLOOM effects can be very useful. These controls are also used to specify GOD RAY and FOG type effects where applicable.
“Other” controls:
- Contrast+ : 0.15
- Saturation+ : 0.10
- Saturation- : 0.15
- Temperature+ : 0.15
OK, I know that logically setting both the Saturation +/- values seem counterproductive but in fact it was necessary to get the desired color intensity I was looking for.
The controls in this section largely are used to control colors. They are extremely useful once you get a hang of them and should be access last for fine tuning your scene renders.
Finally, and this is optional, apply Diffusion 7 to the whole scene. This softens the overall visual plus increases and darkens/saturates/enriches the colors. It also helps give the scene a moody, dreamy look.
Now that wasn’t hard now was it?
Hopefully, if you followed along with the steps in this article you would have achieved something like what we did. Also, in following these steps it should have given you a better understanding of how to set up the effect and how all the parts are inter-related. These concepts are important if you want to gain the full potential of this effect and admittedly, for newcomers, there is a bit of a learning curve. Unlike many other MMEs, RAY-MMD is not a “plug-n-play” effect. It is too complex for that but by the same token, it is fabulously flexible and eliminates the need for multiple effects to achieve similar results. So in that sense it does make things a lot simpler.
In any case, once you do have this set up constructed, you will have a decent sandbox to experiment with. Try for example, to play with the MMD lighting controls to see how these affect the overall scene. Also, remember, in real life, lights have color. Although we only touched on this through the expedient of using a specific sky box, in reality, RAY-MMD is masterful at replicating a wide range of real life lighting conditions.
But even at a basic level, as hopefully shown in this article, anyone can achieve drop dead gorgeous results with it with only a minimal understanding, experimentation and effort.
Thanks for reading!
CREDITS
- Rayneshia (aka Princess Reynesia) model by Black-Yuzunyan
- Stage and motion by Trackdancer.deviantart.com
- Scarborough Fair song performed by Hayley Westenra
- MMD 9.31
- AviUtil
- IrfanView
- RAY-MMD / Diffusion 7 / MirrorWF
- KOZU (not used in this article but was instrumental in setting up the key frames for the camera motion)
- SketchUp 8.0 (used for creating the stage)
Note: If you follow the link given in the stage download page, you can see the same video rendered using a more “traditional” approach. Please go see that for a comparison, but from a personal perspective, the RAY-MMD method here was a lot simpler to set up.
IMPORTANT CAUTIONARY NOTE: The set up used here may not work in all circumstances. Different sky boxes have different characteristics so may require alternative configurations.
– SEE BELOW for MORE MMD TUTORIALS…
— — —
– _ — –
![]()

can believe this is for “Beginners”. what is the point of that even this tutorial? I’ve been trying to learn this stuff for over 1 year now (more than a year 1y 8 months ), and STILL to no avail I continue to struggle and feel hopeless. I still don’t believe I was confuzzled by this. so much for the beginners tutorial. Trying to copy this was still very hard, the tutorial is still very long and still confusing as all of these are. I don’t want to be sad anymore, but alas this has granted more severity to my sadness. I’m sick of this.
What happens… what doesn’thappen? It IS complicated… is designed for windows 10 64-bit… needs to be done step-by-step. … This tutorial did help ME to use Ray-MMD. Here’s a page listing ALL of our Ray-MMD tutorials, from my first taste up thru this “Beginners” tutorial and beyond!
https://learnmmd.com/http:/learnmmd.com/why-doesnt-mmd-have-a-users-manual/
While I’m sorry that you couldn’t find your way around Ray-MMD to the point where it actually starts to spark joy, there’s not so much that can be done about it. From the very inception, MMD itself was a program that had its own bar for what the “Beginner” means in its terms, and like it or not, Ray-MMD raises that bar a bunch of notches immediately and without warning. It *is* complex, and if you don’t understand what you’re doing and why, it’s quite easy to misstep. You either have patience to learn how it works, or you don’t.
Good news is, you don’t *have* necessarily to use it. There are plenty of enjoyable MMD videos made without it, and if you feel that some sort of a lighting system is absolutely necessary for yours, Half-Lambert produces quite nice results and is much easier to handle.
I’m nearly crying because I didn’t understand A THING
i downloaded the exact same materials listed in this tutorial, but when I try to copy it’s just not the same
What is that window where you draw the order of models or something like that? I think it should be more clear about this, I just don’t understand, i’ve lost myself in this part because i have no ideia where it is
and also, when i load a skybox it just doesn’t appear, it’s literally invisible and i can’t make it show aaaaaAAAAAA i really REALLY want to learn how to use this raycast stuff but its almost a year and i still don’t get it, I still don’t know how this works and how to make it work
help me please!!!!!!!
A.) Raycast/Ray-MMD is not for beginners… it’s a complicated environment/atmosphere/lighting system that challenges even experienced MMDers.
B.) There IS a basic/simplistic “How To” article that is probably TOO simple, but it does get your toes wet. Then I wrote one that, also, is too simplistic… THOSE are the first two articles on this list of our Raycast articles.
C.) That Model Draw Order window is at the top of your MMD screen under the Background tab.
I hope this helps to get you goin’.
— Reggie
aaaaah thanks
i found the Draw model order, i was just being so stupid HDSHFJKSFKAS well thanks
I know basically what is raycast it’s just i never managed to learn it ;( but i’ll keep trying
Great. I cannot “hold your hand” as you work your way through Raycast… but if you have specific questions, please do ask them via these comments; we check the comments several times a day and we may be able to get you some answers. Always glad to help when we can.
Ray-MMD 1.5.0 – 11.1.2018.
Ray-MMD 1.5.2 – 13.3.2018.