


![]() I want to construct my own stage, how can I do that? My stage has too many accessories, it’s hard to find what I want. What is the efficient way to handle accessories?
I want to construct my own stage, how can I do that? My stage has too many accessories, it’s hard to find what I want. What is the efficient way to handle accessories?
How to handle multiple accessories
Most MMD-users start with ready stages downloaded from somewhere, and it usually turns out to be enough. More advanced ones find what they want in model libraries and convert it to MMD format using programs like Blender. But what if you want to do something very specific, and a suitable stage for it simply doesn’t exist?
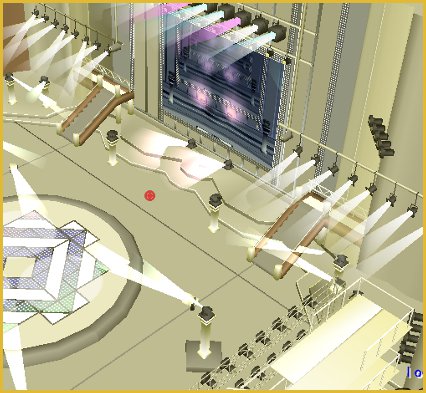
When working on Portal-themed videos and pictures, I wanted the environment to look authentic, and the best way to achieve that would be using models from the game itself. There was a limited set of ripped models published on dA, which included walls and floors that I could use to build basic room-like spaces right in MMD. It was a bit uniform at first, but fortunately, after learning the way to import resources from the game, I had no shortage of textures to produce an unlimited amount of my own walls and floors; all I could ever need, simply by retexturing a basic model. But there was another problem.
The brick approach
To build a stage from wall-like components, one has to place lots of identical models into his MMD space. Even though I used PMDE to compound several pieces together, thereby getting larger chunks of wall to manipulate at once, the Model Manipulation Panel was still cluttered with lots of same-named models, and the only way to navigate them was to select each one of the type, until a bone marker appears where the piece you search for was located. And some of stages I built were big enough to strain the MMD engine in other ways, too.

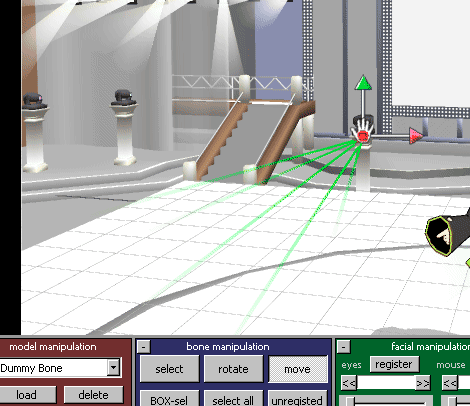
The solution was to convert all static boneless models to Accessories and attach all of them to a Dummy Bone. A standard 15-pin Dummy Bone would not be enough to hold every piece attached to it, though. Instead of loading several DB’s (which would not *quite* solve the cluttering problem — you’d have to remember what is attached to where), I revved my PMDE and produced my own “Stage Bone” with 50 attachment points, which should’ve sufficed to every possible need.
Now, when you select the Stage Bone, you have the layout of *all* your accessories visible at the same time on the main screen. It takes a single click to select a respective bone in case you need to move it for whatever reason. Or, if you suddenly decide to use a different type of wall, you’ll simply have to attach a different accessory to the same bone without the need for repositioning. More than that, even if you need to find a particular accessory itself to manipulate it through AMP, the Stage Bone helps you to select one of many identical pieces as well. Simply remember the number of the bone you just selected, then switch to the Screen mode and in FMP fast-click through every suspicious candidate until you see the one attached to that bone.
There’s a bug in MMD causing this trick not always work. Sometimes attachment point names in AMP spontaneously turn into pseudo-Japanese mode and then switching *does* work as intended. When they are in English mode, though, the last used bone name sticks regardless which accessory you select.
Other than simplified navigating, converting static models to accessories also increases MMD’s productivity. I found that the vastly overblown scene that recently started to take 3-4 minutes to load, now loads in 30 seconds again.
Appendix A: United we stand
So you have a model for a piece of wall but what you really need in your stage is a *bigger* wall and you don’t want to  hand-place the same model each time. You can use PMDE to compound a bigger model to operate several wall pieces as a single chunk.
Open your model. First you need to find out its exact size. Select the Vertex tab in the main window, then in the PMDView window make all vertices visible (the green cloud icon in the lower toolbar) and selectable (“Sel: [V]” button in the upper toolbar). Select a vertex on one model’s edge (notice how it is selected automatically in the main window’s list), copy/paste its coordinates, and then select the vertex on another edge. By subtracting one from another, you can figure a model’s out-to-out dimensions precisely.

Now select the whole model with Ctrl-A and use the “Object operation” panel to shift your selection by exact numeric value — the width of your model. Then find the same model’s .pmd file in Windows Explorer or whatever file manager you use and drag it to the PMDE window, selecting “Adding” in the options pop-up (make sure that “Merge with the same name bone” checkbox is set or you’ll have to clean extra copies of a master bone). Now you have two models of the same type connected seamlessly. Repeat the operation as many times as you need, shift the final model so that it would be centered again, then save the model under a different name.
Appendix B: Bones for the Bone Dummy!
While you may think that making a sufficiently big Stage Bone would be a long and tedious process, there’s a trick for producing a SB of practically unlimited capacity *quickly*.
Open PMDE. Select Bone tab in the main window, click on the empty bone list, and press Ctrl-P number of times as fast as you can to add a bunch of new bones. Now switch it into PMX mode by selecting “Information”->”PMX to edit switching”. Shift-select *all* of your new bones and press the “Move” button (for those only familiar with PMD mode, it’s an equivalent of setting Bone Type to 1). Switch back into PMD mode. Fill English bone names using “Edit”->”Batch correction of the name”, add bones to a group in the “Display pane” tab (more fast-clicking), and save the file.
Keep in mind that bones in the model produced this way won’t have destination points like ones in the original Dummy Bone and also they all will reside at 0;0;0 instead of each bone having a separate starting position, so any movement involving “local axis” mode would be impossible. It doesn’t matter for attaching static stage elements, but if you plan to use some of accessories moving in a complex way, it’s better to have a proper Dummy Bone as well.
If you want a *proper* bigger Dummy Bone, with destination bones and/or separate positions, there’s an alternate method, not as quick and dirty as above but still working faster than making such a Bone in PMDE by hand. It is based on PMDE’s ability (albeit only in PMX mode) to import and export whole lists of items in a text format using clipboard.
Copy the following fragment into your text editor (replace posh quotes forced into this article’s text by WordPress engine with regular double quote signs):
Bone,”bone00“, “bone00“, 0,0,0,0,0,1,1,0,1,1,””,1,“bone00+” , 0,0,0,0,0,1,””,0,0,0,0,0,1,0,0,0,0,1,0,””,0,57,29578
Bone,“bone00+“,”bone00+“,0,0,0,2,0,1,0,0,0,1, “bone00“,1,””, 0,0,0,0,0,1,””,0,0,0,0,0,1,0,0,0,0,1,0,””,0,57,29578
Bone,”bone01“, “bone01“, 0,0,1,0,0,1,1,0,1,1,””,1,”bone01+“, 0,0,0,0,0,1,””,0,0,0,0,0,1,0,0,0,0,1,0,””,0,57,29578
Bone,“bone01+“,“bone01+“,0,0,1,2,0,1,0,0,0,1, “bone01“,1,””, 0,0,0,0,0,1,””,0,0,0,0,0,1,0,0,0,0,1,0,””,0,57,29578
This represents two sample bones, each with a destination point at 2 units above, and the second bone being 1 unit removed by X axis from the first. As you can see, the third, fourth, and fifth numerical values in each string stand for X, Y, and Z coordinates respectively. This is what you would get if you created a couple of bones by hand and then exported them into clipboard — you can try that if you wish, or simply use the fragment of text above, already generated and provided.
Now copy/paste as many pairs of these strings as you need for a Stage Bone of a desired size. Edit the text to modify bone names and coordinates of each pair. You can speed up the process by making a group of 10 bones first and then copy/pasting the whole group, only needing to modify tens in each new line. Also, being proficient with advanced text editors like Notepad++ allows to automate your work to even better efficiency.
When you’re done, copy everything into the clipboard, open PMDE, switch into PMX mode (if it isn’t there by default already), click on the empty bone list area, and press Ctrl-V. All your bones will magically appear there. Again, join them into a group in the “Display pane”, and save the file.
The Stage Bone is ready. You can use it straight away… or you can put it to a safe dry place as a master copy for all subsequent Stage Bones.
Appendix B²: Pimp My Bone
Since now you learned to produce your own Dummy/Stage bones at will, you should feel more freely to customize them. Instead of using the same Bone for all your projects, have a customized Stage Bone as a part of each one. If you know in advance you will need a certain amount of bones to hold walls, floors, lamp posts, trees, trucks, chairs, keyboards, or what have you — why not prepare for it properly? Simply rename each bone in the model into whatever accessory it is going to service, assemble them into distinct groups if necessary, and now you can navigate your FMP naturally, without referring to a numerical list of bones either on a piece of paper or in your memory.
What is even better, you *don’t* actually have to plan your Stage Bone’s allocation ahead and switch to PMDE, if you don’t want to. The function of renaming English names of a model (and that’s all you need) is embeded into MMD itself. As soon as you assign an accessory to a bone, you can immediately select “help(H)”->”enhance model(M)”->”edit English name(E)” from the menu. In the opened panel, find the respective bone, and give it a meaningful name, describing not only the type but the position of the accessory attached. You will never forget where you put that elusive sock anymore!
(before you finish, you have to “help(H)”->”enhance model(M)”->”save enhanced model(P)”, of course)
More than that, you can organize your individual bones in chains, allowing for groups of accessories to be manipulated more easily. For example, you have a tree accessory as one .x file, and a swing (probably downloaded from somewhere else) as another. You have a choice to attach them to separate bones in order to allow for the swing to be swinging — and if you suddenly decide to shift the tree to make room for something else, you’ll have to reposition both bones separately (and you already programmed lots of swinging motions for the latter, argh) — or you can attach them both to a single bone, ensuring that both accessories will be hard-linked to each other, but then you’ll have to program swing’s motions through AMP rather than by moving a bone, which is much more painstaking and much less flexible. Preparing your custom Stage Bone in advance, though, you can have a third option: link two (or however many you need) bones in PMDE and enjoy all benefits of proper .pmd model’s management without having .pmd models to begin with.
Appendix C: Clone Walls
If you have a single uniform model and lots of textures you can apply to it, for variety, you don’t actually have to use PMDE for that (well, after you perfected the master copy, that is). Accessory files are simple text files that can be opened in Notepad or other editor. Scroll the opened file down to the end and find a fragment that looks like this:
TextureFilename {
“pared.bmp”;
}
Simply replace the the texture with another one and save the file under a different name. This way you can mass-produce same type accessories faster than if you had to do the same operation in PMDE.
Appendix D: Models for nothing, bricks for free
The described method works on assumption that you already have component models to assemble your stages from. If you don’t, though, you still can produce some makeshift ones yourself in PMDE. Minimally, all you need is a simple carcass to slap a wall or floor texture to. Select “Edit”->”Simple primitive add” in the PMDView window, choose “Plane+” tab, set “u number” and “v number” fields to 1 (there’s no need for many vertices in a simple rectangle wall), set width and height according to texture’s proportions and wall’s desired size (for comparison, average human model’s height is about 20 units), and press “Adding”. Now save the model into the same folder where your texture is, select “Material” tab in the main window, click on new material’s title, and enter the texture file name into the “Tex” field. Save the model again as an .x file… and it’s already something you can use in MMD.

The accessory you just produced will be only visible from one side (if you saved it as a .pmd model, another side will be black unless you ticked off the “ON edge” setting when creating the primitive). If you use it to produce interiors (as it was in my case), it is actually a benefit, since you can build a room with all four walls and view it from any angle without worrying about obscuring the camera. If you’re uncomfortable with a wall you can see from one side only, though, select “Δ” mode in the PMDView window’s upper toolbar, select “Edit”->”Selected face”->”Reverse sides” (the textured side and the transparent one will switch places), then in the Primitive adding window uncheck the “New material” box, click on the material you just added, and then add another rectangle with same properties.
Of course, you may want to make your walls bigger first. This time it will be simpler than importing additional copies of a model. Again, make sure that you’re working with the material already present, change numbers for “Location” variables (for some reason, a single unit of Location equals *ten* units of Width) and hit “Adding” again. Another rectangle will appear next to the present one, already properly textured. Help yourself with these.
Assembling from component models grants you flexibility, allowing to modify your stages on the fly or reconstructing them completely whenever you get the clearer idea of what you need as you progress through your project.
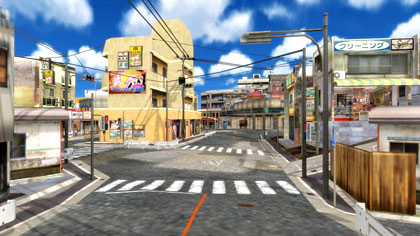
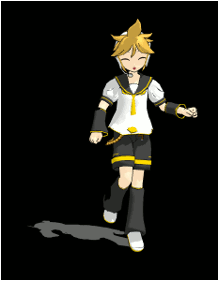
Used in the illustration: LEGO BASE model by IgnisDraconi
– SEE BELOW for MORE MMD TUTORIALS…
— — —
– _ — –
![]()

Hai! Plz help me with this! i just started MMD so its complicated! Heres my problem: so i downloaded a stage ( https://bowlroll.net/file/6466 )
and i don’t know how to add all the colors and things! please help!
Hello. LearnMMD. I’m a mmd user in Korea. I learnd many things through your pages. Your pages are very useful.
However, actually I couldn’t find information to solve one problem. I want to know what is wrong with my mmd program.
When I play after loading a stage, a model, and motion, I cannot see stage’s floor. it is just seen as strange gray floor. When I see in the stage model mode , I can see wooden floor but in camera/light/accessories modeI, just see gray floor. It is same too after extracting video files. What I try to use is ダンススタジオ ver1.10(http://sp.seiga.nicovideo.jp/seiga/#!/im5367699).
I’m so sorry because of my terrible English but i will be happy if you leave a reply…!
Hi Olive! The first thing that I would check is your ground shadow. When trying to make fancier renders, the default ground shadow can cause a lot of problems. In English, this is under the view menu (view->display ground shadow).
There can be other issues; this is just the first thing I would check.
OH I did it! I can see the floor…! Thank you! Thank you so much!!!
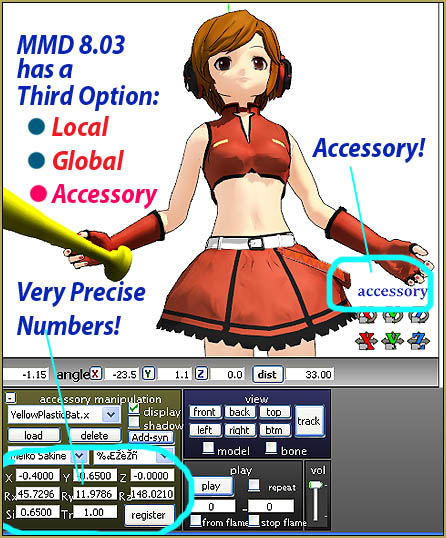
LearnMMD Please Help Me! I am trying to load and accessories and put on my models hand but I don’t know how. Please Help Me
To load an accessory: switch to your camera; look on the bottom of your screen for “accessory manipulation” panel, hit the load button on that panel, find your accessory. To move the accessory– well, for starters at least– select a loaded accessory in that panel, enter values in the X, Y, and Z boxes of that panel, and hit register in that panel. (Lots of “in that panel!” Because there are a lot of other places to load, enter values, or register, and they won’t necessarily affect your accessory.)
If you want the accessory to be really *on* (or in) your hand, you attach it to the wrist bone… yeah, in *that* panel. :D