How can I apply multiple effects to an MMD model? Can I use more than one effect at a time on my MMD model? Can I combine multiple Effects? Can I layer Shaders and Post Effects in my MMD animation?
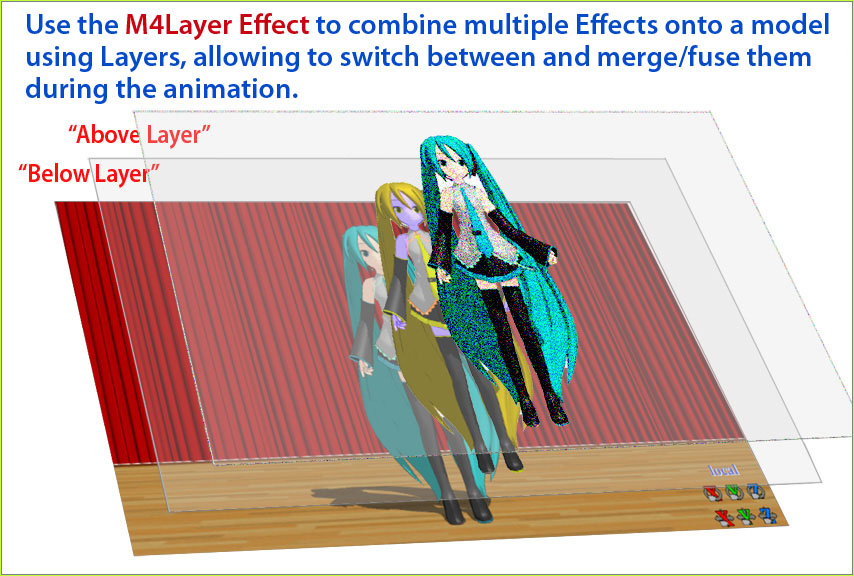
Use the M4Layer Effect to combine multiple Effects onto a model using Layers, allowing to switch between and merge/fuse them during the animation.
Multiple operations to combine effects
by adjusting the transparency of the layers!
The M4Layer Effect
This tutorial will present how to use a version of the M4Layer effect I personally extended to be able to combine and switch between effects during animation. It is available here : M4Layer (extended)
First, you should know that this effect does not make it possible to chain effects (one taking as input the output of another one), only to freely combine their outputs by pairs. For shader effects, this means that you can only combine their outputs directly with other shader effects outputs. For post effects, it means that you can only combine outputs of stacks of chained post effects. Despite these limitations, this effect enables a lot of useful possibilities that I will show here.
As a reminder, shader effects are directly applied on whole models (or accessories) or a subset of their materials (via subset-extract) and are calculated after the output color of the textures and before screen rendering. So, such effects take into account other models (or accessories) and their relative 3D positions. They are generally loaded as an independent fx file via the effect mapping window of MME, and most of the time work on any model (or accessory).
As for the post effects, they are applied to the screen render or part of it (with masks), and are calculated last in the rendering process. So, such effects do not take into account any notion of depth, only relative 2D positions. They are always (to the best of my knowledge) automatically loaded via an accessory or a model (although rarely), and always only work when applied to it.
An almost always exact rule to distinguish the two is :
- If it is loaded independently from any model or accessory, it is a shader effect
- If it is automatically loaded with an accessory or model:
- If the effect seems to be 3D or take 3D space into account, it is a shader effect
- If it seems to be 2D with no depth notion, it is a post effect
Also know that, as explained below, by duplicating, editing, and renaming the effect’s files, you can add an almost unlimited number of layers; really only limited by your computer system’s power to keep up!
The effect contains three folders :
- Shader, which contains the M4LayerShader effect file and its controller
- Post, which contains the M4Layer accessory and associated effect file, plus the masks effect files
- Shared, which contains the actual code for layer operations and a compatibility file for MMM
The presentation will unfold as follows : the first part will be about shader effects, and will be composed of two parts, one explaining the 4 different controls available and how to use them, and the other the 4 kind of usage that can be made from them. The second part will follow the exact same structure, but will be about post effects. Then, I will present how to implement customized operations to combine effects, and finish by sharing some notes and remarks on further possibilities.
Shader effects
M4LayerShader effect works by creating a “below layer” and an “above layer” (copies of the scene) and allowing to combine them. On these layers, shader effects can be applied in the same way it is done traditionally.
Controls
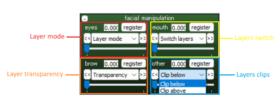
It is possible to change the operation used for combining shader effects directly within MMD, by changing the value of the M4LayerController Layer mode morph. A 100 factor is applied, i. e. to access mode 1, the morph should be set to 0.01. All the modes available are listed in the readme of the effect.
The transparency of the combination result can be changed within MMD by modifying the value of the M4LayerController Transparency morph. The below layer remains visible, and the combination result is drawn over it, so a transparency of 0 means the below layer is completely hidden, and 1 the combination result is completely invisible. However, If the texture already has some transparency, then the two transparencies are multiplied together to give the displayed transparency.
It is possible to switch the below and above layers within MMD by changing the value of the M4LayerController Switch layers morph. When set to 1, it will commute the two layers for the operation, i. e. a – b will become b – a.
Finally, it is possible to clip the values of the below layer and the above layer by changing the values of the M4LayerController Clip below and Clip above morphs, respectively. If set to 1, the correponding layer operation input will be clipped to [0;1].
Usages
First, the M4LayerShader effect should be loaded onto the model(s)/part(s) of interest (since it copies all the scene, it may work whatever it is applied to, but no certainty about that). In MME map effects window, two new tabs should have appeared : BelowRT and AboveRT, corresponding to below and above layers. Then the M4LayerController should be loaded as a model.
How to load M4LayerShader and its controller
On/off switch shader effects in real-time
Set the desired shader effect on the model(s)/part(s) of interest of the below layer and the Layer mode on 0 (combination result equal to above layer, default mode). The effect should not be visible. Then switch the layers, and the effect should appear. The same result can also be achieved by moving the Transparency morph from 0 to 1, but this time the transition is progressive.
How to enable and disable a shader effect during animation
Switching between shader effects in real-time
Now, set another shader effect on the model(s)/part(s) of interest of the above layer, while keeping the mode on 0. When switching layers or changing transparency, the effects are effectively switched.
How to switch between shader effects during animation
Combining shader effects in real-time
Make sure the Switch layers morph is set to 0. Then set the Layer mode on 1 (above + below). Progressively move the Transparency morph from 0 to 1, and you should see the result gradually varying from sum of below and above layers to below layer output. You can then try the same with another mode.
How to combine shader effects during animation
Using more than two layers
As many instances of the M4LayerShader effect as wanted can be used simultaneously. They can either be used on the same model(s)/part(s), by nesting them (in that case they will allow to combine more shader effects into one) or on different models/parts (in that case they will work in parallel). Note that each instance can be independently used in one way or the other, so you can have independent combinations of more than two shader effects on different model(s)/part(s). Although I won’t give a concrete example, this principle is true for every layer, from the default one (main) to any of the ones created with M4LayerShader.
To this end, a new independent instance has to be made :
- First create a copy of the M4layerShader file and rename it

- Then, create a copy of the controller and rename it (both the file and the model in it)

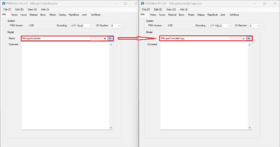
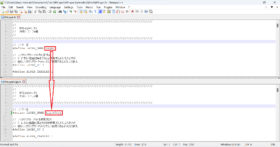
- Finally, change the CONTROLLER_NAME variable of the M4LayerShader file to the name of the new controller
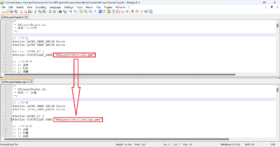
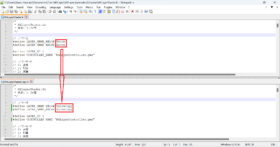
It is also advised to change the LAYER_NAME_BELOW and LAYER_NAME_ABOVE constants to keep track of which panel corresponds to which instance.
There is an alternative :
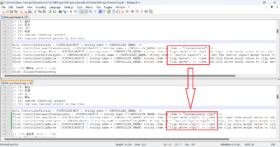
- Instead of creating a copy of the controller, create new morphs on the controller
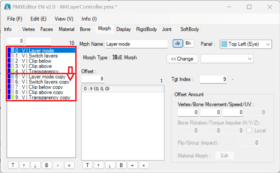
- Then, instead of changing the CONTROLLER_NAME variable, rename the morphs linking its variables to the controller to the name of the new morphs created on the controller
As an example we will use the mode 21 and 22, which combined allow to add a second shader effect onto the parts of the texture(s) not modified by a first shader effect (so make sure the effect you choose does not affect the whole texture(s)). First, put back all morphs to their default values, and set the layer mode to 22. On the below layer, put a second instance of the M4LayerShader effect. Load the controller associated, and set the layer mode to 21. Do not affect any effect on the below layer of this new instance, and affect the first shader effect you want on the above layer. On the first instance’s above layer, affect the second shader effect you want. To avoid any problem, clip the two layers of the second M4LayerShader instance. If you want to understand why, go have a look to the modes 21/22 effect code in Shared/M4LayerCore.fxsub. Your two effects should now be juxtaposed on the same texture(s).
How to combine three shader effects
You can then add a third instance of the M4LayerShader on the main layer, on another model/part. Charge two shader effects on the corresponding generated layers, and choose whatever mode you wish. Try controlling it independently from the other instances.
How to use two independent effect combinations in parallel
Also, just using the M4layerShader effect multiple times without making independent instances will make them all follow the same behaviour defined by the controller. For example, if we set M4LayerShader on two models, and affect the same pair of effects on their layers, when moving around the morphs values, their identical behavior is obvious.
How to use two linked effect combinations in parallel
Additionaly, you can make two independant instances point to the same controller, to get the same behaviour, but with different layer name to not get confused.
Post effects
Now I will present how to do the exact same things, but with post effects (it works the same when considering a stack on each layer, but here I will only use one effect per layer). M4Layer effect works by creating a new layer (copy of the scene) and allowing to combine it with the layer it is applied to (current layer). On these layers, effects can be applied in the same way it is done traditionally. Both shader and post effects can be applied, but shader effects combination might result in incoherent output, since it treats the whole screen as a 2D image without regards for depth or models.
Make sure to start this section of the tutorial from a blank slate, removing all the M4LayerShader effects previously added.
Controls
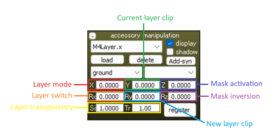
It is possible to change the operation used for combining effects directly within MMD, by changing the value of the X field of the M4Layer accessory. There is no factor applied this time, so you should directly input the number of the mode. The modes available are the same.
The transparency of the combination result can be changed within MMD by modifying the value of the Tr and Si fields of the M4Layer accessory. The two are multiplied together and then a 0.1 factor is applied. The transparency works in the opposite way as with the shader (i. e. a transparency of 1 means the below layer is completely hidden, and 0 the combination result is completely invisible). It otherwise works similarly as for shaders.
It is possible to switch the current and new layers within MMD by changing the value of the Rx field of the M4Layer accessory.
Finally, it is possible to clip the values of the current layer and the new layer by changing the values of the Y and Ry field of the M4Layer accessory, respectively. It otherwise works similarly as for shaders.
Z and Rz fields will be discussed later on.
Usages
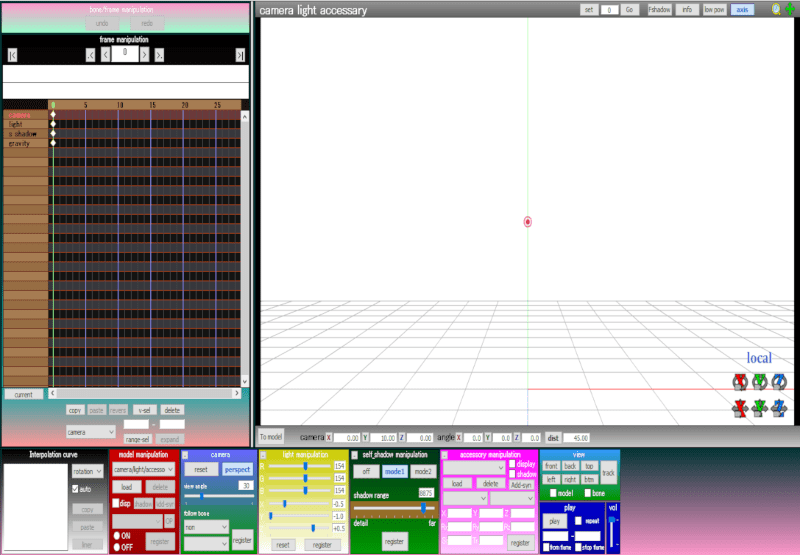
First, load the desired post effect through its accessory and then the M4Layer accessory. In MME map effects window, two new tabs should have appeared : LayerRT, corresponding to the new layer, and LayerMaskRT, which will be ignored in the tutorial. The current layer is the one where the M4Layer accessory is shown (main layer in our case, since it is the first M4Layer instance).
How to load M4Layer
On/off switch post effects in real-time
Set the Layer mode on 0 (default mode). The effect should not be visible (we ignore everything not on a model). Then switch the layers, and the effect should appear. The same result can also be achieved by moving the Transparency value from 1 to 0, but this time the transition is progressive. Lastly, simply unchecking the display box of the M4Layer accessory will switch on the effect.
How to enable and disable a post effect during animation
Switching between post effects in real-time
Now, load another post effect, hide it from the current layer and make it show on the new layer, while keeping the mode on 0. When switching layers, changing transparency, or uncheking the display box the effects are effectively switched.
How to switch between post effects during animation
Combining post effects in real-time
Make sure the Switch layers field is set to 0. Then set the Layer mode on 1. Progressively change the Transparency value from 1 to 0, and you should see the result gradually varying from sum of current and new layers to current layer output. You can then try the same with another mode.
How to combine post effects during animation
Using more than two layers
As many instances of the M4Layer effect as wanted can be used simultaneously. They can be used to combine more post effects into one, by nesting them.
There is no need to copy anything for creating independent instances of M4Layer, they are independent from the start. However, although we will not do it in the example, it is advised to :
- First create copies of the accessory and the effect file (identically named)
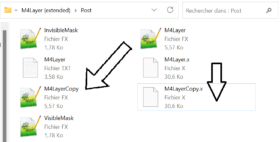
- Then change the LAYER_NAME constant of the effect file copy to keep track of which panel corresponds to which instance
As an example we will use the modes 1 and 2 in combination. First, put back all fields to their default values, set the Layer mode to 1, and register the changes. Then load a new instance of the M4Layer accessory, set its mode to 2, register the changes, hide it from the main layer and make it show on the second layer from the left. There should now be 3 layers, so you can load a new post effect, and hide it from the first 2 layers (from the left) and make it show on the latest new layer, so that only one post effect is active per layer. Your three post effects should now be mixed together. You can then play independently with the two M4Layer effects (do not forget to register before switching from one to the other).
How to combine three post effects
In this example we only combined 3 stacks of 1 post effect each, but as many post effects as wanted can be chained in one stack, as it is traditionally done.
Note that by default a post effect is always loaded only on the main layer.
Adding new operations
You can also add your own layer operations, by implementing them in Shared/M4LayerCore.fxsub. First, you have to know if your operation can be applied to each channel (RGB) independently or if you have to know the value of the three to perform the operation (if you also need the alpha channel, then you will have to thoroughly analyze the effect by yourself and make in-depth changes, as it is not designed to use it).
If the operation is applied to one channel at a time, then you should create a new function (with 2 floats as input and one as output) containing the code of your operation, and then use this function in a new if block with the right Layer mode condition, within the Blend function.
If the operation needs the 3 channels then you should create a new function (with 2 floats3 as input and one as output) containing the code of your operation, and then use this function in a new if block with the right Layer mode condition, within the Blend3_1 function.
By simply looking at how the other operations are implemented, it should be easy to understand how to add one. The nesting of functions instead of direct call is because of a very limited (15) maximum number of boolean (conditions) usable simultaneously (within the same function).
If you want to add multiple new operations, then your new function just needs to itself contain if conditions to tell apart each new operation you implement into it. Be careful that if you add a lot, you may need to have to reorganize the calling hierarchy of the operations, by adding more if condition in each function, or even adding a new nesting level, to stay below the boolean limit.
Notes and remarks on further exploration
Now, some last notes on things theoretically possible but that I never tried. You should be able to use both M4Layer effects and M4LayerShader effects simultaneously, to mix both shader and post effects, as they do not theoretically interact with each other (post effects applied after shader ones).
There are two masks (visible and invisible) available for M4Layer effect (not M4LayerShader), that can be activated and inverted by setting the Z and Rz fields to 1, respectively, in M4Layer accessory panel. This should allow to use multiple M4Layer effects in parallel, on different parts of the screen, in addition to nesting them to combine more post effects stacks, as I previously explained. To use them in parallel, I suppose multiple instances of the M4layer effect just have to be active on the same layer (as opposed to only one previously).
However, I do not completely understand how the effect combinations created by M4Layer and the chaining of effects inherent to post effects interact with each other, especially when starting to play around with how the M4Layer layers are related to each other (i. e. which layer is branching off from which other layer). So, if you need to combine more than 2 post effects, you will have to find the right combination for you by trial and error.
This concludes the tutorial ; I hope you’ve understood all the potential of the extended M4layer effect and will be able to use it to create amazing videos!












Interesting effect. I was wondering if You could do a tutorial on how to use this effect in combination with Raycast.
Hello! I am afraid that you are on your own with THAT idea! This effect is rather complicated and then asking MMD to use it along with Raycast!… Wow!
… if you get it to work, plase let us know how you did it!
— Reggie