![]() How can I make my MMD run faster? What if removing parts using Subset-Extract isn’t enough? Removing un-needed model parts optimises computer assets.
How can I make my MMD run faster? What if removing parts using Subset-Extract isn’t enough? Removing un-needed model parts optimises computer assets.

Sometimes, culling, removing unwanted/unseen model parts, using MME’s Subset-Extract can make the world of difference for your computer performance. But other times, it simply isn’t enough… especially with extremely detailed assets. This tutorial will help you not only stop unseen materials from rendering outside the camera frame in MMD, but will also show you how to remove them entirely. This tutorial is Part 2 of the culling tutorial, and you will need to read Part 1 in order to fully understand how culling works, and how to do it in both MME and PMXe.
Culling unseen MMD model parts optimises computer assets (PART 2)
For this culling method, you will need any version of PMXe. If you prefer using English programs over Japanese programs, I recommend downloading this English translated version: PMXE ver. 0254f, the latest, most complete translation, to date. As with the previous tutorial, you will also need a version of MikuMikuDance that supports MikuMikuEffect… MME.

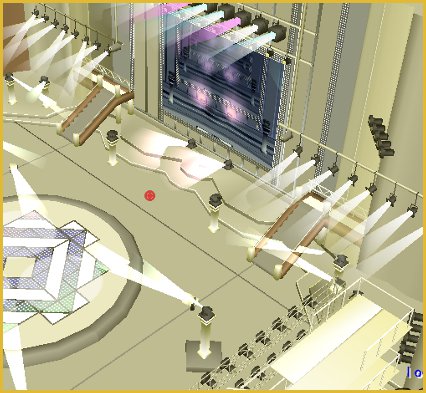
For this tutorial, I will be using one of my favourite MMD stages, NyaLinaa’s Theatre 1 stage. It’s incredibly detailed, well modelled and has an excellent viewing point from the stage’s perspective. Here is the frame I’ve chosen to go with for my new artwork, but my MMD is lagging a lot. And if we zoom out, we find out that the reason is…
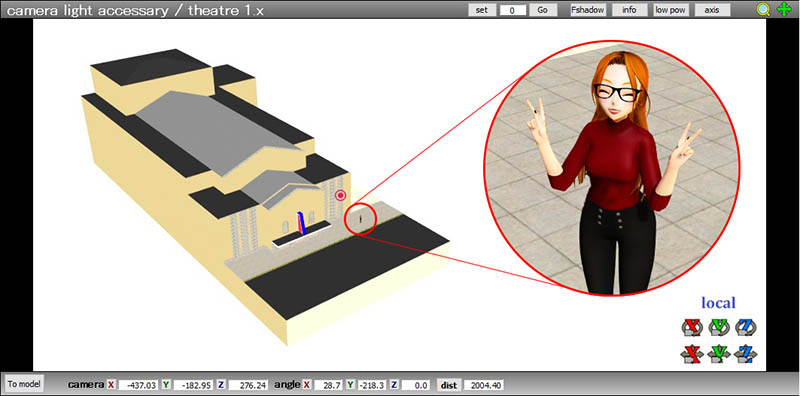
…this stage is H U G E, so huge in fact that there’s me for scale. An absolutely tiny boi. There’s even multiple rooms outside the theatre room such as a waiting area, ticket booth, and a lot of outside environment that we just won’t see in the still render. Therefore, we’re gonna need to cull as much of this stage as possible.

In MikuMikuDance using the MME tab, I am going to find out which subsets I can cull entirely. In this instance, 83/103 subsets can be deleted ▐ ⊙ ▃ ⊙ ▐. Now, In PMXe, I am going to take those cull-able subsets and delete them entirely. You can do this by going to View (V) in the PMX View window, selecting Vertex/Masking (M), selecting every subset you want to delete, right clicking on one of them and choosing “Delete/Erase Parts (P)”. This has left me with a stage that only has the necessary subsets for the still frame.

Now, even though I just deleted 83 subsets, there’s still a ton of material outside of the theatre room that needs to be culled. But how do you do this when other parts of the subsets are needed? First, in the Vertex/Masking tab (M), select one subset you want to split. For this example, I’m going to use subset 18, which is the black layer on the outside of the stage. I don’t need this part of the subset for the final render, so I am going to separate it and remove it.
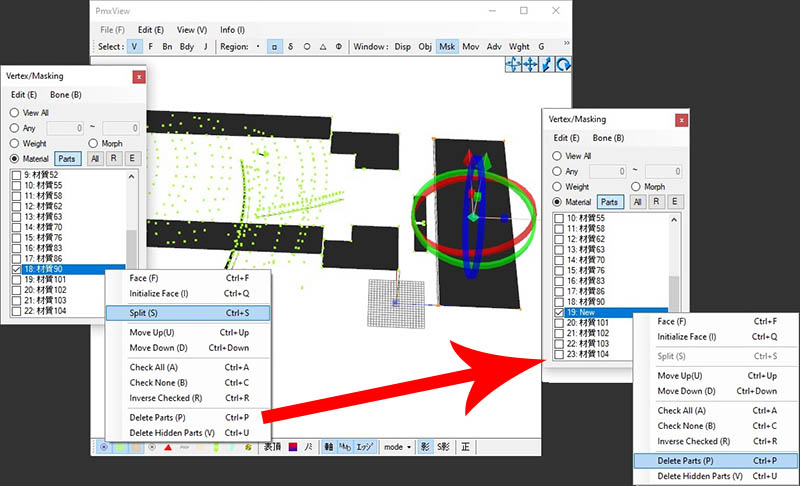
Check the subset you are going to separate and select the part of the subset you want to remove using the region selector. Make sure you also have the vertex display turned on so you can see whether the selection has worked, if the vertices is orange, then it has been selected successfully. Then, in the Vertex/Masking editor, right click on the subset and choose “Split”. A new subset should appear directly underneath the old one, helpfully labelled “New”. Simply right click on the “New” subset and select “Delete/Erase Parts (P)”.
Now you have successfully split and culled an attached subset! Now all you need to do is to repeat these steps with every subset until you have removed every unneeded material from your stage. Make sure to Save-As your new culled versions regularly, abecause if you make a mistake and save over the original file, you may have to redownload that asset and start all over again.

The above image is what my stage looks like now. Looks kinda messy right? Well, as long as you’ve culled everything correctly, added a model and a few effects, the stage in engine should look a little like this…

And there you go! With the stage culled in PMXe, I’ve been able to use Raycast in a much faster engine than before! Because MMD isn’t struggling to render parts of the stage that we weren’t gonna see in the final product anyway, it’s able to redirect that power to the places it’s needed the most!
Misc tips:
Make use of the various region selector tools, as tools such as the free and point selector might help with removing those hard to reach vertices.
Make use of the vertex displays at the bottom of the view window too, the green one shows all the vertices in a subset, while the orange shows those vertices that are currently selected. It’ll make it much easier when you’re trying to select areas to get rid of without damaging the visible ones!
Don’t be afraid to distort subsets to remove them. You can drag vertices into a pile to delete them if they are very close to other subsets, or areas of the same subset that you do not want to delete.
I recommend exploring the Advanced Editor in PMXe, as you have access to a knife among other things, which can help cut of more material, even if there aren’t many vertices available.
Credits:
Chestnut model by Chestnutscoop (full credits here: http://fav.me/de3rdse)
Credits for the final artwork, along with the 6k art render here: http://fav.me/de4ki7w
Have fun with MikuMikuDance!
– SEE BELOW for MORE MMD TUTORIALS…
— — —
– _ — –

