Skip to content
Learn MikuMikuDance – MMD Tutorials – Free 3D Animation Software

Learn MikuMikuDance – MMD Tutorials – Free 3D Animation Software

Download Free Animation Software – Let's Learn How to Do Everything!

  • Step-by-Step MMD instructions
  • DOWNLOADS
  • Troubleshoot, Fix MMD
  • Site Contents
  • Reggie Replies Q&A
  • Homework!
  • What IS MMD?
    • Download MikuMikuDance Newest Latest Version of MMD
  • “HOW TO”
    • Raycast RAY-MMD Effect Tutorials
  • BONUS PAGES
    • Why convert PMD models to PMX?
  • HALL of CHAMPIONS
  • Tutorial Categories
  • About
    • Privacy Policy
  • Toggle search form
  • Reduce MMD video file size by using HandBrake.
    Reduce MMD Video File Size using FREE HandBrake video converter HandBrake video conversion
  • Download Previous Versions of MikuMikuDance from LearnMMD.com! Download MikuMikuDance
  • The Rule of Thirds.
    Use the Rule of Thirds Effect to Create Camera Motion Data in MMD! ARIZONA
  • Getting Started with MMD MikuMikuDance Intro to MikuMikuDance
  • Translate Japanese Model Names into English File Management / Organization
  • Set MMD Widescreen Screen Size balance Size VS Quality MMD Basics
  • How to Switch Models and Stages in MikuMikuDance Accessory Manipulation/Adjust
  • Make WAV files for MikuMikuDance Using Your Music Files Music and WAV Files

Optimise computer assets by culling unseen MMD model parts

Posted on August 24, 2020April 7, 2021 By Chestnutscoop No Comments on Optimise computer assets by culling unseen MMD model parts

How can I make my MMD run faster? How can I optimise computer assets as I run MMD?  How can I speed-up my MMD computer? What can I do to speed-up MikuMikuDance on my computer?

Optimise computer assets as you work in MMD by removing unseen parts of models and stages.

For those of us with low-performing laptops or PCs, creating in MMD can be a challenge. MMD uses much more computer power than many of us expect, especially when using MMEs like Raycast, and so saving as much performance power as possible is an absolute necessity. However, one issue that always lets us down is how so much of the graphic power needed to display models, accessories and effects often goes to rendering subsets that you won’t even see in the final product. So, how can you divert that power from the hidden assets to the visible ones? This is where culling comes in: optimise computer assets as you work in MMD by removing unseen parts of models and stages.

Culling Tutorial:
How to Optimise your Engine using MME Subsets

The term ‘culling’ in its most basic sense means “the action of sending an inferior or surplus farm animal to be slaughtered” (Oxford Online Dictionary, [23/08/2020]). When considered in digital art terms, the ‘surplus farm animal’ should be considered any asset that you can’t see in the rendering-frame, and is therefore expendable. Culling in video game design (which is where my inspiration to publicise this power-saving technique comes from) is the action that describes when you see the environment slowly load in around you as you get closer to it: essentially, the designer has programmed certain assets to only become visible when they are in eyeshot of the player, in order for the computer/ console to not get overwhelmed at the amount of assets it needs to render.

Ok, so we have the definition down and we know how it works, but how do you actually do this in MMD? Well, buckle up buckaroos, I’m about to show you how to get that smooth 60fps quickly and efficiently.

[SIDE NOTE: This tutorial will be a two parter, as depending on the asset you are culling, complete culling in MMEffect is very unlikely to be entirely successful. While this tutorial will describe how to cull using only MMEffect, my next tutorial will show you how to cull completely. ]

For this tutorial, you’re going to need a version of MikuMikuDance that supports MikuMikuEffect. At this point, you should be using latest version of MMD we currently have, which you can download it from our MMD downloads page here: https://learnmmd.com/downloads/


I can delete most of my model because only the arm and hand are seen in my video.

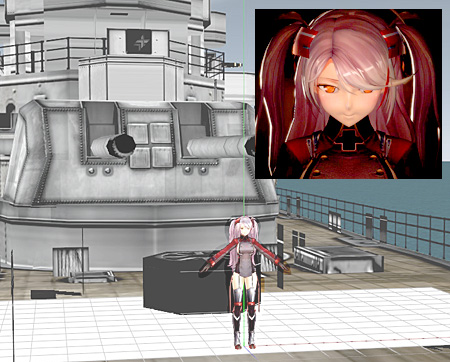
So, here’s an unused project I was working on for my radio show The Art of Gaming. This piece is incredibly simple and only features a PS4 controller, a gradient plane and a hand holding it. But when you zoom out of the frame…

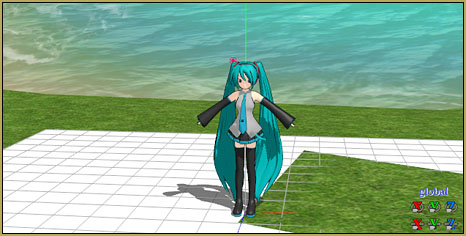
There’s actually a whole model lying right below the frame! This model is highly detailed, and most of its parts aren’t going to be in the frame shot. So, in order to save computer power, we need to remove these parts of the model.

First, open the MMEffect tab in the top right corner and right click “Effect Mapping”, just as you would to apply shaders. Find the asset that you want to cull, right click on that asset and choose “Subset Extract”.

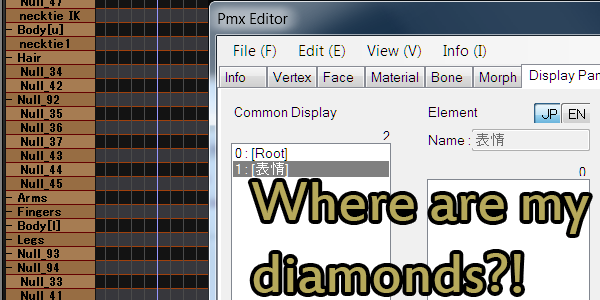
The list of subsets here equals the materials of the asset you would find if you opened it in PMXe. You see those check-boxes on the left of every subset? These ticks determine whether the subset is visible in-engine or not. Currently, I have unchecked the jeans subset, which has made the jeans disappear. When culling in MMEffect, all you need to do is uncheck each subset that you don’t see in the final frame. For this image, every subset of the model apart from the left arm can be unchecked.

Optimise computer assets by removing any unseen model parts using subset-extract!

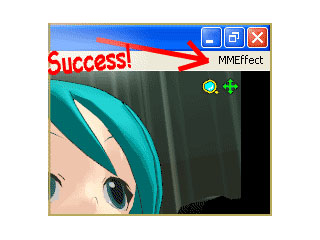
Now that I’ve culled the model, you’ll notice that both arms still load due to being built into the same subset. Unfortunately for this model, complete culling cannot take place without PMXe to separate the arms. As said before, this technique will feature in my next tutorial╰(˵ヘωヘ✿)╯. But for now, this is good enough for what I need right now. Just like with applying shaders, click “Apply” and “OK”. Make sure to save your project regularly to avoid having to cull over and over when you come back to projects.

CLICK to see the full sized image of the finished art piece.

And voila! (CLICK to see the full-size image)… Now you can finish your artwork much more quickly! Also bare in mind that this technique is not exclusive to models, but can work on stages and accessories too, so you can cull as many assets as you need to!

I hope this tutorial has been informative, this is my very first tutorial written for LearnMMD, and there will be many, many more to come! (⌒▽⌒)ゞ


Credits:

Chestnut model by Chestnutscoop (full credits here: http://fav.me/de3rdse)

Credits for the final artwork, along with the 3k art render can be found here: http://fav.me/de3t4r1)

Gradient plane and PostPointLight assets by Chestnutscoop (the PostPointLight assets are currently unreleased, but I’m hoping to release them very soon! I will also write a tutorial on how to use them ^^)

Have fun with MikuMikuDance!


– SEE BELOW for MORE MMD TUTORIALS…


— — —


– _ — –


Visit the LearnMMD.com Homepage! Plenty of Mikumikudance instruction and info!

More MMD Tutorials...

Enjoy the "camera Angles WEIRD in Anime" meme...

Enjoy the "camera Angles WEIRD in Anime" meme... This image is from The Slayers - NEXT, ...read more

Reader asks how to create MMD artwork... stuff like posing, camerawork?

A reader asks... Is there a tutorial on how to create MMD artwork, like those you ...read more

Learn MikuMikuDance in Small Steps! New LearnMMD Video Series

Learn MikuMikuDance in Small Steps. Where can I find easy-to-follow MMD instructions on YouTube? How ...read more

Apply Multiple Effects on an Entire MMD Model Using M4Layer Effect

How can I apply multiple effects to an MMD model? Can I use more than ...read more

MMD Plugin Manager... I Found a Treasure!

What sorts of MMD Plugins are there? MMD Plugin Manager? MMD Plugins. Plugin MMD. More ...read more

2025: Hatsune Miku is 18... but she is designed to be always 16 Years old, by design and in reality!

Finally, in 2023, Hatsune Miku is 16 years old! but in August of 2025, she ...read more

Chestnutscoop, MMD Basics, MMD Tutorials, Random Thoughts & Visions Tags:Chestnutscoop, Culling, mikumikudance, MikuMikuEffect, MMEffect, Resource Management, tutorial

Post navigation

Previous Post: MME Plastic Effect adds plastic realism to MMD model parts
Next Post: Fix the “Post Effect cannot be specified” error

Related Posts

  • MMD Fine Art: Explaining the inspiration of my MikuRose MMD Basics
  • Learn MikuMikuDance in Small Steps: a new video series on YouTube by LearnMMD.com!
    Learn MikuMikuDance in Small Steps! New LearnMMD Video Series MMD Tutorials
  • LearnMMD.com _ MikuMikuDance MMD Tutorials
    Trouble Keeping MMD Faith When Those Around You Don’t Keep the Faith-MMD Credits/Sharing
  • Weight Painting MMD models in Blender with MMD Tools Bandages
  • Raycast / Ray-MMD First Steps MMD Tutorials
  • Ray-MMD Painting with light!
    Ray-MMD: The Art of painting with Light MMD Tutorials

More Related Articles

Understanding MME Render Targets for Miku Miku Dance Effects Adult Shader effect
Miku Expo 2014 New York – learnmmd.com coverage NeKo MANiac aMMDy
Easily Create Walk-in-Place Motion in MMD Animation Shortcuts
MMD Bone Reference Charts make MMD Model-making Easier! Mae Blythe
Adjust downloaded motions to fit your MMD models Animation Shortcuts
MMD Dance Motions start with making your own motions. How to make smooth motions in MikuMikuDance animations Animation Shortcuts

Leave a Reply Cancel reply

Your email address will not be published. Required fields are marked *

Download the latest version of MikuMikuDance!
See the MMD Step-by-Step instructions page!
Learn how to make your own MMD motions!
LearnMMD.com
  • Video Dojo Expo 4 CHAMPIONS are CHOSEN! Video Dojo Competition
  • PMD Editor Basics, now in English – Modify Your MMD Models! Nuts & Bolts
  • The Cheaplens Effect is easy to use and very powerful!
    MME CheapLens Effect controls the “Look” of your MMD video CheapLens Effect
  • MME Quartz Effect Refracts Reflections All Around! MMD Tutorials
  • Excited about MMD? Write for LearnMMD.com! Welcome to LearnMMD.Com!
  • Dummy Bones Hold Accessories in MikuMikuDance Dummy Bones
  • Making MMD Pictures: JPG vs PNG – which is better? MMD Tutorials
  • The Rule of Thirds.
    Use the Rule of Thirds Effect to Create Camera Motion Data in MMD! ARIZONA

Copyright © 2022 Learn MikuMikuDance – MMD Tutorials – Free 3D Animation Software and Instructions..

Powered by PressBook Premium theme

Go to mobile version