


![]() What are materials in MMD models? What is their purpose? How can I divide materials into smaller parts and what could be gained from that?
What are materials in MMD models? What is their purpose? How can I divide materials into smaller parts and what could be gained from that?
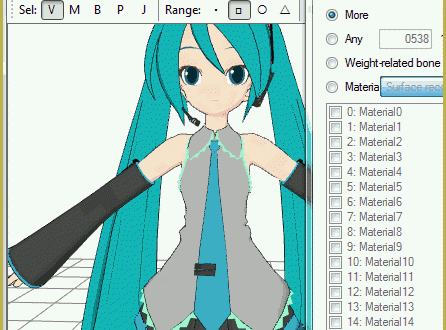
Manipulate models in PMDE more efficiently by using materials

As you possibly know, an MMD model is divisible into “materials” – blocks of vertices sharing the same texture file or – in case of textureless stock models – the same color. Each material consists of group of vertices linked to each other in a reticular network. Each triangle – facet – made of three neighboring vertices defines a piece of texture or a solid colored surface that is seen between them.

Open PMDE and load any model. In PMDView window’s lower toolbar, select “Wire+ (P)” mode and “green cloud” button allowing to see all vertices at once. Select any vertex (an astrolabe tool must appear around it) and drag it aside by astrolabe’s arrows. You can see that it drags a bunch of ribs after it, skewing facets that these ribs participate in, but other vertices and further-residing facets stay untouched. If you select *several* vertices, then those facets whose all three vertices were selected will move unskewed. Now, if you manage to select *all* vertices in a material (which is actually easy if you use PMDView’s “Vert/Mat” panel) and weight it to a free-moving bone, you’d be able to move that bone as a separate piece, not linked to the main part of the model in any visible way. (Actually, this is not true. There are models where this conceptual rule does not work – see below. But with PMDE, it is in your power to *make* it so).
But the fact that the material is a separate solid piece of the model does not make it *smallest* possible piece. In fact, PMDE allows you to granulate models’ materials into smaller pieces, which sometimes can be quite useful. That’s what we will be doing today.

In PMDView’s upper toolbar, select the triangle button of the “Range” group. It means that, unlike in three other modes, we will be selecting not vertices themselves, but facets that they construct. Shift-click a group of triangles and see them turning red. Now drag them by the astrolabe. Again, you can see some unselected facets trying to follow your selection, distorting the model. Some of facets, though, will be cut clean. That’s because where you can see vertices that comprise facet’s border, each of them is in fact a *pair* of vertices, one of them that gets selected by your ministrations and moves with selection, and another stays in its place. Now press Ctrl-Z, annulling your movements but keeping selection intact. Press Ctrl-X (the shortcut for EDIT->Selected face->Adjacent to the surface selection extension). It will make all facets connected to your selection with shared vertices to cascade-join it. If you try to move your selection now, the whole piece will be clean-cut.
Or maybe not. In some models (stock ones actually being a stark example) materials themselves can have vertices shared between them. Since Ctrl-X does not spread across materials’ borders, you can select a whole material and still get some dragging facets from neighboring materials. If that prevents you from doing what you want, you can “separate” such a material into a new one with EDIT->Selected face->Removed to a new material by separating the vertices. The old material these facets were taken from will become empty and can be erased.
Now, the piece you selected may be either less or more than what you want to make a separate part. The fact that you cascade-merged some facets to your selection does not mean that the whole material automatically is selected. In models imported from some unknown sources, rather than created straight in PMDE, a material may already consist of disjointed conglomerates of facets, and they may or may not match what you have in mind. If you need a bigger part than you already got, keep Shift-clicking and Ctrl-X’ing more segments until you get what you want. Make sure that you *did* get what you want – drag the selected part aside and check for pieces or separate facets (you may not notice them from certain angles but unselected green dots usually provide a clue) that were left behind. Add them to selection and Ctrl-Z shifted part back into position, then check it again.

The other kind of situation is when Ctrl-X’ing gets you too much of the material that you want separated. Sometimes it may be just few extra segments, or it may be a large chunk of the material (or maybe even the whole of it). If you feel that you’re mostly done with the selection and only need few facets disconnected, you may simply Ctrl-click them out. Sometimes, though, it may be more convenient to make a surgical cut at the border and then to attempt the selection again. Select the facet immediately bordering with the part you want separated and then command EDIT->Selected face->Separation of the shared vertex. Now select the part again and see if Ctrl-X gets you too far. You may also try to drag the selected part aside and check if the facet connected with your selection by a single vertex rather than a rib tries to follow your movements; if so, you’ll have to separate it too.
Keep in mind that when you’re done with this sub-material and start to select the *next* one, these singled facets will stay lone wolves and you’ll have to pick them up specifically.

On the other hand, sometimes you just can’t get an approximately close piece with a convenient Ctrl-X tool. You may happen to deal with a model where it gives you all or nothing. In such case, you’ll have to select your shape manually. Just press Shift+LMB and keep hovering over the model until all necessary facets are selected. Drag the selection to sides to ensure that nothing is left behind. Those trailing bands of distorted facets will be easy targets to spot and determine whether you need them or not. Keep in mind that, unlike Ctrl-X’ing, when you’re selecting facets manually, a facet not selected explicitly won’t get co-opted automatically even when all three neighboring facets – and therefore all three its vertices – already *are* selected. Thus, some small facets may be forgotten and unnoticed no matter how closely you inspect your selection. To avoid that, drag it somewhere far and then inflate it by dragging small cubes on astrolabe’s axes to the right. On a bigger (and most possibly skewed) shape, those small runaways will be noticed more easily.
Finally, you have selected the piece exactly as you wanted it. If by dragging it aside you only see sharp edges without sticking “petals” from the main body, command EDIT->Selected face->Is taken to a new material; in case that you used methods not completely separating selected and unselected facets, choose EDIT->Selected face->Removed to a new material by separating the vertices. Both commands create a new material with all parameters identical to its parent. Immediately afterwards, exclude it from processing by “Vert/Mat” panel and inspect the space the sub-material just was. It may happen that despite all your efforts, you still missed some small piece. If so, you can Ctrl-Z it back, restore the previous selection (or at least a part of it) with EDIT->Select the previous state and do the selection again quickly. After that, proceed to the next piece. Hint: if you start from eliminating simple shapes first, selecting more complex ones that stay on screen at that point would be much easier.

And now, when all your model is broken into tiny pieces, you ask yourself: what was the point of all that? Did all that tedious work serve any actual purpose other that demonstrating your supreme prowess in PMDE-wielding? The answer is simple: weighting. Leaving only relevant parts of the model on screen with “Vert/Mat”, you may boldly brush your model with red, not hand-picking vertices one by one and not risking to tip some wrong vertex and then search for your mistake for hours.

More than that, when only a single operational piece is present on screen, you can take full advantage of the gradient weighting tool (“>>>” button in the Weighting panel), which would be almost useless otherwise, as it runs through models’ vertices indiscriminately. With it, though, you can achieve smoothness of motion that simply couldn’t be reached with regular means. Even though the process described in this article may look excessively complex, selecting a part of the model by facets first is much less error-prone than going straight to weighting (where selecting by vertices is the only option).
Just out of curiosity, I took and re-rigged the turret model that served as a case study in the previous post. Last time, weighting it from a single chunk of a material took a couple of days. With breaking it into sub-materials, all was done in an hour. The more thorough the preparation – the more it pays in the end!
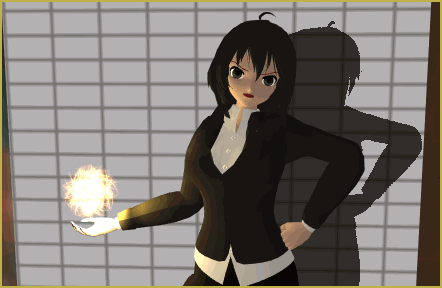
Models used for illustration: Miku by Animasa, Cube dispenser and GLaDOS are from Valve’s Portal game, ripped by SKaa3w
– SEE BELOW for MORE MMD TUTORIALS…
— — —
– _ — –
![]()


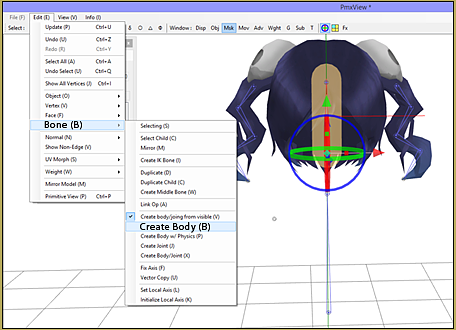
EDIT->Selected face->Is taken to a new material
There is no such option?
this is nice but how do I merge vertex’s or materials so that objects like the shirt and chest can be moved together rather than separately
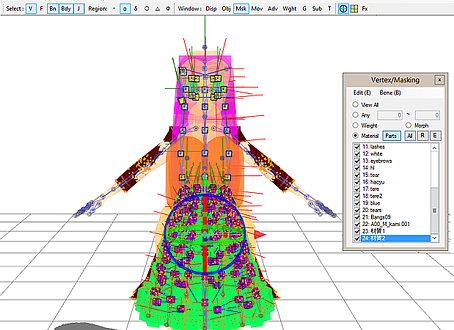
First, in order to move several materials at once you don’t actually need to merge them. Simply select/check all parts you need to move in “Vertex/Masking” panel (shown at the top picture), then “Select all” in PMDEView window, and they will move together any way you will (beware, though, that their bones will *not* move unless you select them properly, so before moving chest or any other bodypart that was in the original model make sure you really know what you want and what you’re doing. And always keep a backup, too).
Second, merging materials is possible if needed, but again, you must know what you’re doing. If they are parts of the material you’ve previously split for rigging and/or moving, they are safe to merge again (unless you’ve changed their other properties). Otherwise, they will most probably have different color/texture/edging/whatever settings (there’s a reason they were made *separate* materials in the first place, after all), so if you try to merge them, settings of the first material in the merged group will override all others’, which will most surely ruin your model’s looks. You must check their features in the materials list before trying anything funny.
Anyway, if you want to merge few materials, you can do it by shift-clicking them in the Material panel’s list if the main PMDE window, then right-clicking on the group and selecting “Join” (or “Binding materials”, depending on the translation version you use) command.
THANK YOU! now I know how to get this model’s arms to have different textures
Thank you so much! I have been trying to do this for a month and couldn’t figure it out.