


 How can I paint BDEF4? How can I paint weights in Blender? What tools are available for weight painting MMD models?
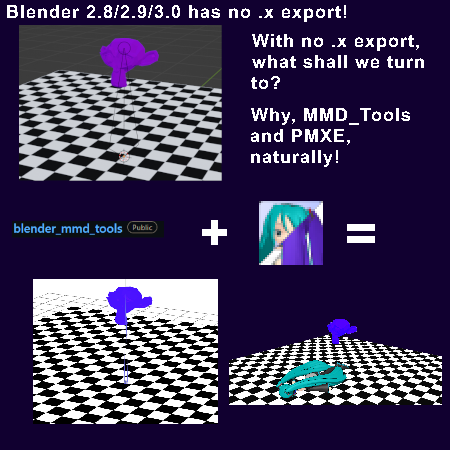
Weight painting can be difficult and tedious– especially in an application like PMXE, which doesn’t have all of the tools of more professional 3D modelling packages. In this tutorial, I’m going to show you how to weight paint in Blender.
Getting started
![]() If you haven’t already, please read this earlier tutorial. It will guide you through information on installing Blender, MMD Tools, and importing an MMD model into Blender. If you haven’t read it, read it up to the part where I break out the UV view. Then come back. I’ll wait.
If you haven’t already, please read this earlier tutorial. It will guide you through information on installing Blender, MMD Tools, and importing an MMD model into Blender. If you haven’t read it, read it up to the part where I break out the UV view. Then come back. I’ll wait.
Good? Okay. Blender’s UI can be difficult, and I’d also recommend reading the first few chapters of the Noob to Pro series, which will let you in on some of Blender’s idiosyncrasies. Once you’re comfortable with the interface, everything will come a lot more naturally.
Okay, done? Go ahead and launch Blender and import a model. Let’s start skinning!
Displaying your armature in Blender
The first thing that we need to do is make the bones visible. In Blender, the bones are called armatures, and MMD Tools hides them by default so that you can focus on your mesh. We’ll use the Outliner to make them visible.

The Outliner should be in the upper right corner of your display. You’ll see Scene at the top, which is the parent of World and Camera and Lamp– and your model! Hit the + button to the left of your model’s entry and it expands. The first entry underneath it is your armature. See the icons to the right that look like eyes? That’s one way to hide or display objects in Blender. Click on the eye icon to the right of your model’s armature in the Outliner, and you should see a bunch of weird looking pyramids appear in the 3D view. Those are your bones.
Looking around in Blender
Of course, you’re not going to get very far in posing or weight painting without being able to adjust your view. Controls in Blender are a little different than in PMXE. If you hold down the middle mouse button, you can orbit the origin. Mouse wheel zooms in and out. Shift middle mouse button pans.
There are also some useful hotkeys. Numpad . (period) zooms on your currently selected object and sets it as the center of your orbit. Numpad 5 toggles between orthographic and vanishing perspectives. Numpad 1 takes you to a frontal view, and ctrl-Numpad 1 takes you to a rear view. Play with some of the other numpad keys for other views as well.
Posing your model in Blender
Why are we posing? Because one of the really cool things that Blender can do is let you weight paint posed, deformed models. This makes it much easier to get your weights right. You don’t have to hunt down bad vertices in the main view and you don’t have to flip back and forth between views to see how your painting is going. Instead, you pose, then you paint until the pose looks right. Simple!

Select your armature, either by clicking on one of the bones in the 3D view, or by clicking on its entry in the Outliner. Then change to Pose Mode. You can do this from the Mode box near the lower left corner of your display (which probably says Object Mode right now), or, when your mouse cursor occupies the main 3D view, you can hit ctrl-tab. When you’re in Pose Mode, changes to your bones won’t move them– instead, they’ll deform your mesh. Select one of your arm bones, hit R for rotate, then move your mouse around. See how the bone– and the mesh– rotates? Left click to confirm.
Just as in MMD, leg bones won’t respond much, because they’re under the control of IK bones. If you want to move a leg, try moving the IK bone. If you select a bone that can move, use G (for grab) to move it. You can constrain rotation or movement to a particular axis by hitting X, Y, or Z after the action. So to rotate in the X axis, for example, make sure your mouse cursor is in the 3D view, hit R, hit X, move your mouse, then left click. Don’t forget: in Blender, the Z axis is up/down, and Y axis is in/out.
Vertex groups
Blender doesn’t do bone weights the way that PMXE does. It uses vertex groups. Vertex groups can be used for all sorts of things, but skeletal deformation is the big one.
To start weight painting, you’ll need to select vertex groups. Blender is smart enough to select a vertex group whenever you select a bone. But, if you have a mesh selected, you can also select a vertex group by selecting it from the Data tab of the Properties window. The Properties window is on the right side of your display, and the Data tab looks like a downward pointing triangle. In the Vertex Groups subsection, you can see that MMD Tools has created a vertex group for each of your bones.

Remember how I said that vertex groups are used for more than just bones? There are two extra vertex groups: mmd_edge_scale and mmd_vertex_order. These are used by MMD Tools to keep track of edge scale and vertex order respectively. For now, let’s delete those groups. It won’t break anything. Select mmd_edge_scale, then hit the – button to the right of it, and that group will be removed from your model. Then do the same for mmd_vertex_order.
Weight painting
Okay, go ahead and select one of your vertex groups. Any of them will do. Now, select your mesh. You can do this by right clicking on your mesh. If you’re in Pose mode, it will change you to Object mode, since you can only pose armatures. But we want to be in Weight Painting mode. Again, you can do this manually in the Mode field, or ctrl-tab will take you there. Like everything else in Blender, ctrl-tab is context sensitive. How it acts depends on what you have selected and where your mouse cursor is.

This should look familiar. It’s much like PMXE’s Weight (D) display mode. Try clicking anywhere, and you’ll see that you’re painting weights. If you click on your posed arm, you’ll see that the arm changes right as you paint! You can still select any vertex group from the properties window, at which point those will become the weights you’ll see and paint.
Tool shelf
The panel on the left side of your screen is called the Tool Shelf. Make sure you’re on the topmost tab, labelled Tools. This is where you tell Blender how to paint. For a complete understanding of this, read Blender’s weight painting documentation. We’ll just mention a few things.

Unlike PMXE, Blender doesn’t normalize weights. You can tell it to by checking the Auto Normalize button on the Tools tab.
I like to paint weights with an Add or Subtract Blend mode, a Strength of 1.0, and manually controlling the Weight, which is usually very small like 0.02. That’s control freak mode: add or subtract an exact, controlled amount to everything under the cursor.
Blender starts out weight painting in Face Select mode, where painting a face affects all of its vertices. You can change to Vertex Select mode by hitting V when your mouse cursor is in the 3D view. Now you see all of your vertices, and they can be painted individually. Hit A to deselect them. Now try shift-right clicking on some of them: it selects individual vertices. While in vertex mode, your painting will only affect selected vertices.
Hit A again once or twice to get everything selected and try out some of the other tools. Down in the Weight Tools subsection of the Tools tab of the Tool shelf, Smooth blurs your weights. Try it now. You can always hit ctrl-Z to undo your last actions.
Operator panel
Okay, let’s learn something else. Select Weight Gradient from the Weight Tools, then drag a line across your model. This should look a lot like PMXE’s linear gradient tool, but with the advantage that you can see it work, and that you can disable normalization.
You’ve probably used programs where you set tool options, then use a tool. Blender’s a little different: sometimes, you set tool options after you use the tool. After using the Weight Gradient, look at the lower left of your display. There should be an Operator box that’s now labelled Weight Gradient, with a droplist for Type. Change the Type from Linear to Radial, and Blender will reinterpret the line you just drew as a radial gradient.

The Operator box exists for all sorts of Blender operations. Keep an eye out for it as you play with Blender’s tools. For example, you can make Smooth stronger, work across all vertex groups or just one, or limit it by selection through the use of the Operator box.
Painting many vertex groups

If you’ve tried W4 weight painting in Blender, you know what a painful process it can be. PMXE seems to be saying, “I’ll let you paint BDEF4, but I don’t have to help!” Blender’s not like that. Blender doesn’t care how many bones you paint onto a vertex. It treats them all the same, no matter how many there are.
In Weight Painting mode, select one of your vertices, then, with your mouse in the 3D view, hit N. This opens the Properties Shelf. Scroll through the Properties Shelf until you see a subsection called Vertex Weights. These are the exact weights of your vertex, and you can watch them change as you paint, if you want.

Turn Auto-Normalize off, then select a vertex group not already assigned to your selected vertex. Then give that vertex a dab of paint by left clicking on it. See how the new group gets added? Do it with yet another bone, if you want.
Preparing for export
So we’ve posed our model, and we’ve painted some weights. There are a few things left to do before we export.
Blender doesn’t care how many vertex groups you have. But MMD does. So the first thing to do is to make sure that we’re not sending MMD more than four weights for any vertex. In Weight Painting mode, select all your vertices, then use the Limit Total Weight Tool. Look in its Operator box below, and make sure that the Limit is 4. This will drop the least weighted vertex groups from any vertices until they have only 4 vertex groups.
We’ve also been painting without normalizing. Let’s make sure that we send MMD properly normalized weights. Use the Normalize All tool. In its operators, make sure that All Groups is the drop-list Subset, and that you’re not using Lock Active. (If you have extra vertex groups like edge scale and vertex order groups, they affect this normalization– that’s why we deleted them!)

We’ve posed our model. If we export it like that, it will export with that pose, just like saving from the transform window of PMXE. So let’s reset the pose. The fastest way to do that is to select its armature (from the Outliner), then navigate to the Data tab of the Properties window (not the Properties Shelf– oh Blender, I love you, but I hate you.) Look for the person-shaped icon. When you have an armature selected, there’s a Skeleton subsection of Data, with buttons for Pose Position and Rest Position. Just click Rest position, and all of your skeletal deformation will disappear– gone, but not forgotten.
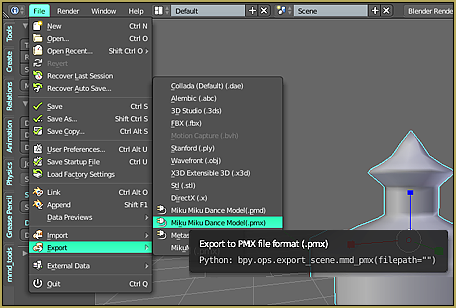
Export
 Now you’re ready to export! Select your model, and Export Model from the mmd_tools tab of the Tool Shelf. Give it a name and a place to save, then load it in PMXE or MMD and see how it looks!
And we’ve just scratched the surface of Blender’s vertex group tools. Explore the weight painting tools, then take a look at some of Blender’s modifiers, and if you still need more, there are always add-ons.
Keep the Faith and credit your sources! I used my own Tda Tutor Teto, wearing some sweet pants by 9844 and shoes by MariCorsair! And she’s using my laptop.
![]()
– SEE BELOW for MORE MMD TUTORIALS…
— — —
– _ — –
![]()


I followed most of this tutorial but somehow Blender exported pmx has broken weight on IK legs. Is the solution supposed to be before export or tweak weights in PMXE itself. thanks in advance
I’m sorry to hear it! Would you consider sending a link to the model? Preferably, before-and-after .pmx; even better, with a pre-save .blend. That way I could be sure to explain what happened, and I could see if there was anything that I could improve in this tutorial.
Just the IK legs? Did you download MMD Tools from the link I gave, or did you already have it installed? Previous versions of MMD Tools have had problems with bones, especially IK bones, but the newest versions should be okay. That’s the most likely thing I can think of, but there are plenty of other potential reasons.