


How do I make camera motion data in MMD? How do you zoom in the camera in MMD? How do you use the camera in MikuMikuDance? How do I save my MMD camera data? What does the camera panel do in Miku Miku Dance?![]()
Your Chance to Direct Without Going “Hollywood.”
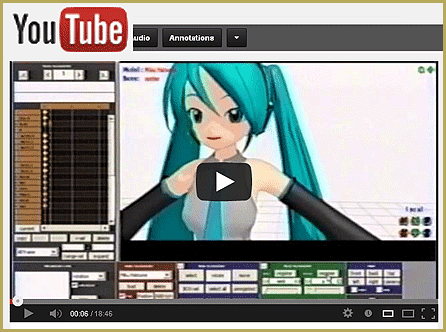
MikuMikuDance has a very user friendly camera function. Whenever you watch MikuMikuDance videos on YouTube you’ll notice that the camera is dynamic. Anyone can download the same dance motion data and use it. However, if you want your animation to stand out, do your own camera motion data. The two panels you’ll work with are the Frame Manipulation Panel (FMP) and the Camera Panel (CP). If you have camera motion data and you want to load it then see my other article: https://learnmmd.com/http:/learnmmd.com/load-camera-motion-data-vmd-files-using-the-file-menu-in-mmd-7-39/
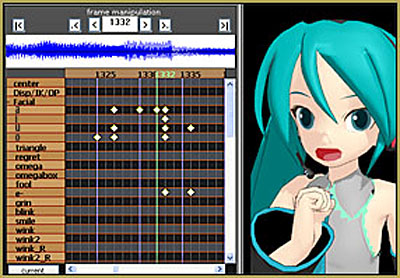
The Frame Manipulation Panel (Pictured here) is the  work horse of MikuMikuDance. Everything that happens in MMD is referenced there by frame number. If you want to see a specific frame; you can just type in the frame number in the field (located top center), push Enter on your keyboard, and see that exact frame displayed on the main screen. You can also use the left and right arrow keys on your keyboard to reach that point. An important point to remember is that one second of playback time is roughly equal to 30 frames in the FMP.
The Camera Panel is where you can adjust what the camera sees. This pops up when the Model  Manipulation field reads camera/light/accessory. You can play with view angles and decide the camera angle in your animation (default is 45 degrees). This is where you register your camera motion data to the Frame Manipulation Panel. When you register your shot, it will be represented by a diamond in the camera line. If you want to erase a shot, click on the diamond and use the delete button listed toward the bottom of FMP.
Whenever you register your shot, make certain you are selecting the register button on the camera panel and NOT the light manipulation panel. It is easy to confuse them. Check the FMP to confirm your selection.
How to Make a Zoom-in Shot in MikuMikuDance
- Load your favorite model and then
 make sure your model manipulation panel reads camera/light/accessory.
 - Scroll back with your mouse’s scroll wheel as far as you like.
- Click the register button in the camera panel.
- Type in 30 in the FMP (or click on 30th frame).
- Scroll in and position the main screen so it just shows a close-up shot of your model’s face.
- Register the new shot in the camera panel.
- Press play.
- Congratulate yourself on your first 1st original camera motion data!
 Using this new skill, you can practice Pan Shots (short for panorama). Pan shots are like zooms, only left and right or vice versa. You should also practice Aerial shots (also known as overhead shots or crane shots). Matrix-like Circular Shots are also within your grasp.
Cut shots, or just cuts, are abrupt changes in camera angle, scene, or subject. Let’s start from scratch with a new model and new set up. Go ahead, I’ll wait.
How to Make a Cut Shot in MMD
- Pick a shot you like and register that in the camera panel.
- Type in 30 in the FMP (or click on 30th frame in the FMP).
- Register the same shot.
- Select the 31st frame.
- Move your shot to a different angle or subject (say a profile shot).
- Register this new angle in the CP.
- Type in 61 in the FMP (or click on 61th frame).
- Register this shot in the CP.
- Press Play.
- Congratulate yourself again for your 2nd original camera data!
")
Now you can do close-ups or head shots, reaction shots, and POV shots (point of view).
Using your mouse is a quick and fast way to create camera motion data. It can look rather “choppy” though. In order to create the smoothest motion, move the camera with your XYZ rollers (located at the bottom right of the main screen). So, use one method for experimenting and the other for your final product.
Saving Your Original Camera Motion Data.
Experiment to your heart’s content and try out different frame values.  If you want to save your newly created camera motion data, here’s how.
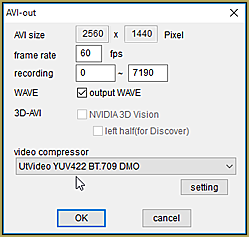
On your main menu select Frame then click select all camera frame. Now go to File and choose save motion data. This opens up the Motion sub-folder window in your User File. Now create a new folder for your original camera motion data and save it there.
Have fun with this.
Post Note:
The default angle of MMD’s camera is 45 (In later versions, 30 is the default angle). You should also play around with this. The higher you set it will give you a fish-eye effect which could be used for showing speed. The lower settings will give your film a more professional “movie-like” feel to your work.
– SEE BELOW for MORE MMD TUTORIALS…
— — —
– _ — –
![]()


I downloaded camera work from someone else and change a bit to fit my bigger model, but now it gets blocked by the floor (low angel shoot), is there a way to make the floor see through when the camera goes under?
There are various options that require various degree of skill. What do you mean by floor, to begin with? If you just have the coordinate grid turned on, disable it by View->Display coordinate axis.
If you’re using a stage and its floor isn’t transparent from below, *and* the stage is a .pmd/.pmx model, then you can edit it to create a material morph for switching transparency on and off.
If the stage is an .x accessory (and you don’t want to convert it), you still can turn the floor off permanently by using subset-extract MME feature.
Then again, if you’re editing your camera motion anyway, why not change it to *not* go below floor?
I have seen people to where they’re camera will just switch to a different part of the screen, but mine moves to the next frame. I want it to just switch to a position. How do I do that?
Shift to the frame *prior* to the one where the camera has to move, and register the camera’s old position. Then select the next frame, move the camera to a new position and register that too.
I was wondering how to make the camera move slow, then moves fast, then goes slow when reaching the end of the pan?
Interpolation curves work for the camera just as well as for models.
How do you rotate the MMD Screen like in circular way? hmm not like the simple ones like only the controls are left and right and up and down ;;
you can use the distance of the camera to make a rotating motion.
first you put the distance to 0 (dist)
go to the center of the circle you want to make.
then register that.
zoom out to the distance you want.
register that as well
then go to the frame where you want it to finish
use Y to rotate the camera to the final position
press register and done
Well, you set a starting time point, aim the camera at the target (if the target isn’t at the center of the stage make sure that its coordinates are close to camera’s X,Y,Z settings), register, then shift to the final time point, rotate the camera using Y control, and register again. If you want to zoom while rotating, make sure you change the “distance” parameter but not the anchor point of the camera itself.
Whenever I start up any version of MMD, the frames start counting up by itself. How do I fix this? I’ve tried everything that my friend, who is good with MMD, has told me to do.
Hi Chase… What does that mean:”Counting up by itself”? You open MMD and what happens; what do you see?
I still don’t get one part. Where is the FMP?
The FMP is the Frame Manipulation Panel … the big black and brown frame chart full of diamonds.
How do I load a custom camera data? I downloaded it with a motion data.
You look in the brown Model Manipulation panel (in the lower left of your screen) to be sure that Camera/Light/Accessory is selected. Then you FILE / Load Motion Data and navigate to your Camera .VMD file.
Thanks FA!
This was one of my favorite articles to write.
This is super original!Great tutorial,thanks!