
How do I attach an item or accessory to a bone in PMDEditor? What is weighting when using PMDE? How do I weight an ![]() accessory in PMD Editor for MikuMikuDance?
accessory in PMD Editor for MikuMikuDance?
What are you Weighting for …
Attach an item or accessory to a Bone in PMDEditor!
Let’s say you have just made a model. It is truly exquisite – it has all the parts you wanted, the facial sliders are great, the bones are named (between you and me, I never do that), and its textures and sphere files look great. You save the model and open up MMD to test your model out. It looks great when you open it, but  when you add the sample dance motion data and you click play, the model’s shirt/hat/bracelet/etc. either stretches out when he or she moves a certain way or just stays in place. NOOO!!! How could this happen to you?!
I know it’s hard to believe in your sorrow, but many other people have this problem. You are not alone! Lucky for you, I do know how to fix it…
I have had the exact problem…my new model UTsune Mactoshi (download here: http://browse.deviantart.com/?qh=§ion=&q=learnmmd#/d5afn4i) had a shirt that WOULD NOT COOPERATE. When she jumped, bent, or squatted, her shirt would stretch and glitch out. I had no idea how to fix this problem, so I asked the knowledgeable deviant FicticiousAnimation, a co-author here on LearnMMD.com. He knows a lot about PMDE. He said you have to attach an item or accessory to a bone in PMDEditor.
That’s what led me to write this article. “Weighting” in PMD is simply attaching a part to a bone. That’s all it is! It’s not as simple as adding textures and sphere files, but it is pretty easy overall.
Make a folder. Copy a base…or a model…
Now let’s say you want to put an ice cream cone in the model’s hand. Download a vanilla/chocolate cone here: http://mmd-mall.deviantart.com/gallery/?set=26458472&offset=24#/d52377f Copy the ice cream cone and its textures into the model’s folder.
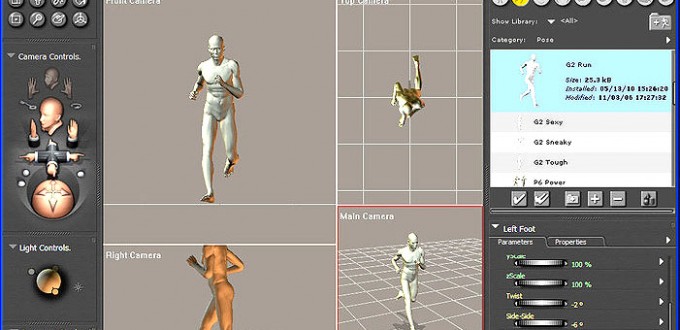
Open up your model in PMDEditor.  Drag the ice cream cone into PMDView, click “AD” and use Object Controls and Vertex Manage to move and rotate the ice cream cone until the ice cream is facing forward and is in the model’s left hand. In PMDView, find the letters at the top that spell “Me”. Go over until you find the letter W. Click on that. The Weight tab should come up. The ice cream’s layers on the model should start on the second MA0. Check that and everything under it. There should be a tab on that window called “edit”. Click on that tab, then click the last word, which is in Japanese. If you selected the right one, only the ice cream cone should show! Highlight the whole ice cream cone and click “Go” which is in the Weight window. The red dots on the ice cream should turn into black dots. Go into the main window of PMDEditor and go into the Bone tab, which is shortened to “BON”. Sort of like bon bons!

This step is the most painful. You have to go through all of those Japanese bones and pick the left hand bone! The bone you pick will turn red on the model, which is helpful. (The hand  bone will likely have a blue box beside it in the main window.) Once you have picked the right bone, highlight the ice cream cone again so it turns red. Press “Go” again. The dots should disappear. Go into View>Test Model and rotate the arm. If the cone stays in the hand of the model, celebrate!
You have successfully weighted a model!!
– SEE BELOW for MORE MMD TUTORIALS…
— — —
– _ — –
![]()

Hello! I know this is old, but I am currently struggling with attaching a collar/necklace onto my model! I don’t think the collar has a bone, so I can’t use the “parent-child bone” method, and I saw that Bandages mentioned attaching the vertices to a bone… however, I don’t know how to select a bone and vertices at the same time. When I try, it unselects the vertices of my collar and I am unable to proceed with clicking “ctrl-M”.
Any suggestions as to how I can attach the collar to my model’s neck?? Thank you!
Chance are, it does have a bone, even if its just a center bone (that you could rename to match your neck bone.) Any .pmx or .pmd model has at least one bone. (And PMXE will add a bone to any .x file you import into an empty file.)
To select both vertices and bones, first make sure that the selection of each is enabled (V and Bn buttons on toolbar), then select as you would anything else. To add to a selection, for example if you have some vertices selected but not the bone, hold down the shift key while you select. (To subtract from a selection, use the ctrl key.)
It worked! Thanks a ton, I really appreciate it! :D
OK, I got almost to the end of your procedure. But when I get to the next-to-last step (“Once you have picked the right bone, highlight the ice cream cone again so it turns red. “), I can’t select the vertices in the ice cream cone. At this point, the cursor is a red circle and no matter what I do, it won’t let me select the vertices. I can’t get back to the regular cursor without it un-doing what I’ve done up to that point.
I’m using PMX editor ver. 0.2.2.2 (English) which doesn’t tend to crash on my PC like earlier versions of the editor. In this version, there are additional things in the “Weight/UV Drawing” box I don’t understand. Also, there is no “Go” button but there is a “Start” button which seems to do the same function.
Any suggestions?
Yeah, this is an older tutorial, and I think there may be some differences between PMDE (which the tutorial talks about) and PMXE (which you are using). In case you’re curious, yup, you should be using PMXE, you should be using the English version, you’re doing all the right things, it’s just that this tutorial is older.
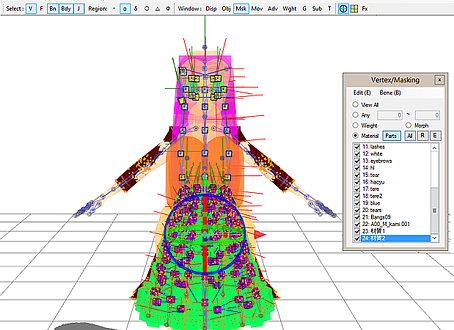
Now, in PMXE, you shouldn’t need to highlight anything. So don’t worry about that. Once you have a bone selected, and you hit the Start button, you should be able to start painting. The only thing is, you want to be careful about only hitting the ice cream cone, not the surrounding hand. Masking by material is a good way to do that. ( https://learnmmd.com/http:/learnmmd.com/editing-model-materials-pmde/ talks about how to do that, if you don’t know how; it’s PMDE, but in this case, it’s basically the same.)
If you’re using PMXE, you might find https://learnmmd.com/http:/learnmmd.com/pmxe-weight-painting/ to be more useful. In that article, I don’t walk you through any particular steps, but I go over what the stuff on that panel means, and how to get weights onto your model, and probably a bunch of other details that are unimportant because that’s how I roll :)
One more thing: if all you want to do is weight the ice cream cone to the bone, and you’re not concerned about learning more complicated stuff yet, there is a easy way. Select all of the ice cream cone’s vertices, select the bone you want it weighted to, and hit ctrl-M. That weights all the vertices you selected, 100%, to the bone you selected.
Wow, this is a good update.
Yes, I do want to learn the more complicated stuff, but I’m pretty much a novice now so I’m taking it one small piece at a time.There’s lots of tutorials out there but many are not the easiest to follow. I’ll try your suggestions and get back if I have more questions.
Thanks!
And that’s smart too. Editing models, or creating models, is a big process, but none of it is insurmountable when you just take it one step at a time.
Happy to help, and happy to entertain any other questions you have, feel free to ask.
Alright!!! I was able to do it!
And, I was finally able to attach some shoes (as PMX files but without bones) to a model. I’d been messing with this for a while (unsuccessfully). Great!
Thanks again for your help on this.
:)
OK, I’ve run into another problem. I added a skirt I downloaded to my model using the “ADD” function in Import. It went on nicely and moves with the rest of the model. But, some of the bones that make up the shape of the skirt are now in seemingly random directions with random lengths. They’re not that way in the skirt before I imported it. I re-tried it several times and it does the same thing.
So, can I edit the lengths and orientations of these bones making up the skirt so that they are correct? How?
That sounds strange. Bone length or direction doesn’t actually matter– really, they’re just points. But presumably, the bones are pointing to other bones, which are maybe out of position, and that’s bad.
The most likely cause for this is if you had some existing bones with the same names that got merged. Look at the files before and after import, and look at all the bone names to make sure there aren’t any duplicates. (Could happen easily if you’ve imported other stuff too, and they both used default skirt plugin names.)
If that’s not the issue, feel free to send a copy of both files getting merged. Check out https://learnmmd.com/reggie-replies/ for reggie’s address, and he’ll forward it to me, and I’ll figure out what’s going on and get back to you.
Or, if it works, you could just let it go :) Usually, if things are working, it’s not worth stressing them too hard. And when things start to go wrong, you’ll have more clues about what happened.
Come to think of it, there was another skirt on this model that I deleted. Maybe there are some old bones left over, as you suggest. I’ll look more closely at it.
Thanks again for your help!
That would make sense. Don’t forget to check for hidden bones. Inappropriately merged hidden skirt bones will do what you describe, but not actually affect anything (the skirt plugin bones that are hidden by default don’t actually do anything.)
OK, I re-checked and could not find that I had any left-over bones from the skirt I deleted (when I deleted the skirt, I included deleting the bones). The new skirt I added seems to move all right, except in a few cases when the model bends forward her underwear starts to emerge through the skirt in a few spots. I don’t know if this might be caused by the randomly directed bones. But it begs a bigger question– what exactly do the skirt bones do? I had assumed they give the skirt its shape, or determined how it moves under the influence of physics. Is this the case, or is it something else?
BTW, I really do appreciate your patience in this sort-of conversation we’re having on model editing. Your guidance has already been a big help.
I’m always happy to help anybody that’s so interested in learning.
For bones, think about your shoe that you weighted. It rotates around another bone. And your shoe moves and rotates with it. The bone is the center of the rotation of your shoe. You can experiment, moving the shoe around and then seeing how it gets affected by the bone. And you can experiment with bone direction and length as well, by changing the shoe bone’s points-to bone or offset. If you experiment with that, you’ll see its length and direction doesn’t matter. How could it? The bone is just a point around which to rotate. The word “bone” is really a poor choice, because they’re not long. A bone is more like a joint, like an elbow or a knee, than like a humerus or femur.
Your skirt bones are exactly the same. Each rotates around another bone, probably the next higher skirt bone. And each has vertices weighted to it, skirt vertices, weighted exactly the same as your shoe is weighted, that rotate around the skirt bone. There’s nothing special about it being a skirt, it works the same way.
Now, you’re starting to get into physics issues. And I’ll tell you, physics is hard and frustrating, and you might want to wait a bit on trying too hard to figure it out. But basically, when bones are set to use physics, which is done by creating a physics-type rigid body attached to that bone, then the bones stop following their parent bone and start following the rigid body to which they’re attached. They rotate around its center of mass the exact same way they would otherwise rotate around a parent bone. But rigid bodies get acted on by things like gravity, joints, and collision with other rigid bodies that are created for a model. Like, legs. Skirts do use physics. But the fundamentals of their bones are the same.
Thanks for the explanation! I think I have a better understanding of what is going on.
Are you still interested in seeing the model and seeing if you determine why the bones end up messed up? If you use OneDrive I can put the appropriate files and folders up on it and send the access link to you via Reggie. But it’s up to you– I don’t want to burn up too much of your time.
If you want to do that, I’d take a look. You can also feel free to post the link here in the comments. Remember, best to include the two original files, pre-import, as well as the post-import file.
I’ve emailed the link to Reggie. I didn’t want to post it here since I didn’t want everyone to be able to access it. The model is just for my testing purposes and is not intended for dissemination.
The folder (Rin Test) contains two versions of the model– one before adding the skirt and one after. The file for the skirt (skirt 2.pmx) is included so you can try adding it yourself to the “before” version.
BTW, the shoes don’t work on the model I uploaded because this is a version before you showed me how to attach them.
I have a website I will be updating a few times a week with original animations and short films along with concept art for the animations and other kinds of media. How can I copyright everything on my site so that the copyright info I have on the bottom of every page “All original content (C) 2008 (My Name)” actually means something? Will my logo, site name, all content be copyrighted?.
You cannot. Once you post something online … you lose control of it. Yes … it’d be nice if your copyright statement meant something … but, really, it’s useless. Anyone online can copy or save-as or “Control A and Control C” to copy-paste your info into their own document or file system.
thanks reggie!! So I was trying out this tutorial but It doesn’t teach you how to give the acessory you attach to the model in PMD a morph manlupitation, the reaon why I wanted to remove the fan before was because the fan could not open or close and there are no tutorials that I can find that teaches you. I’m trying to put a fan like this http://images.visitbeijing.com.cn/20120905/Img214746962.jpg onto a model and make it so that it can close or open when dancing in a video.
Wow … nice fan “:o) … I see what you want … to be able to open and clos the fan during your animation … lemme think on it!