

![]() I want to make a bouncing ball. How can I make a ball that bounces on its own? How can I apply physics to my bouncing ball?
I want to make a bouncing ball. How can I make a ball that bounces on its own? How can I apply physics to my bouncing ball?
The MMD physics engine is powerful. In this tutorial we will make a dynamic model, a bouncing ball, which takes full advantage of the MMD physics engine!
Use PMDE to create a Bouncing Ball for MMD!

If you’re using the PMD Editor, make sure you’re using the latest version (version 0.1.3.9) like we are as the earlier versions might not have the model making functions.
Let’s get started!
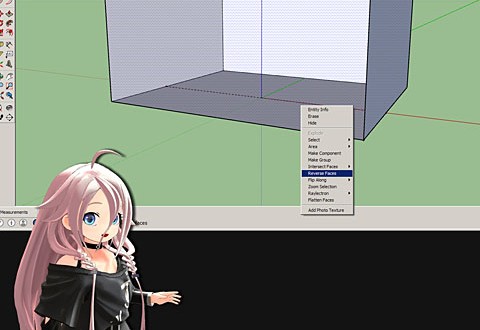
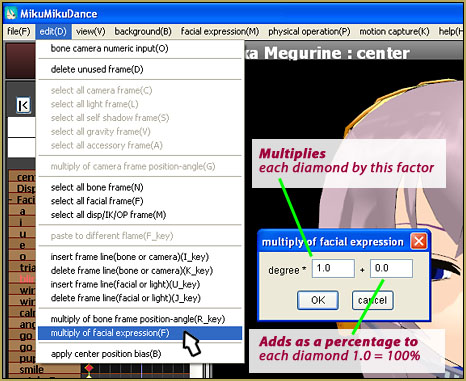
In the PMDView window, go to the bottom of the Edit menu and choose the “Simple Primative Add” function.

This opens up a new panel. Choose the sphere and change both the longitude and latitude values both to 16 and the radius value to 1.0. Then click on the “Adding” button. This will give us a nice smooth sphere that is sitting in the center of the screen and halfway embedded into it.

Note that when created the sphere is by default weighted to the center bone so when you move that bone in MMD the ball will move with it.
But a ball embedded into the floor does us no good so we’re going to change that. Also we’re going to need another bone to control the ball. So, let’s address that first by going to the bone tab in the main PMD window and right click anywhere in the bone list view and select “Add>At the end add”. This creates a new bone which we will name “ball” – make sure you name the bone on both the Japanese as well as English side in the labels field. Click on the “Move” button” – both the “Rot” and “Move” buttons should be depressed as we want a Rot/Move bone – this is displayed in the MMD and PMD displays as a square bone. Rotation only bones are displayed as a circle.


Now make the center bone the parent of the ball bone and the ball bone the child of the center bone. We need this hierarchy for the next steps.

Select the new ball bone in the bone tab then go back to the PMDView display and select the “W” button. This opens the weight painting controls. In the display all the vertices
ADVERTISEMENT
should be black. Make sure the ball bone is the focus bone in the weight painting panel’s bone focus field. Then click on the start button and paint all the vertices until they change to red. Depending on how you set up your PMDView display controls you might not see any vertices until you click on the start button. In any case, once all the vertices are painted red, the ball is now completely weighted to the ball bone. Unclick the start button and close the weight painting panel.

We’re going to move the ball so that it sits exactly on the floor. Make sure both the “V” and “B” controls are selected and then select all the bones and the vertices that makes up the ball. Then click on the “C” button to open the Object Operations panel. Go to the value tab and under the “Move” button in the middle (Y) field, enter 1.00. Then click on the “Move” button and everything will move up exactly 10 centimeters. Close the Object Operations panel. Go back to the bones tab and change the center bone’s Y axis value back to “0”. You should now be able to clearly see both bones in the PMDView window.

Next we’re going to add physics to the ball but before that go to the Display Pane tab. In the list view right click and select “add new”. This creates a new category – rename this to “ballcontrol” in both the Japanese and English side of the label field. With this category selected, next to the “?Add” button, open the bone selection list. There should be only one bone in there: ball. Click on the “?Add” button. This will now be added to the category list so that we can easily find the bone in MMD and with this model, it is absolutely important that we can see this bone listed in the MMD frames display bone list as normally, after the next steps, this bone is invisible and unselectable unless the physics engine is completely turned off.

Now go to the physics tab (Rigid body). Create a new physics by right clicking on the list view display. As with the other tabs, just right click on the list field to add/create another item. You can either select “Add to this position” or “At the end add” to add the bone. With only a single physics it doesn’t matter where it appears on the list as it will be the only one. Label this bone “BallPhysics” on both the Japanese and English side of the label field.
Use the following properties for this physics:
Related bone – ball
Type – Physics
Shape – sphere
Group – 16 – warning: make sure none of the boxes underneath are checked or the ball will drop through the floor!
Radius – 1
Location – y=1.00
Physics Parameters:
Mass: 1 (default)
Move atten: change to 0.25
Rot damp: change to 0.25
Friction: change to 0.125
Now with only these values set what we’ve done is to build a brick. The ball would just drop to the floor and remain there unless it’s is kicked. But we want the ball to bounce so we will need to change the Repulsion value.
For now make the Repulsion value 0.75. This will give us a ball with a good amount of bounce. However, if you want a balloon filled with helium, make this value 1.0 or greater.

Next go to the Joints tab and create a new joint. Label the new joint “ballJoint” on both sides of the label field. Connect the joint in both the Conn A and Conn B fields to ballPhysics. Make sure both these fields are populated or the ball will crash MMD when it is loaded!
With the ball bone selected (which should be automatic if you properly assigned the ballPhysics to the ball bone in the steps above) click on the “?bone position” button. The Y location value should change to “1”. This locates the joint properly to the bone.
Since this is a rigid joint, we don’t have to do anything else in this tab.

Now go back to the PMDView window and with the proper view options selected you should see something exactly like this:

Ok let’s make the ball a little prettier!
Go to the materials tab and use the values as shown in the next screenshot to create a nice shiny pink ball. We won’t go too much into materials specifications in this article as the subject is covered in other articles here on LearnMMD.

To finish the ball, goto the Information tab and label it “pinkBall” or whatever name you want to call your ball. As before, populate both the Japanese and English side of this field.
SAVE as a PMX model…
Now save the ball model – we’re saving ours as “pinkBall.pmx”.

So let’s test out our new physics equipped pink ball in MMD!
Testing out our dynamic ball model in MMD
So load the ball into MMD and… nothing happens! Even if you select the center bone the ball doesn’t move… what gives you might ask?

Well, if you were awake during physics class you might have a clue as to what’s going on. The ball has a mass but there is no force exerted on this mass so it will naturally remain inert. So it won’t move. But what’s the point of that you might ask and so
ADVERTISEMENT
let’s exert some force on the ball and see it move. The easiest way to do this in MMD is to goto MMD’s physics controls and go to the gravity settings function. Check off add noise and register. The ball should immediately start moving in a random direction.

Basically, the add noise function is used to simulate wind and our ball is relatively light so it’s getting blown about by a gentle breeze. Anyway for now turn off noise in the gravity control for the rest of this article as it will only make things more complicated to understand.
The pinkBall is not a “normal” model…
When you load pinkBall.pmx, you will find that you cannot “do” anything with it; you cannot move it even with its center bone. The reason why you cannot pick up the ball with the center bone is because it is not weighted to it plus the fact that the ball bone to which the ball is weighted is under the control of MMD’s physics engine. Bones under the physics engine’s control cannot be user selected normally which is why they are normally hidden from the user in the MMD display.
(The ball’s center bone CAN be moved. It’s just that the ball won’t move with it when physics is ON. However, when physics is OFF or switched off on the “ball” bone, you can actually move the whole construction with the center bone.)
But what’s the good of a ball that you can’t even control?
Actually, the ball can be totally controlled by a vocaloid! In actual fact the vocaloid can not only pick up the ball, but drop it. And if they can drop it, that means they can throw the ball and in a scientifically accurate manner if you program her correctly.

… but THAT’s another subject!
I have written another tutorial detailing the physics of the ball as you use it to play games within MMD! I will show you how to make a model pick up and THROW the ball!
Have fun with your Bouncing Ball!
– SEE BELOW for MORE MMD TUTORIALS…
— — —
– _ — –
![]()


I followed the instructions correctly but when I load the model in MMD my ball is invisible! Maybe it’s because I used PMXEditor?
First of all, is it really invisible, or falling offscreen before you notice it? Turn off physics, load the model again and see if its there.
Second, is it really invisible, or maybe it’s just white on white backgound and thus inconspicuous? Load a stage and check again.
If nothing else works, upload it somewhere, some of us could take a look.