


![]() How do I create Sph files? What can I use to create sph files? Can I create sph files without a drawing tablet?
How do I create Sph files? What can I use to create sph files? Can I create sph files without a drawing tablet?
What are Sph files?
There are many articles on this site alone that deal with Sph and Spa files. But the only MMD related thing the phrase “Create Sph Files” brings up when you type it into Google is one video from 2011. Today, that is changing. Or, more so, it changed upon the date of publication.
Create Sph Files in Blender Without Drawing Anything!
Today, I’m writing for the me from a week ago that tried to figure out how to make Sph files without whipping out her drawing tablet.
Note: This article assumes prerequisite knowledge from my previous article.
The First Step to Create Sph Files . . .
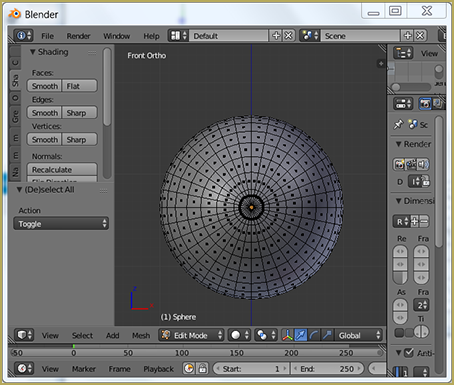
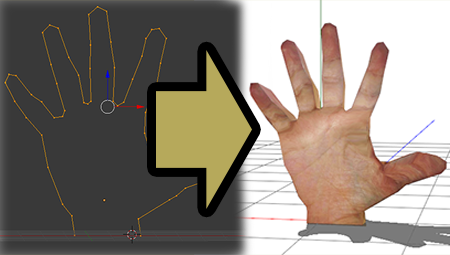
The first step to creating a sphere file is to create a sphere!
I’ll breeze through this without visual aids.
- Open new Blend File
- Delete Everything
- Switch to Orthographic mode
- Seriously. It’s a nightmare without it
- On the Create Tab, add a UV Sphere. The settings don’t matter.
- Drag it above the center point.
- Type “r, x, 90” (without the commas!) to turn it on its side for easier cutting.
- Switch to “Right” view then switch to Wire frame view.
- Enter Edit mode and press A to deselect everything if anything is selected.
- Switch to Face Select and then press B. Draw a box so that everything behind the blue line is gone.
- Select all and click the “Shading / UVs” tab of the sidebar. Set everything (or at least faces) to “Smooth”.
And your Sphere is prepared!
Creating the UV Map
This is a short step, but it’s really important that you follow it. Otherwise, you’ll end up with a funny looking circle!
Select All by pressing “a”, then press “u” for the unwrap menu. Select “Project from View”. In the UV Editor view, select everything. First, use “g” to grab and move the circle so that it is centered. Then, use “s” to resize the geometry to fill the area without going outside of it. Keep adjusting until you’re happy!

Then, of course, make a new image in the UV Editor and save it as image. If you’re going to use Cycles Materials, this is vital.
Preparing the Materials using Cycles
I went into deep detail about how to append materials from Blend files in my previous article. Again, I’m going to rush through how to create sph files with Cycles Materials without visual aids. Of course, the first step is to switch to Cycles render, but forgetting to do it until the last step doesn’t hurt anything.
- Go to Object Mode if not already there.
- Click “File” on the top bar and choose “Append”.
- Navigate to the Blend file you want to use.
- Once inside the Blend file, choose the “Material” directory.
- Choose your Material.
- Right click your hemisphere.
- Go to Materials tab.
- Click the orb next to “New” and pick the material you just appended.
If you succeeded, your hemisphere will have a nice new texture when you switch to Rendered View! I’m currently using a Crushed Velvet material from here.
What Lighting is Best for Creating Sph Files?
There are two main camps for this. There’s HDRi and then there’s lamps. HDRi are like the skyboxes in Ray-MMD. Unlike the skyboxes in Ray-MMD, however, HDRis in Blender can be any file type of any size.
HDRis are insanely easy to set up and take care of all of the worries of light placement. On top of that, it’s insanely easy to find free HDRis at places like HDRI Haven. The issue is, especially for glossy materials, is that the shadows and highlights created by that HDRi will be baked into the Sph or texture.
(Major, major note. HDRis do not show up in Orthographic mode. So, leave that behind and switch to perspective if you want to use HDRis!)
If you are custom making Sph files for a certain project that is set in a certain location, using HDRis to make your Sph files are perfect! Load the material, load the HDRi, then add the image node to the material texture (because of course) and then bake!
For example, here are three spheres with an HDRi. The materials are leather, water, and upholstery.

You can tell how much of the background is reflected in the water, whereas the upholstery doesn’t reflect much at all.
Here are the same three spheres with spot lamps.

As you can tell, these are instantly more suited for creating sph files. The leather looks like it has just enough light to be an add-sphere without any further editing. On top of looking more like sph files off the bat, the lamps feel more easily customizable.

Setting up Lamps to Create Sph Files
I will focus on Add-Sphere type Sph files. They make things happy and shiny!
There are infinite ways to set up lamps, but this is the only way I’ve really gotten to work for my purposes so far.
First, I go to the “World” tab and just set the background to black so that there is no ambient light making the Sph brighter than it should be. (Seriously, I couldn’t even see the details of well made Sph files with my old monitor settings.)

Then I go into Object Mode and add the only lamp I’ve gotten to work well for this purpose: the spot lamp. When positioning the lamp, go into orthographic mode!! It’s nearly impossible to get it to do what you want in perspective mode.

As you can see, I set the spot lamp to directly shine onto the hemisphere. Now, I can go into rendered mode and play with the settings!
Once I’m happy, I add an image to the material nodes because I don’t know why you just have to. Then, I bake.
Sometimes, using the “Shadow” bake type works perfectly. That means that you don’t have to mess with GIMP or Photoshop because it’s already greyscale. Sometimes it doesn’t for some reason so you have to use “Combined” and edit it so that it won’t affect the color of the part the Sph is applied to. Though, it should be noted, sometimes “Combined” also messes with you for some reason. Really, it’s a gamble when you pick what to bake and I don’t understand why.
This is one of those times “Shadow” doesn’t work that well.

This will take some compositing in Photoshop or GIMP to be presentable.
However, switching materials to something more Sph friendly instantly makes a pretty good Sph map with the “Combined” bake type.

How Much Detail Is Too Much Detail?
While researching for this topic, I made a YouTube video on this very subject.
MMD does not like tiny details. In the case of Sph files with too much detail, banding occurs.
When anything like that occurs and you don’t want it to, open the Sph in Photoshop or GIMP to fix it by blurring it out.
Have Fun Creating Sph Files!
I hope this was helpful to at least one person. Experimenting with materials and ways of getting out of doing anything art related is a lot of fun! I’m excited to see what everyone makes.
– SEE BELOW for MORE MMD TUTORIALS…
— — —
– _ — –
![]()


how do you switch to orthagraphic view?
Very cool, and the skirt looks great!
You can quickly make the UV map you’re looking for with numpad-1 (front view) numpad-5 (ortho view) u->project from view (bounds). That’ll scale it up to the size you want automatically.
Thank you so much :D ! I did stare at “Project from View (bounds)” for about twenty seconds before just deciding it probably wouldn’t do what I wanted . . . It would have!