Skip to content
Learn MikuMikuDance – MMD Tutorials – Free 3D Animation Software

Learn MikuMikuDance – MMD Tutorials – Free 3D Animation Software

Download Free Animation Software – Let's Learn How to Do Everything!

  • Step-by-Step MMD instructions
  • DOWNLOADS
  • Troubleshoot, Fix MMD
  • Site Contents
  • Reggie Replies Q&A
  • Homework!
  • What IS MMD?
    • Download MikuMikuDance Newest Latest Version of MMD
  • “HOW TO”
    • Raycast RAY-MMD Effect Tutorials
  • BONUS PAGES
    • Why convert PMD models to PMX?
  • HALL of CHAMPIONS
  • Tutorial Categories
  • About
    • Privacy Policy
  • Toggle search form
  • Intentionally Build Dramatic Atmosphere into your MMD Animation MMD Tutorials
  • Downloading MMD 9.32 is Quick and Easy! Download MikuMikuDance 9.32 Download MikuMikuDance
  • RAY-MMD: Haku’s crazy light show [PART 1] MME Effects Tutorials
  • Download MMD Pokeball Accessory and Learn Accessory Manipulation Accessory Manipulation/Adjust
  • Motion Reference Videos Available FREE Online Animation Resource
  • A better MMD followcam in PMXE with physics and IK bones Animation Shortcuts
  • MME ExcellentShadow2 effect smooths ugly Self-Shadows ExcellentShadow2
  • RAY-MMD: Haku’s crazy light show [PART 2] MME Effects Tutorials

Use Accessory Manipulation Panel Settings to Position Props

Posted on January 10, 2013July 30, 2015 By Reggie_Dentmore 3 Comments on Use Accessory Manipulation Panel Settings to Position Props

How do I use Accessory Manipulation Panel Settings to A Feature Article by Reggie Dentmore on LearnMMD.comattach an accessory to my models in MMD? How do I get my model to hold a guitar? How can I put the Negi into Miku’s hand in MikuMikuDance? How do you use the AMP settings? What are those number settings in the Accessory Panel?

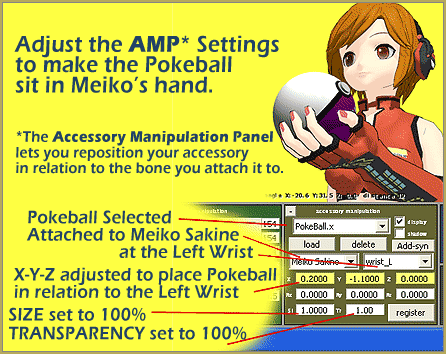
Attach that Banjo to your model using the AMP!

Use the Accessory Manipulation Panel Settings!

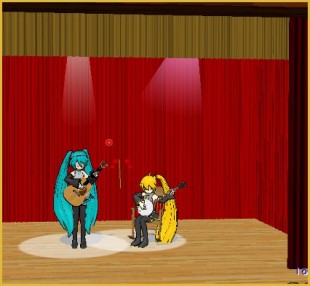
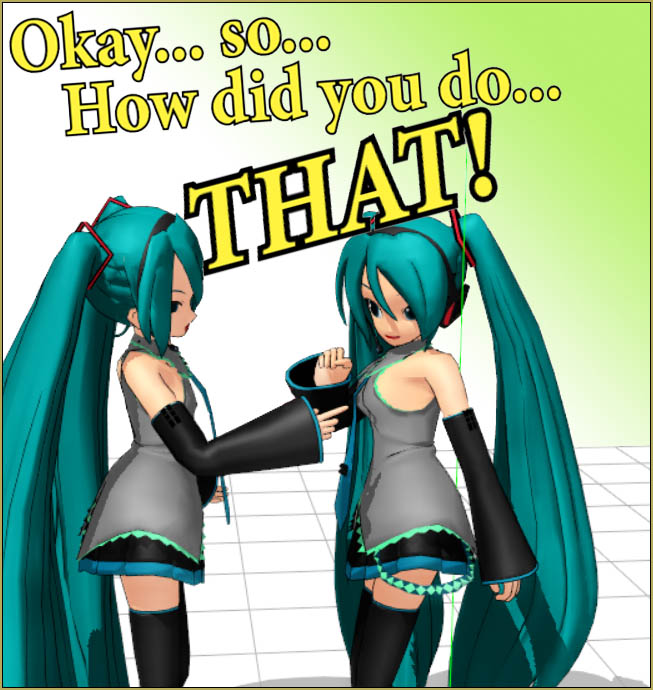
As an MMD Newbie I tried to avoid using all those complicated-looking settings over there on the right side of the I attached the banjo to Len's Lower Body so it would sway with the motion! LearnMMD.com MMDcontrol panel. “Who needs ’em? … Just attach your accessory to the Ground or to a Dummy Bone.” … That works for a while … but then you want Miku to hold that Negi … or you want Len to play the banjo! How can you get those things to “happen”? … Use the Accessory Manipulation Panel Settings!

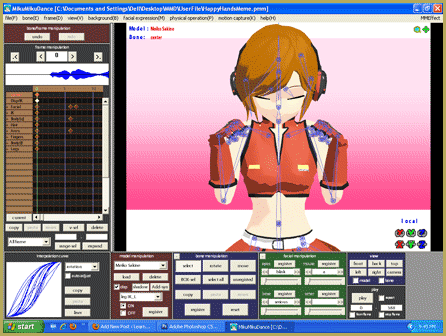
When you first load an accessory, it arrives attached to the “Ground”. Often, you’d rather attach it to a model. So, load your model, go back to the AMP (Accessory Manipulation Panel) and attach the accessory to your model. The choice of bone for attachment is up to you … choose wisely! For my “Len Plays the Banjo” segment, I decided to attach the Banjo to his “lower body”. That way the Banjo will sway along with his dance movements. If I’d attached it to his hand, it Attaching the Banjo to Len's "Lower Body" looks bad until you adjust the accessory manipulation panel settings. LearnMMD.com  MMDwould appear to be “glued to his hand” during the animation.

When I attached the banjo to Len’s “lower body”, the banjo flipped into place … but something didn’t look quite right!

Sadly, I had to learn to adjust the settings in the AMP!

Take a look at the grid on the floor. Each Square measures-off 5 units. In the XYZ world of 3D animation, you position things in relation to that grid. Changing that X value of 0.00 to a setting of 5.00 will move the banjo one whole square to the right. If you want to move the banjo up, enter a positive value into the Y window.

After thinking about if for a bit, I decided on these values to position the banjo on Len’s lower body. Knowing the value of 5 for each floor grid square, I made this guess at adjusting the Accessory Manipulation Panel Settings. LearnMMD.com MMD

After a few guesses, I almost had it!

My final settings in the AMP put the banjo right where I wanted it!  LearnMMD.com  MMD


(That position on Len’s model … I swear it said Lower Body as I attached the Banjo!) … THOSE are the numbers I used in my animation. Note that the value of Z at -2.00 only moved the banjo forward 2 units … not 2 squares … asquare is 5 units.

Also NOTE: The same kinds of moves can be used as you attach a dummy bone to your accessory.

Get Reggie’s BANJO from the LearnMMD Downloads Page!

Experiment with the Accessory Manipulation Panel settings. See the other AMP articles on LearnMMD.com!


– SEE BELOW for MORE MMD TUTORIALS…


— — —


– _ — –


Visit the LearnMMD.com Homepage! Plenty of Mikumikudance instruction and info!

More MMD Tutorials...

Introducing MMD model 1052C China Qipao Miku

Where can I download MMD model 1052C dancers? I want the 1052C China Qipao Miku ...read more

Download Jomomonogm's Snow Miku 2019 for MMD, a most unusual model!

Where can I download Jomomonogm's Snow Miku 2019? What is so unusual about this Snow ...read more

MMD animation made-from-scratch Forgotten Vocaloid Mew Rags on Reggie's MMD Videos

How do I make my own MMD animation from scratch? How do I start my ...read more

Rediscover your old MMD Animations: Love them again!

Rediscover your old MMD Animations: Love them again! https://youtu.be/P4b3todZMUI A labor of love... Remember how it was when ...read more

MMD Boobs too Big yields Too Funny Really Bad Boy video!

Can MMD boobs too big get in the way of a downloaded motion file? What ...read more

Download Hatsune Miku type N models from 2010... a set of 6!

Can I still download Hatsune Miku type N models? Where can I download a few ...read more

Accessory Manipulation/Adjust, Dummy Bones, Reggie Dentmore

Post navigation

Previous Post: Make your own READ ME files so you can track your Sources
Next Post: Using The Manga Shader Effect for MikuMikuDance

Related Posts

  • Make a “Dream Fighter” MMD Music Video "the making of" my video
  • Download ARROW Lip-Sync Soundtrack Zip Folder "the making of" my video
  • MMD Lip-sync is fun to do... just do it!
    MMD Lip-sync is fun to do… just do it! Animation Shortcuts
  • MME Quartz Effect Refracts Reflections All Around! MMD Tutorials
  • Blackout Effect offers Fade-to-Black and fade-to-white!
    MME Blackout Effect offers Fade-to-Black and Fade-to-White Blackout Effect
  • Paper Crowd model delivers instant huge audience Paper Crowd model

More Related Articles

Customized Skydome replace stages, enhance MMD animations MMD Tutorials
Crazy Animation Creation yields fun video and good practice! "the making of" my video
After lowering the stage -.2 on the Y axis, the floorlights.x work great! Easy Fix for the Auditorium Stage Accessory: Use a Dummy Bone Dummy Bones
The MME Oppai Effect adjusts the breast size of your MME models! MME Oppai Effect enhances MMD Model’s figure… one for the boys! MMD Tutorials
Everything is loaded and ready to "Play!" ... Happy Hands MMD Meme. Create an MMD Video using the “Happy Hands” Meme Making Videos - Rendering to AVI
My personal Jopurney through the many MMD memes. Personal Journey MMD Leekspin, Nyan Cat, Levan Polkka, more! Random Thoughts & Visions

Comments (3) on “Use Accessory Manipulation Panel Settings to Position Props”

  1. hanyu says:
    November 23, 2019 at 8:36 pm

    Heellooooooooooo. I wanted to add some accessories but i noticed that the accessories manipulation panel doesnt appear… what do i do?

    Reply
    1. KillerBeer says:
      November 24, 2019 at 7:40 am

      Press “to camera” to switch between the model mode and the camera mode (where accessories are available).

      Reply
      1. Reggie_Dentmore says:
        November 24, 2019 at 10:08 pm

        Thanks, KB! … I never realized that button was there!

        Reply

Leave a Reply Cancel reply

Your email address will not be published. Required fields are marked *

Download the latest version of MikuMikuDance!
See the MMD Step-by-Step instructions page!
Learn how to make your own MMD motions!
LearnMMD.com
  • Optimise computer assets by culling unseen MMD model parts Chestnutscoop
  • Minimize both windows so you can reach the RECORD in Audacity and then the PLAY in you video player. Make Sound Effects in your MMD video soundtrack.
    MMD Soundtrack Make Sound Effects on your Desktop using Audacity® "the making of" my video
  • Squash and Stretch Ball
    The 12 Principles of Animation for MikuMikuDance. ARIZONA
  • Model eye-mesh texture VS Photographic eye-mesh in Blender.Blender
    Photos make realistic eye textures for your MMD models Blender
  • Learn How to Make Transparent Parts Work: Visit YouTube to watch this video. LearnMMD MMD 7.39
    Make Window Glass and Transparent Parts Work Correctly MMD 7.39 Accessory Manipulation/Adjust
  • The Making of: Sleepover Gone Wrong (REMAKE) "the making of" my video
  • Switch Models without Physics Glitches Accessory Manipulation/Adjust
  • Using Subset-Extract to Customize Your Models. ARIZONA

Copyright © 2022 Learn MikuMikuDance – MMD Tutorials – Free 3D Animation Software and Instructions..

Powered by PressBook Premium theme

Go to mobile version