


 How do you adjust the Physical Operation Tab settings in MMD? What’s new in the MMD 9.10 physics engine settings? How do I turn off the physics in MikuMikuDance?
The PHYSICS ENGINE Settings in MMD 9.10
After a long time, I think I finally figured out the nuts and bolts to the new Physics Engine (The physics engine is the name of the entire physics package together), in MMD 9.10.
First, we’ll discuss the various different selections and physics modes on the Physical Operations tab. A physics mode is a different mode or “variation” of the physics engine.

on/off mode (O): In this physics mode you can turn on and off the physics on certain bones and/or model and have those setting outside of playtime.
Scenario: Your playing a motion, but you have a model (a) whose physics will crash your program and a model (b) whose hair keeps bumping into the model (c) next to it. You want to see what the physics will be like without pressing play.
In the case of a, you need to turn off the physics, but you don’t want turn the physics completely off. Same with model b, you just want b’s right pigtail to stop bumping into poor model c (whose physics are fine, by the way).
For model a here’s what I recommend you do: turn the physics off on the model.
There are two methods to turning physics off on a model :
Deleting Model Physics: Method 1 (Long Method):
1. Go to the Physical Operations tab, and click select all physical bones (Physical bones are the bones that are affected by physics, as in they are no longer there when you turn on the physics)
2. Once you have selected select all physical bones, click select physics ON frame (X mark).
3. Then go to Change physics ON/OFF frame

4. In the drop down list, select OFF
Your model’s entire physics should be turned off. Though to save you the hard work and toil of going through that entire process, let’s look at the
brand new little button in the blue Bone Manipulation window called “Physics.”

Deleting Model Physics: Method 2 (Short Method):
1. Go to the Physical Operations tab, and click select all physical bones.
2. Click on the physics button in the Bone Manipulation box, once you select the button it should not be blue anymore. (If it’s already “not blue” don’t click on it).
3. (Make sure you’re on the first frame) Click on the register button next to the “physics” one.
To turn the physics back on, follow one of these methods:
Restating Model Physics: Method 1:
1. Go to the Physical Operations tab, and click select all physical bones
2. Then go to Change physics ON/OFF frame
3. In the drop down list, select ON (X Mark)
Restating Model Physics: Method 2:
1. Go to the Physical Operations tab, and click select all physical bones
2. If the physics button in the bone manipulation box isn’t blue, click on it. If it’s already blue don’t click on it.
3. Click on the register button next to the “physics” one.


Now let’s talk about model b‘s hair issue. Remember you just want her right pigtail to be turned off. What I’d recommended doing is turning off the physics on those individual bones.
Here’s how:
Turning off the physics on individual and/or groups of bones: Method 1 (Long Method)
1. Select the individual bones you want to delete the physics from (Do this in No calculation mode).
2. In the Frame manipulation window (to the far left), individually select the physics (X’s) that you want to delete by clicking and dragging your mouse.
3. Then go to Change physics ON/OFF frame
4. In the drop down list, select OFF
Turning off the physics on individual and/or groups of bones: Method 2 (Short Method)
1. Select the individual bones you want to delete the physics from (Do this in No calculation mode).
2. If the physics button in the bone manipulation box is blue, click on it. If it’s already not blue don’t click on it.
3. Click on the register button next to the “physics” one.
Restating the physics on individual and/or groups of bones: Method 1 (Long Method)
1. Select the individual bones that you want to re-apply the physics to (Do this in No calculation mode).
2. In the Frame manipulation window (to the far left), individually select the physics (X’s) that you want to restate by clicking and dragging your mouse.
3. Then go to Change physics ON/OFF frame
4. In the drop down list, select ON
Restating the physics on individual and/or groups of bones: Method 2 (Short Method)
1. Select the individual bones that you want to re-apply the physics to (Do this in No calculation mode).
2. If the physics button in the “bone manipulation” box is not blue, click on it. If it’s already blue don’t click on it.
3. Click on the register button next to the physics one.
Incase you want to know, you can change the on/off state of physics between frames! For example at frame ten, you want the model or certain bones on that model’s physics to go off, and at frame 30 you want them back on again. This is actually possible! You can use either method, but I recommend the second ones just so you don’t get lost.
Changing the physics on/off in different frames:
1. Go to the frame at which you want to turn the physics off (in this case frame 10)
2. Delete your model’s physics (using one of the above methods)
3. Register at that frame.
4. Move to the frame in which you want to turn the physics back on (in this case frame 30)
5. Restate the model’s physics (See above)
As a final note about this mode, you do not have to play or render your animation in on/off mode. On/Off mode is more specifically for seeing the setup of the physics (which ones are on or off) without pressing play.
anytime(E): In anytime, the physics are always on, when your both playing your animation and not. The only exception to the constant physics, is if you turn them off manually. BUT, if you want the physics to always be on, no exceptions, follow these steps:
Having the physics constantly on, 100%:
1. Make sure anytime in the Physical Operation bar is selected.
2. Select Physical Operation> playtime use on/off mode.
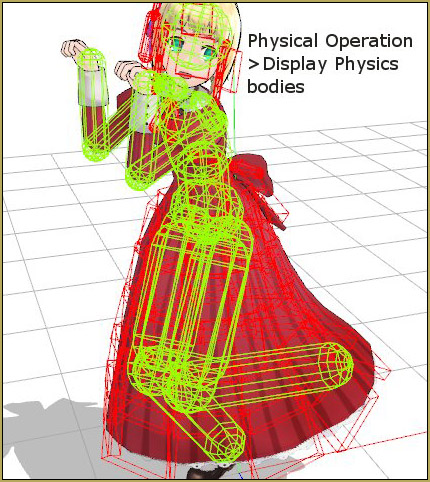
trace mode (T): Trace mode is the physics mode in which you cannot move the physics bones. The bones instead (when registered) align, or trace themselves with the physics bodies.
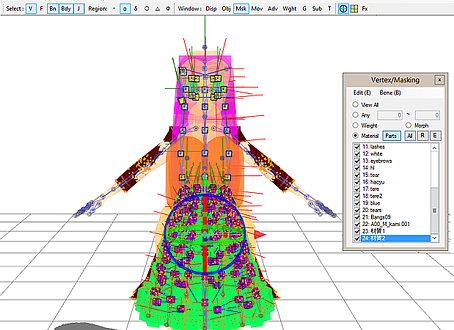
Physics bodies are the “pieces of physics” assigned to certain bones. The red ones are affected by gravity(“wind”)and the green ones are not. If you go to Physical Operation>Display Bodies. You’ll see what they are.
After a lot of messing around, I found out that: “trace mode” is not that different from “no calculation.” Except for these things:
- Trace mode will always have the physics on during playtime (unless you turn them off manually, but there is no button that you press for all the universal physics to turn off).
- During trace mode, when you move from frame to frame, the physics bodies will stay with their designated bones.
- You cannot move the physics bones in Trace mode.
no calculation (N): The new no calculation received a huge improvement over the no calculation in the previous MMD versions.
No calculation universally turns off your physics. All the models are affected when you click this button. Now, at first, it does not turn the physics off completely; they still go on during playtime. Luckily this can be changed.
Turning the physics completely off, 100%:
1. Make sure you are in no calculation in the Physical Operation bar is selected.
2. Select Physical Operation> playtime use on and off mode
–
gravity setting (G):

Now you can REGISTER the Gravity Settings!
Though this tab is familiar to most MMD users, there is a new thing about it that I’d like to mention: you can Register the Gravity settings. For those who do not know what the “gravity setting” is. I’ll give a quick explanation:
Gravity setting: What it does and how to use it.
In MMD physics terms, gravity basically means wind. When you click the the “gravity settings” option on the “Physical Operation” tab you’re going to get a window that pops up with three sliders on it labeled: x, y, and z.
x: When you move the x slider to the left the “wind” will blow left (Towards -1). When you move this slider to the right the “wind” will blow right (Towards 1).

y: When you move this slider to the right, the “wind” blows upward. When you move it to the left the “wind” blows downward.

z: When you move the slider to the right the “wind” blows from the front. When you move the slider to the left the “wind” blows from the back.
 or backwards (away).")
Now for the update on the gravity settings: You can now change gravity in different frames!
Scenario: In a DRAMATIC animation, you want the wind to blow forward first (frame 0-30)and then up (31-60). Luckily, you can now do this!
Changing the gravity (wind) settings in your animation:
1. Go to the frame where you want to start your first wind effect. (Here, wind effect just means the setting of the wind).
2. Go to Physical Operation>gravity setting
3. Adjust your the x, y, and z sliders to what kind of wind you want
4. Hit the register button in the “gravity settings” window (the one with the sliders).

5. Go to the frame where you want the second wind effect to be made
6. Repeat steps 2-4
Keeping the Physics there:
Scenario: You just sit your model (who has a long skirt) down on the floor with the physics on “anytime” mode. The skirt, with the help of physics, smoothly sets itself along the floor, instead of going through like it normally would. You want to turn the physics off for a while because they’re slowing down MMD, but you also want the skirt physics to stay. Here’s the fix!
Keeping the physics bones in place while still having the physics off:
1. Once you have your model (and their physics) in the position you want to keep, click Select all then Register in the bone manipulation box.

2. Select no calculation or trace mode in the Physical Operation tab.

Now your physics will stay there, and your computer won’t have a heart attack!
– – –
This new engine has greatly baffled me for a while. It still does in some ways. This tutorial has been an overview of what I’ve seen, and how you can apply that to your “MMD’ing. ” If you find a new discovery, that’s fantastic! (Tell me about it)
Happy animating,
Winky
– SEE BELOW for MORE MMD TUTORIALS…
— — —
– _ — –
![]()


MMD Tutorial Example: In MMD, you want to turn off physics on the active character model for frames 0-500.
1. The top MMD menu 6th menu from the left, Select physical operation, on-off mode.
2. The top MMD menu 6th menu from the left, Select physical operation, select physical bone. This causes all of your character’s physics bones to be selected, and all of your character’s non-physics bones to be deselected.
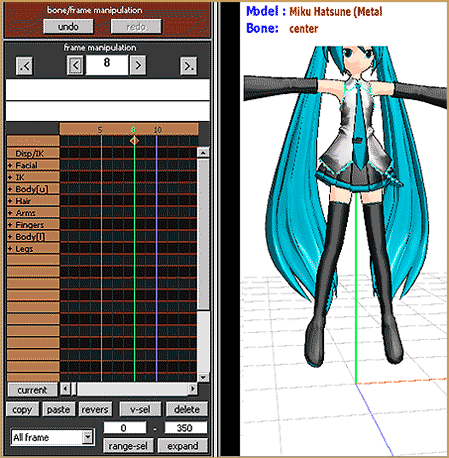
3. In the frame manipulation panel (left side of MMD), go to frame 0.
4. In MMD’s bone manipulation panel (bottom of MMD), turn off the “physics” button by clicking on it, if it is not already turned off. (If the physics button is turned off, it will have a white color. If the physics button is turned on, it will have a grey color.) Then click on the “register” button of the bone manipulation panel.
5. After registering a key frame for your character’s physics bones, you should now see your character’s physics bones appear visible in MMD’s main 3D view window (if the “select” button of the bone manipulation panel is turned on).
6. In the frame manipulation panel (left side of MMD), go to frame 500.
7. The “physics” button is still turned off. Click on the “register” button of the bone manipulation panel. Now each physics bone of your active character model is being controlled by 2 key frames during the time period from frame 0 to frame 500, instead of being controlled by physics.
8. In the frame manipulation panel (left side of MMD), go to frame 501.
9. In MMD’s bone manipulation panel (bottom of MMD), turn on the “physics” button by clicking on it. Turning it on causes it to have a grey color. Then click on the “register” button of the bone manipulation panel.
10. Now the animation of each of your character’s physics bones is controlled by 2 key frames from frame 0 to frame 500, not controlled by physics from frame 0 to frame 500. From frame 501 to the end of the animation, your character’s physics bones are controlled by physics.
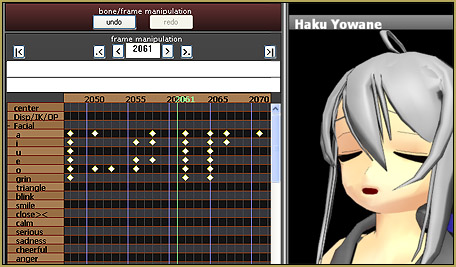
11. In the frame manipulation panel, the key frames where physics is turned on, and normal key framing is turned off, will appear as X, instead of having the normal diamond shape.
Additional possibilities:
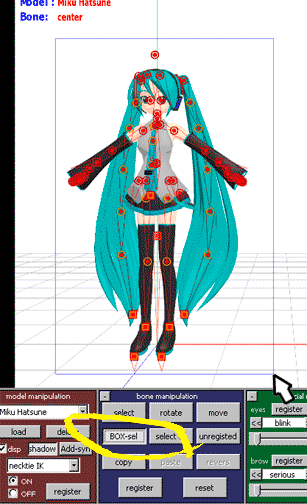
1. You can also key frame only some physics bones instead of all of them, using Box select (Box-sel) in the bone manipulation panel, for example, before clicking “register”. Selected bones appear red in MMD. You can also change the locations and/or rotations of individual physics bones before registering key frames for those changes.
2. Under physical operation, there are 2 other menu items which can help you to edit your physics on and physics off key frames:
select physics ON frame (X Mark)
change physics ON/OFF frame
Wow! … Awesome information… Thank you! All of our pages are totally searchable and the search engines will find your discussion, here… so… thanks for your help!… Readers will benefit!
It’s your loss that you did not use a proper email address… or we could have contacted you.
Bro i have a question
What if i want the physics to be on for all the animation except a certain frame?
For example i have a model that wears a hoodie and if i make it move too fast the physics fuck it up and for example the hoodie goes trought it
What if i want the physics to be on for the entire animation except during that frame wich i make the model move fast?
Here’s what I’m talking about
https://www.instagram.com/p/BmjduJJgbsE/
The model changes stage and position a lot of times and i had to turn off the physics even thought they would be helpful for the rest of the animation
Is there any way to avoid this?
Technically, you can freeze physics for selected bones and selected time. Uncheck the “physics” button in the Bone Manipulation Panel, and register the bone you want to turn it off. Be wary, though, that the bone will freeze not in the position it would be if moving normally, but the way its coordinates are configured *without* physics. That itself may cause unwanted jerking, so you must plan carefully.
Physics bones will actually register in whatever position they’re in, not in default position. If you want to freeze them at a particular position, try using trace mode for your physics, then step through the animation starting from the beginning (or from the last place physics were enabled for the bone.) Register a physics on frame, then a physics off frame one frame later, and they will freeze in place. This is actually pretty cool, and you can use it to make seamlessly repeating animations involving physics.