How can I edit MMD effects? How do I edit Raycast materials? What is HLSL? How can I edit MME?
Learn to Edit MMD Effects by Editing Raycast Materials
![]() A lot of people are afraid to edit MMD effects. Effect files are like magic spells, full of unpronounceable words from an ancient, dread tongue, and the first time you try to edit MMD effects, very little makes any sense.
A lot of people are afraid to edit MMD effects. Effect files are like magic spells, full of unpronounceable words from an ancient, dread tongue, and the first time you try to edit MMD effects, very little makes any sense.

But many effects include parameters intended to be edited by anyone. Raycast MMD is one such  effect: every material definition is actually its own, independent effect. They’re effects that get further interpreted by Raycast’s main effect, but they’re still independent effects. Although Raycast comes with a material editing interface, you still need to type the values in.
So maybe you don’t realize it yet, but if you’ve been editing Raycast materials, you can already edit MMD effects; you’re already a shader programmer!
What next then? Duh: get better at it! And a good way to learn to better edit MMD effects is to start understanding what’s happening in the Raycast material effects you’re already writing.

Starting to edit MMD effects
If you’ve already begun to edit MMD effects, including Raycast materials, go ahead and skip this section. I’m just going to give some background to people who haven’t reached that point yet.
When you load a file like Ray.x, MME searches for an .fx file of the same name in the same directory and loads it– like ray.fx. Sometimes it makes new render targets to hold bits of information for later use; sometimes it loads effects into those render targets automatically. For example, ray.fx creates a MaterialMap render target and loads material_2.0.fx automatically into it.
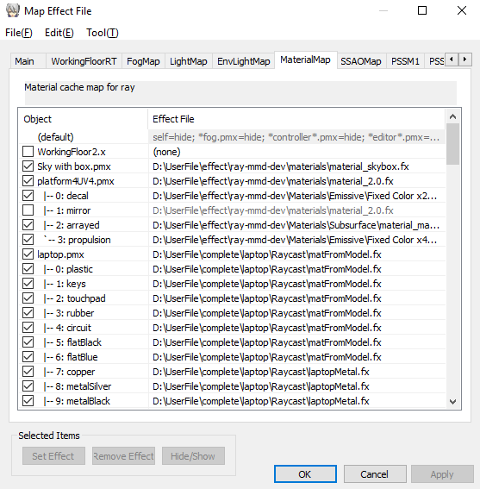
But you can often change the effects loaded onto a particular render target. In the case of Raycast MMD, you can edit material files– that is to say, edit MMD effects– and load them onto models or individual materials in the MaterialMap render target to get a wider variety of materials into MMD for a more beautiful render.
An effect file is just a text file. It doesn’t matter that they use the .fx extension (other than the fact that MME looks for an .fx extension to load the file automatically) or the .fxsub extension or sometimes .conf or .h. You can open them up in any text editor (Windows comes with Notepad, but I use Notepad++.) You can edit MMD effects just by typing and you can save them directly from the text editor.
What is HLSL?
You edit MMD effects with a programming language called HLSL (High Level Shading Language— you wouldn’t want to see what low level looked like.) HLSL is based off the influential C programming language, and anyone with any knowledge of C shouldn’t need to read this article.
When MME loads an effect, it tells your operating system to compile the effect into code readable by your video card, in a fashion that depends on your specific video card, and voila! you get a different render than you would otherwise.
Computers are dumb
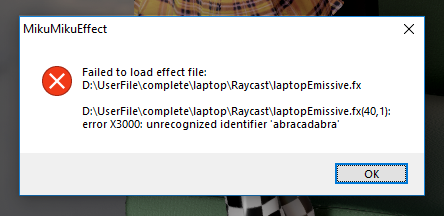
 Really, really dumb. When you edit MMD effects, everything has to be spelled the right way (or spelled the same wrong way, as is too often the case.) Including capitalization. There’s a big difference, for example, between = and ==, between () and {}. It’s easy to make a lot of tiny little mistakes with spelling, capitalization, open parentheses, etc. You can’t refer to a value in nearly any way until you’ve actually told the computer what you’re referring to– it’s no use telling it afterwards, the compiler won’t listen. It stops as soon as it doesn’t understand something.
The good news is, that’s fine. If you mess something up, MME will give you an error message when it loads the effect. Which it does, by default, every time you save an effect file that’s in use. It’s okay to make mistakes. I make hundreds of mistakes like this in the course of writing a single small effect! Nobody gets it perfect the first time. You fix the error, save, fix the next one, save, and eventually, you’ve got it all under control. That’s fine. It’s like Bushido: there is no failure, only death. Who knew programming was so macho?
Understanding Raycast material definitions
Let’s open up a Raycast material definition and see what everything is. If you want to follow along, I’ll be looking at Materials/ClearCoat/material_albedo.fx. But all of them follow the same rules.
Pre-processor directives
The very first line you see when you open material_albedo.fx is
#define ALBEDO_MAP_FROM 3
This is known as a pre-processor directive. In this case, it is a define directive. The reason they’re called pre-processor is because they’re evaluated before the code is actually compiled into machine code; these kind of instructions are marked with a hashtag (#). Think of them as macros, convenient ways to find and replace throughout your code.

When material_albedo.fx gets compiled, the first thing that the compiler does is find everywhere that ALBEDO_MAP_FROM is used and it cuts that out and replaces it with 3. It’s good to understand that, because if you type something incorrectly in a definition, some compilers won’t realize where the error is. If I instead type,
#define ALBEDO_MAP_FROM 11.1
then some compilers won’t realize there’s an issue until the first place that ALBEDO_MAP_FROM is actually used, and tell me that line number, even though the error is actually on the very first line.
Notice that the definition is in capital letters. It’s a convention used by almost all programmers so that they can tell at a glance whether a particular value refers to a value defined by a pre-processor directive or whether it refers to a variable value.
#defining Other Types
Definitions don’t have to be numbers. Check out line 6:
#define ALBEDO_MAP_FILE “albedo.png”
This will replace every instance of ALBEDO_MAP_FILE with “albedo.png”, which the compiler might use to decide what image to read for the diffuse texture of your material.
#include statements

There are other kinds of pre-processor directives. Scroll down now to the very last line of material_albedo.fx and you’ll find
#include “../material_common_2.0.fxsub”
#include is another kind of macro. It finds the specified file and copy/pastes it into the effect, right where you tell it to be included. (That’s important, because it’s not changing any relative paths for any files referenced by the included HLSL file.) You can find the specified file up one directory (../) and open it up. And if you delete the #include directive and instead copy/paste the contents of material_common_2.0.fxsub in, you’ll find that the material shader behaves identically.
The #include instruction is just a way for programmers to organize their code. In this case, it spares people editing materials from having to look at all the confusing lines in material_common_2.0.fxsub and it allows all of the material definitions to refer to a single file– so that you don’t have to change a million files every time you want to change the way the shader operates. This is a principle known as Once and Once Only in programming circles, and it’s a very important principle, often more easily said than done.
Variable Declarations
Take a look now at line 8:
const float3 albedo = 1.0;
This is what’s known a variable declaration and initialization. We declare what kind of thing albedo is and we set its initial value.
 The first word, const, is a word that indicates to the compiler that this variable will never, ever change: it is a constant. That allows the compiler to do some things with the variable that it couldn’t otherwise, simplifying some programming tasks and improving the speed at which it renders. The compiler just forgets that there was ever a name for this value or a way for it to be set and builds it right into the code instead.
Variable Types
A float is a floating point value, which is a number that might have a decimal place. For example, 1.1 meters is a floating point value, but 3 stairs are not, because you can’t have half a stair– 3 is an integer value, and would be declared with a line like
int stairCount = 3;
Casting
In this case, albedo is referring to a color value, expressed as a red/blue/green triplet of floating point values that usually exist in the range from 0 to 1. But if it’s actually three values, why is there only one number? When this value is used, it gets cast, meaning converted from one type of data to a different type, using specific rules. The compiler is smart enough to know that if you write only a single number, you probably want that single number in all the values of that color. Telling it 1 or 1.0 or 1.0f for float is the same thing as telling it (float3)1 which is the same thing as telling it float3(1,1,1). Which is white.
You can give it three numbers if you want. If you’ve told Raycast to ALBEDO_MAP_APPLY_SCALE (by defining that value to be 1, which is computer-speak for true), or if you’ve set ALBEDO_MAP_FROM to 0 (which is Raycast-speak for just make it the color I tell you), you can enter any triplet here you want. Try out
const float3 albedo = 1.2*float3(1, 0, 0.5);
Those aren’t well-chosen values, because the material might reflect more red light than it receives (1.2 times as much), but you can do it. Raycast will do its best to interpret it– in this case, as a hot pink color. But notice that not only did I assign a value, I did some math right there in the statement. The asterisk (*) is a multiplication symbol. You can do all sorts of math in most of these statements.

float2
There are more types than floats and ints and float3s. Notice line 9:
const float2 albedoMapLoopNum = 1.0;
A float2 loop distorts the pattern.It’s a float2 because it contains two different numbers: scaling factors for U and V coordinates for your textures. If you change this line to read,
const float2 albedoMapLoopNum = float2(1.0, 2.0);
 then you tell Raycast to scale your texture to only half size in its vertical axis, squashing it down.
And, yes, there are also float4s. They’re actually the most common variable type used in HLSL. (And there are samplers, and textures, and strings…)
The semicolon
There’s just one more bit to this line, but it’s very important: the ; semicolon. The semicolon tells the compiler that it’s the end of the instruction. Every instruction line needs to end in a semicolon.
But what about the pre-processor directives? Our #define statements don’t end in semicolons. Remember, these aren’t real instructions. They’re macros. The actual lines where those defined values will get copy/pasted in have their own semicolons. If you put a semicolon at the end of the define statement, you’ll probably end up with too many semicolons, and possibly in the wrong places. Let’s make a mistake on purpose:
#define RGBMULT 2;
float3 rgb = (float3)(3*RGBMULT);
Can you see what will happen when RGBMULT gets copy/pasted in? We get
float3 rgb = (float3)(3*2;);
Which ends our line before the parentheses get closed, then creates a new line with closing parentheses but not opening parentheses, and we get an error.
Comments
If you’re like me, you probably don’t want to lose your old settings when you edit MMD effects. There’s a good way to keep those in the file without having to remember them through the use of comments. They’re called comments because they’re supposed to be used for programmers to make plain language notes about their code (yeah right), but they can be used to hide anything you want from the compiler.
Try doubling up your albedo declarations like this:
const float3 albedo = 1.0;
const float3 albedo = 1.2*float3(1, 0.5, 0.5);
Then save. If you have MMD+MME open and running that effect, you’ll get an error, because variables shouldn’t be declared twice. But you can comment out one of these lines by typing // at the beginning of the line, and then the compiler won’t see it.
//const float3 albedo = 1.0;
const float3 albedo = 1.2*float3(1, 0.5, 0.5);

Save it, click through the MMD error message from your older version, and you’ll see that it’s running properly. Now, anytime you want to return to your old albedo value, all you have to do is comment out the second declaration and uncomment the first:
const float3 albedo = 1.0;
//const float3 albedo = 1.2*float3(1, 0.5, 0.5);
//const float3 albedo = float3(1, 0.5, 0.5)/10.0f;
Multi-line Comments
Looks like I tried out a new value that didn’t work out like I wanted either. You can comment out as many lines as you want. You can also comment out multiple lines using /* to open the comment and */ to close the comment, like this:
const float3 albedo = 1.0;
/*const float3 albedo = 1.2*float3(1, 0.5, 0.5);
const float3 albedo = float3(1, 0.5, 0.5)/10.0f;*/
Just don’t try to nest multiple line comments inside each other or you’ll probably get an error. HLSL compilers will gladly spend hours carefully examining loops for optimizations to net a few microseconds, but nested comments, apparently that requires HAL.
Let’s take a break and do something fun
Enough, this is boring. Let’s do something weird.
float colorMod : CONTROLOBJECT < string name = “(self)”; string item = “Goth”; >;
float4 colorMod2 : CONTROLOBJECT < string name = “(self)”; string item = “floor”; >;#define ALBEDO_MAP_FROM 3
#define ALBEDO_MAP_UV_FLIP 0
#define ALBEDO_MAP_APPLY_SCALE 1
#define ALBEDO_MAP_APPLY_DIFFUSE 1
#define ALBEDO_MAP_APPLY_MORPH_COLOR 0
#define ALBEDO_MAP_FILE “albedo.png”
//const float3 albedo = 1.0;
static float3 albedo = float3(colorMod2.y, colorMod, 1);
//const float2 albedoMapLoopNum = 1.0;
#define PI 3.14159265359
#define PERIOD time/(2.0*PI)
#define albedoMapLoopNum float2(1, sin(PERIOD))
I’ve created two controls, right here in my material definition. One reads my model’s morph named Goth. The other reads the world space position of a bone in my model named floor. Then I use those to modify the color of my albedo map.
More dramatically, I use the current time to control the albedo’s loop— making my texture stretch in a wave automatically, without any keyframe registrations. It’s not so hard to edit MMD effects, see? You can edit MMD effects right from the Raycast materials.

Note that the standard Japanese named bones don’t work well with HLSL. You should create English named bones to control effect variables. They can be hidden bones or system morphs. They’ll still work.
Static Variables
Static variables are like constants, but slightly different. They don’t change, but unlike constants, they can depend on run-time values, values that change frame-to-frame, like we’re doing here. Constants can’t do that. They’re built into the program. So I commented out my old constant variables and used static variables instead.
time is defined later in the #included effect file, and refers to the time elapsed in MMD in seconds. By using a #define statement to access it, I can refer to it before the compiler actually knows what it is. But I could also just make a redundant variable referencing the same value. Here, I’m using time to scale my albedo texture in a nice, smooth sine wave pattern.
Using a #define to do this isn’t the best way to do things (remember the capitalization conventions?) but it works for just playing around.
Tracing code

Okay, now you know what sort of thing albedo is, and what sort of thing ALBEDO_MAP_FROM is, but how do you know how the shader actually uses these? By reading the code.
I’m sure there’s a video tutorial somewhere….Of course you don’t want to have to understand everything to be able to understand one thing. Start by finding where the word is used. In this case, let’s do a search for ALBEDO_MAP_FROM. It’s only used once in the file? Not quite, because remember, material_common_2.0.fxsub gets copy/pasted into the file by the compiler. So open up that file and search in it as well.
There are a lot of files in Raycast, too many to conveniently search with a simple text editor. A good way to search the code is by searching its Github repository. Github will search all the files in the repository for any keyword you specify, faster than your own computer could do it.
And you break it down from there. When we get confused by
#elif ALBEDO_MAP_FROM == 4
float3 albedoColor = use_spheremap ? tex2D(AlbedoMapSamp, coord * albedoMapLoopNum).rgb : MaterialDiffuse.rgb;
then we search again: Google for #elif (an HLSL pre-processor directive), == (an HLSL reserved character set) and ? (a ternary operator), Microsoft HLSL documentation for tex2D (an HLSL intrinsic function), and the Raycast code base for use_spheremap, AlbedoMapSamp, coord, albedoMapLoopNum, etc. It’s complicated but it’s all doable if you approach it one step at a time.
Believe it or not, most of the words in an effect file actually mean something. Albedo isn’t the True Name of some third-tier demonic sycophant; it is the amount and color of light reflected by a body. By learning what these words mean in the context of 3D graphics, you can edit MMD effects much more easily.
Other Resources
There are still a lot of basics I haven’t discussed here: function declarations, blocks, conditionals, loops, techniques, semantic, scripts, passes… My goodness. Anyone who wants to edit MMD effects is encouraged to read as much of Microsoft’s documentation as they can stand.
For a good start on understanding the default MMD/MME shader, check out the translated version of yzrlog’s excellent analysis.
It would also be worthwhile to read the translated documentation for MME.
Most computer graphics techniques are platform agnostic– that is to say, at a conceptual level, OpenGL does mostly the same thing that DirectX does. When searching to learn more, don’t ignore resources involving different languages!
Keep the faith and share your art with the world! Feel free to download and use this Teto model, this chair, and this laptop. You don’t have to credit me, just pay it forward by sharing what you make! And no, comments are not ignored at LearnMMD– please ask if you’re trying to edit MMD effects but having trouble, or if you’ve made a cool effect yourself and want to share!
– SEE BELOW for MORE MMD TUTORIALS…
— — —
– _ — –


