![]() Why do imported objects turn white? Why don’t imported accessories move right? How can I fix imported textures and bones in PMXE?
Why do imported objects turn white? Why don’t imported accessories move right? How can I fix imported textures and bones in PMXE?
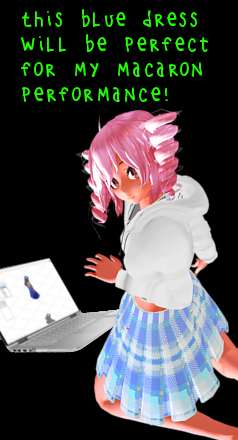
Hi! Reggie forwarded me a few questions from readers having to do with some problems that people often have when starting to learn PMXE. One reader writes,
When I load the finished model into Miku Miku Dance it changes the base of the model to white.
Another writes,
I add a necklace to my model but when I went to MMD it didn’t move with the body.
If this is happening, don’t worry! It happens to everybody, and it’s easy to fix. It just requires learning a little bit about PMXE.
What happened to the textures?
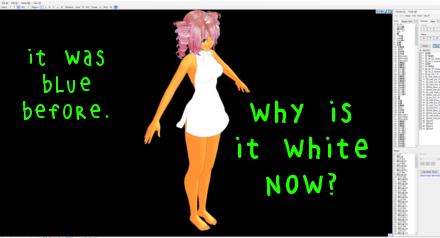
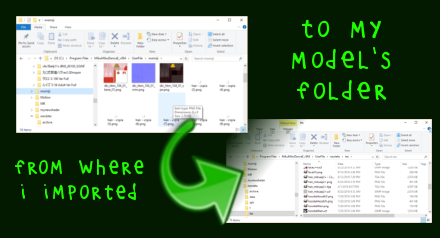
When Teto imported the dress into her model file, not everything came with it. That’s because parts of the dress are textures. PMXE needs to know where to find these files. When you import one model into another one, PMXE no longer knows where to look. You have to copy the textures from the old model’s folder into the new model’s folder.
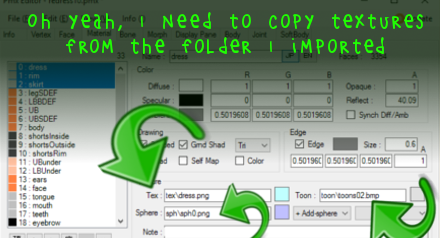
Copying textures from imported models in PMXE
If you’re not sure what to copy, you can probably get away with copying everything. But you can look at the PMXE materials tab to figure out exactly what textures you need to copy. In this case, PMXE says that it expects the dress texture to be named dress.png, and it expects it to be in a folder named tex. So once I copy that tex folder to the same folder that the model is in, I’ll be good!
 If it’s open, PMXE isn’t going to realize that you copied textures. It doesn’t look unless you tell it to. You can tell it to check for textures again with Edit->Update or ctrl-U from the 3D window. Or, you could close PMXE and open it again.
Why aren’t my accessories moving right?
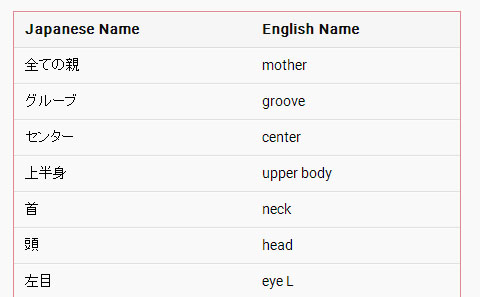
 When you import a new model into your model, it needs to know how to move. Sometimes, the imported object is just weighted to a center (センター) bone, instead of weighted to the parts of the body that you want it to use. Sometimes, your model has more bones than the accessory modeller knew about: the modeller may have weighted it to an Upper Body (上半身) bone, but you have an Upper Body 2 (上半身2)bone that would be a better bone for that accessory to follow. When that happens, the imported accessory isn’t going to move right on your body.

Fixing imported bones in PMXE
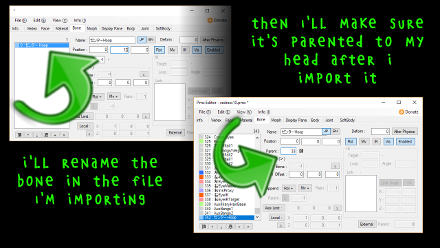
But it’s not hard to fix this. Before you import one model into another, take a look at the bone tab. This will give you an idea of how the model is laid out. One good technique is to rename the bones in models that you import. Then, when you import this model, the bones will be added rather than merged. (And, you can use the imported model’s bones to more easily adjust its position and orientation.)
Then, after you import the model, you have to make sure that the imported model’s bones are following the right bones for your model. Here, Teto’s ears follow her head (頭) bone. So we’re going to assign the head bone as the parent of our imported earring’s center bone.
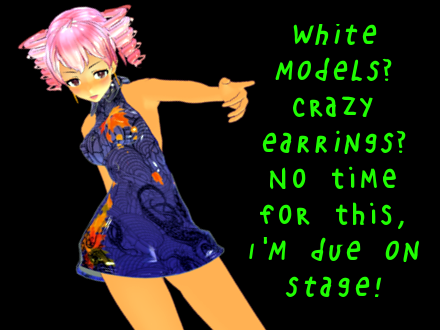
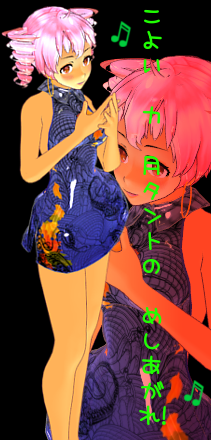 Now, with a new haircut to show off her earrings and the high collar of her new dress, Teto’s ready to perform! And your model is too!
Keep the Faith and credit your sources! I used my own Tda Tutor Teto for this tutorial, in a dress based on meshes by Kanahiko-chan!
![]()
– SEE BELOW for MORE MMD TUTORIALS…
— — —
– _ — –







https://seiga.nicovideo.jp/seiga/im9754663
This is the stage that comes with textures but MMD does not display them. If anyone could shed some info about this specific stage I would appreciate the advice.
All these texture names are in Japanese, so maybe your gaijin Windows has trouble using them. First, if you didn’t use Bandizip to unpack the archive, redownload it and unpack once again to preserve those filenames intact. If you did, and *still* can’t see textures, prepare for a long and tedious process: open the stage in PMXE, select every material in it, replace the Japanese texture name with something with English letters only, AND THEN FIND THE RESPECTIVE TEXTURE FILE AND RENAME IT THE SAME. You may or may not find it quicker to open the .x stage as a simple text file in an editor that treats Japanese characters properly (Notepad++ is my choice, standard Windows Notepad is NOT) and find and edit those names directly there.
.x files themselves you’ll have to rename too.
Hello there, I have around the same problem. I’ve tried every tutorial, fixes, or even watched videos on it, or it might just be that I don’t understand the instructions that well. But when I open the file that I want, like the base, it comes out fine. But when I go to import things, it turns white and I try to copy the files and all, even renaming as well as putting in the textures to the tex and sphere boxes. Can you help me? Or explain the instructions in simpler terms for a beginner like me.
Have you tried putting all of the texture and sph files into the same folder as your model? … That is usually the problem… all of the model and its parts should be together in the same folder.
When you open an existing model, the editor looks for its textures in the same folder where it loaded the main .pmd or .pmx file from. When you import a part, you can take the shape from anywhere, but for its textures it *won’t* look in a folder where the part itself is, and will just keep looking where it started (until you open a different model, at least). If you want to assemble a model from parts, first gather all their files in a single plain folder, then start messing around.
Hello there, I have a problem and very tutorials or fixes that I’ve looked at so far haven’t worked. But I could just not be understanding it. When I open the file to the model and such, it comes out perfectly but no matter what, when I import anything it comes out white. I’ve tried to copy the files, fix the textures, use other downloads, but none of it works. Can you help me? Or explain it in simpler terms.
Hey, it seems like my PMXE doesn’t want that I load more than one thing. Every second thing I import turns white and when I load the texture again, it doesn’t work.
I tried all, I renamed the stuff, I checked the folder path and so on and don’t know what to do now. Please help me TwT
You can load one model at a time. Everything else has to be added as a part. This is normal for 3D modeling/editing programs. You use the IMPORT controls/command to add parts.
I have tried this, and no matter what I do textures refuse to load in pmx, however they show up if I load the original file in mmd. I don’t know how to fix this, and it’s been stressing me out.
Okay. Find one example of a white texture in your edited file. What is the folder path of the edited file? Look at the material that isn’t getting a texture. What does it say in the Tex field for that material in PMXE? Now, what is the folder path of the texture you want to use for that material?
Hello good afternoon
I placed a model and it appears completely invisible. as much as in the MMD as in PMX editor
i need help. when i load my model on pmx editor 64x i can put any hair on the model. it goes completel white and invisible and i cant move it. how do i fix this prob?
You came *exactly* to the page that has answers to both of your problems. Have you tried to read what it says?
i have a problem guys. i downloaded pmx editor 64x eng from dv. everything is running fine but when it comes to the model a problem comes up. i cant put the hair on the model, it either comes invisible or white or not there at all. when i load the hair instead i cant add the model. so all i have is a naked model and i cant do anything about it. pls help. not even clothes or accessories
Okay,so I went on this very website and downloaded mmd,its components,and the english PmxEditor x64.When I open PmxEditor I have 3 errors.
1.Failed to Initialize Direct3D x2
2:Failed to initalize plugin.
When the errors are done,PmxEditor opens but the view doesnt.Please help me.I can’t make myself a mmd model if I cant see!
Be sure you have added the required programs for MMD: The DirectX 9c Runtime and the two C++ versions correct for your version of MMD.
See also: https://learnmmd.com/StartHere/Steps5.html If you are new to PMXE and new to MMD… put the idea of making your own model at the bottom of the list of things you will be doing. Learn to run MMD… become “a pro” with it before considering the making of a model.
Additionally to the other advice: find the PMXE archive file you’ve downloaded (download another if you simply “opened” it without saving when installing PMXE), right-click on it, and select “Properties”. See if there’s an “Unblock” button, and if so, press it, erase the previously unpacked PMXE folder, and unpack the archive anew. That might resolve the “Failed to initialize plugin” error for you.
I had the same problem. Not only was the View not functioning, I also couldn’t really load anything. I know it wasn’t an “unblock” issue because I already knew about it (I’ve been using MMD and PMXE for years, I’m just reinstalling on a new system), and I know it wasn’t an issue of not having the right DirectX or Visual C++ because I’d already downloaded all the right stuff.
I eventually fixed it by enabling 3D acceleration. I’m working in a virtual machine (because my main OS is Linux, which MMD and PMXE don’t work on), which meant that enabling 3D acceleration just meant tampering with the VirtualBox settings. If you’re not running a VM, then enabling 3D acceleration probably involves messing with the BIOS.
I’m not sure it’s a common problem, but i made a model that looks fine in PMXE transform view, but once he’s in mmd some vertices are messed up even without posing him! and i’m 100% sure it’s not a vertex count issue because he’s only 13k and he doesn’t have any useless vertices. can someone help me? (for information: it’s a model i exported from blender)
I am referring your question via email… please see your email.
All of the writing is combined in PMXE. How do I fix it?
What is there to fix?
Do you mean that the text in English PMXE goes under the boxes? That’s a known issue with some versions of English PMXE. Unfortunately, there isn’t really a way to fix it due to how PMXE is constructed. You just have to learn to work around it.
Ok, if the problem you refer to is unnaturally big fonts on all PMXE panels, you can try several possible solutions:
1) Set text size to 100% and screen resolution to “recommended” In Control Panel Display settings.
2) Also select “Set custom text size (DPI)” and check the “Use Windows XP style DPI scaling” option.
3) Right-click the PMXE executable, select Properties/Compatibility and check “Disable display scaling on high DPI settings” option.
If fonts are of the normal size but texts are just too long to fit their places (can happen if you use iBozo’s PMXE translation), use a different PMXE. Here’s the newest favorite: https://www.deviantart.com/inochi-pm/art/PmxEditor-vr-0254f-English-Version-v2-0-766313588
Did you ever get helped? This is a really hard question to answer without having the model file to look at it. The most likely culprit is bad weights– and it’s pretty easy to get bad weights when exporting from Blender, because Blender and MMD handle weights very differently.
These are some questions that I would be asking myself to troubleshoot the issue: what does the model look like when I re-import the .pmx into Blender? What does the model look like when I open it in PMXE? What does the model then look like when I view it in PMXE’s transform mode? Are the misplaced verts under the influence of physics? What are the exact weights of the misplaced verts: do they add up to 1? What type are they? Are they weighted to any bones that don’t make any sense?
I edited a hair texture for a model I was making (well, using hair and base models) but the hair texture glitched and it mapped just the red and I had to edit the color map things just to get the hair to even show red in the first place. Does anyone know of a fix?
Can you explain better? What exactly did you want to do, what exactly you did, and what exactly went wrong?
I created a base in PMXE, and it turner out looking perfect. I had to copy the file names to the texture reader, like you showed in the tutorial. However, when I loaded the model in MMD, the base itself was fine, while everything else on it (hair, clothes, etc) were pure white. It only happens in MMD. I even took a look at transform view, and it looked fine.
Any ideas? I can’t really upload a good picture right now, but I can try if you really need one.
Make sure that textures from all parts you import into the model are gathered in model’s folder.
Don’t trust PMXE seeing your textures until you’ve closed and restarted PMXE. PMXE tries to “remember” relevant texture locations when importing models, but MMD won’t do that (and PMXE will forget after close/restart.)
If some textures are working but some others aren’t, it’s probably the case that there’s a mismatch between some of the paths given for textures in the .pmx file and the actual location of those image (texture) files. Go through your model’s materials, one by one, and make sure that the textures exist on the paths specified, relative to the folder where the .pmx file exists.
whenever i load pmxe, the windows are all scrunched up like this: https://www.dropbox.com/s/okizgd8e0hjqwdt/pmxe%20ridiculosness.PNG?dl=0
and enlarging the editor does nothing to help this. is there any way to fix it, or am i sol?
This has to do with interactions between more recent versions of Windows and PMXE. The solution lies in your Windows settings, not PMXE, and it depends on your specific system details. Googling “pmxe text size win10” and “compatibility win10 text size” gave me a long list of articles with various things to try; that’s what I would recommend. (In the future, it might be smarter to ask these kinds of questions on articles that are relevant to the issue– a good place for general questions would be https://learnmmd.com/reggie-replies/ .)
Thank you so much for your help! I finally got the editor working by changing my dpi after weeks of driving myself mad with uninstalling and reinstalling c++, .net framework, and even the editor it’s self! I am very new to learn mmd, so my apologies for not commenting in the right place, i will be sure to make a note for next time
It’s no biggie, please free to ask when you need help. I’m glad you got it all working, have fun!
Um… I’m not sure if this was already asked, I haven’t seen this question yet, but…
When I imported a back hair model, the hair was too far above the head model. Is this common? Is there a way to fix it? Answering would be good, thanks!
Nope… not a common problem… may just be an error in that model. … Fix it?… most likely… open it in PMXE and give it a shot!
Are you trying to edit a model by adding a different (or plain new) hair? If so, yes, the issue is quite common. You have to adjust the imported part to fit the base. See this tutorial, for example; you can find more by searching for “fixing models”, “rigging”, etc.
Soo, when attempting to redo the textures of my models eyes, instead of them turning out pure white they show up like this: https://i-am-ayla-cat.deviantart.com/art/Um-What-732888900?ga_submit_new=10%3A1519635726
Any solutions that DON’T involve UV map primer? I can’t install at the moment(For unknown reasons) and I need an alternative.
Even though they say that one picture is worth a hundred words, in your case, I’m afraid, it won’t be enough. Please provide more details about what you attempted, how did you expect to accomplish it, and what you got in result. Don’t be afraid to bother us with long posts, we’re tougher than we look.
Due to lack of time available, I will give you a basic overview of what I attempted and what I aimed to do.
I was following https://www.youtube.com/watch?v=_K7G60PLLWs to make a model of my own (assets don’t match because the key ones were not available) and I reached the recolouring of the eyes. In the video, it shows the same issue but using UV map primer to fix the issue. I cannot install said plugin for unknown reasons(all useful screen shots of my issues and steps are available here: https://sta.sh/2amfx5yu1z3?). I can supply more information/screenshots/links later.
First, you have the UV plugin downloaded, but when you try to launch it, it throws the error, is that right? If so, try to right-click on its file, select Properties, and see if there’s Unblock button in there. If there is, press it, and try to launch the plugin again.
Now, if you *absolutely* can’t get it to work (it’s a useful thing to have, so you ought to try), there’s a different way. Open the new and the old texture file in a graphic editor, and modify the new one to have exactly the same proportions and the eye to take exactly the same position in it.
… I forgot that the selection to unblock a file is only there if the file is blocked. Thanks for your assistance, and sorry if I wasted your time in any way.
Update:
Plugin doesn’t load correctly after unblocking – different error though…
Error: https://sta.sh/0dr6hj5dhsv
Will try the other tip you advised. It may make editing textures more difficult, but I’ll adapt to it.
UPDATE: Last time I’ll bother you hear, I promise. The English translation of the UV editor does not appear to be compatible with the latest version of the PMDEditor. After running some driver updates, and downloading the original version of the plugin, I have been capable of successfully launching the editor with the plugin installed.
I apologise once again if I have been a nuisance in any way, and thank you for assisting me in resolving this issue.
It’s okay, as long as you succeed. (^_^)_b
If I remember correctly, there are different plugin versions for PMDE and PMXE, and the translated version only applies to PMXE. Then again, you might find it useful to move to PMXE altogether and convert models that you edit into a newer format. Comparing to PMDE, its interface may look a tad intimidating at first (and that comes from personal experience!), but trust me, in the end you’ll be handsomely rewarded.
I see now I should have selected PMXE instead of PMDE – all of the tutorials are in PMXE.
Thank you for your advice and your assistance.