![]() How do I render 60FPS video in MMD? What codec should I use when rendering in 60 FPS? How do I upload 60FPS MMD videos to YouTube? How do I use Ut Video with MMD?
How do I render 60FPS video in MMD? What codec should I use when rendering in 60 FPS? How do I upload 60FPS MMD videos to YouTube? How do I use Ut Video with MMD?
Rendering HD 60 FPS video with
MikuMikuDance, and upload it to YouTube!
Goedendag (good day) LearnMMD readers, I am parkeerwacht a Dutch MMD’er and I am new here on the team. I was wanting to share my techniques, for creating HD 60 FPS MMD videos and uploading them to YouTube.
There is still a lot that I have to learn about MMD, but Let’s learn together. :D
Introduction
Since YouTube supports 60 FPS videos these days, you must have seen a lot (or at least some) of MMD videos being uploaded in 60 FPS. (FPS stands for Frames Per Second, for the people who don’t know.) If you are like me and thought: Well why not set the frame-rate to 60FPS in MMD’s render options and you’re done, right? Well this is not everything you have to do. If you don’t use proper codecs and settings, the end result may be at a low quality. In this article I will be explaining how I render in 60 FPS step by step.
Sooo… let’s get started!
Step 1: Create an MMD animation.
 Load up MMD and make your animation. It can be anything you like. It doesn’t matter for this tutorial. But for this Article I will be using my latest MMD video I uploaded to my YouTube channel. You can watch it at the bottom of this page.
What? You don’t know how to create an animation?
No problem, there many tutorials here on LearnMMD to help you with that, like creating a dance/music video. You can follow these instructions from our editor Reggie Dentmore in this article: Make an MMD Music Video Bo Beep Bo Beep! or find other things you can make here: https://learnmmd.com/StartHere/
Step 2: Let’s talk codecs.
Once finished with your animation, you must render it to an AVI, of course. AVI video is a container format, which means it can contain any codec you would like. (well not all, but I am not going into detail here because that will get very complicated.)
So which codec should I use?
Choosing a proper codec is what a lot of people forget when making videos in general (not just MMD). You may think it is as simple as picking any codec that you  like, Right? Well this may turn out ok. But I have found a codec called Ut Video.
Ut Video is a lossless codec, which means that whatever goes in, comes out. A lot of codecs are “lossy”, this means that there is quality loss after encoding. YouTube also uses a lossy codec.
The nice thing about this codec is, that it is both 32-bit and 64-bit. This means that this will work in 64-bit MMD. Most codecs I tried before only worked in 32-bit. So I had 2 MMD versions running. (64 and 32 bit) This codec is also fast at encoding 60 FPS video.
Ok so, where do I download this codec?
You can download the latest version (23.1.0 as of 07/04/2024) of Ut Video by clicking this link (the latest release is at the bottom of that page… use the .exe format, it installs UTV properly so that MMD can find it. )
Step 3: Rendering in 60FPS
using Ut Video
UPDATE: 29-04-2016: Due to a bug in Ut Video, the audio may get out of sync at some point in the video. A workaround is to lower the screen size in MMD, if you run into this bug.
Before you start rendering make sure your screen size is at least 1280×720 or YouTube won’t encode your video in 60 FPS, use this article from YouTube as reference for your resolution (screen size). There is a table on there that shows you the resolutions you can use. I selected 2560×1440
Rendering using this codec doesn’t differ from any other codec, except that you have to change some settings.
Do the following:
-
- Go to file (F)
- Click on render to AVI file (V)
- Choose where you want to save your video file.
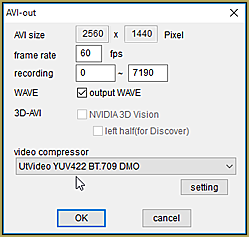
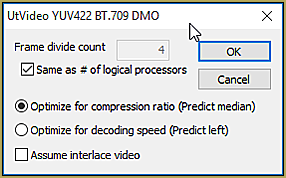
- On the AVI-out screen change the following settings (or check the picture)
-
- Set frame-rate to 60 FPS.
Select UtVideo YUV422 BT.709 DMOas compressor. NOTE: YouTube prefers 4:2:0 subsampling to be uploaded, use YUV420 BT.709 DMO for faster processing by YouTube.
- Now click on the settings button.
- Select the following settings:

- Tick “Same as # of logical processors”
- Select “Optimize for compression ratio (Predict median)”
- Click on OK.
- Then click on OK to render.
This should render the video in proper 60 FPS! :D
IMPORTANT NOTE:
When using this codec make sure you have at least 40GB of free hard drive space. This codec outputs very large files. As you can see in the image this video is almost 26GB large.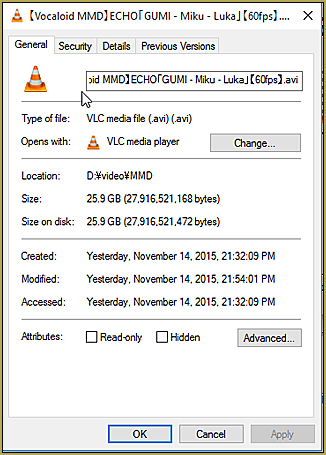
We are going to fix this in the next step. I don’t know how long your video is, so 40GB is a good recommen-
dation.
Another note, Rendering may take a long time. Anything from a few minutes to a couple of hours. This depends on your screen size, the amount of MME effects that you have used and the speed of your processor and video card. I have a High End computer, so I was able to render this in 15-20 minutes.
Step 4: Transcoding the video to upload it to YouTube.
UPDATE 28-12-2016: I wrote a new guide on transcoding which can be found in this post, the instructions here were out of date. the post linked give you better results! Follow the information under H.264:
Using the right codec when Rendering to AVI in MMD
Step 5: Upload the final video to YouTube
I am not going very in-depth about this, because our author MMD-Nay-PMD has written an article about this: Uploading MikuMikuDance YouTube Videos MMD
Be sure to include 60 FPS in the title of your video, this will tell people who browse YouTube that your video is 60 FPS.
Also, because it is 60 FPS, you will have to wait a little longer for it to process. This is my result:
Some tips/notes:
Make sure to playback your video after rendering from MMD. If you use VLC, you can’t play it back. VLC also doesn’t support the codec. Use Windows Media Player instead. Do the same when you are done with transcoding.
Why go through all of these steps?
The reason for using this method is that, this way, you prevent YouTube from destroying your video after processing. It is also because direct H.264 codec in MMD 32 bit makes MMD crash (at least for me) This is because this codec doesn’t work well with the AVI format.
If you have any tips/suggestions, if you have used this article to render your videos, if you have any questions or if you have another method of processing your 60 FPS videos, please tell me in the comments. I like to answer questions and I am open to feedback.
This article was inspired by this post from Trackdancer on Deviant art I was browsing through his DeviantArt when I saw that post. You can read through some MME effects noted there but I was mostly interested in the codec.
So, this covers what I have discovered about rendering in 60 FPS in MMD.
Tot ziens (goodbye),
Parkeerwacht
– SEE BELOW for MORE MMD TUTORIALS…
— — —
– _ — –







When trying to render, I only get a split second of video. How do I fix this??
Do you have the length of your animation entered into those windows right below the MMD PLAY button. MMD has to know how long your animation is supposed to be.
I prefer to use:
AviUtl and Tsunderenko for newbies or MeGUI for advanced users.
With AviUtl you can do everything you want, like putting lyrics with karaoke, transition effects… etc etc there’s a lot of tutorials for AviUtl on google and the final quality is pretty good when you render in 1080p + x264.
Ut Video is not showing every time i try to render it what do i do?
You say “not showing” … is that black screen with sound?
no when you get the option for the video compresser it wont show up
I would suggest, maybe, download and install that UT Video codec again.
So, i have gotten UTvideo 2 work 4 me, but tonight it keeps crashing. it says “MMD has stopped responding” whenever i click on making the codect UT 709 422 which is the one u recommended. I try all of them and the same thing happened.
HELP ME!!!! I am making a MMD 4 my BFF’s bday on Monday and i rllllllyyyyy need help getting it 2 work!
Plz respond as soon as u can, this is urgent!!
What screen size are you using? and at what framerate?
Thx, so much! The only thing wrong is that when i play the vid it’s abit blurry, is there any way I can fix that
There are two different causes of blurriness: codec loss, and low resolution.
Every single step along the way can lead to image degradation (codec loss). Make sure that you are rendering to a lossless codec like UT (I use a Lagarith personally). Then, anytime you run it through a conversion program, make sure that you’re just using H.264 encoding. If you’re using additional steps, make sure that the codec is lossless at every step until the last!
The other thing is resolution. Render at a high resolution, then convert at the same resolution you rendered at. And, finally, make sure that you’re playing at the proper resolution as well! You have to tell Youtube to let you watch in, say, 1080p.
As with codecs, any extra steps you take in the middle have to preserve the resolution. There’s no point in rendering at 1080p, then 720p, then back to 1080– you might as well have used 720p to begin with, you’re never going to recover that quality.
My laptop won’t let me download the ut video.
The video in that article? It played fine, just now, on my old XP desktop system… I don’t know what to tell you.
You can use the Windows Live Movie Maker if you create a Save Movie setting. Then you can change it to 60 fps. When I did, it changed to 720p on Youtube. I don’t know if you already figured this out, but I was excited enough about it to type this. :)
Cool! I’ll try that out!
Does the ut codec work with MikuMikuMoving in the same way?
On the AVI-out screen, I can’t access the settings (It’s just gray) and everytime I choose the codec for the video compressor, the MMD asks me to close the program. What do I do??
Interesting…
I can suggest these things:
Reinstall Ut Video (Run the setup program as admin!)
Try another codec other than Ut Video, to check if it is actually the codec or something else. (try cinapack but when you use that one reduce to 30fps and 640×480 screen size, just for testing!)
Try lowering the screen size (even I don`t use 2560×1440 anymore I reduced it to 1920×1080 because it greatly reduces render times! and file size!)
If this doesn`t work, tell me!
It doesn’t work; it’s the same for other codecs as well. Most likely something else.
May I have a screenshot of the problem?
https://scontent-lga3-1.xx.fbcdn.net/hphotos-xfa1/t31.0-8/12594016_223906471285785_6690618689168046707_o.jpg
You must select the UtVideo Encoder! Cinapack crashes for me as well!
It’s the same for UtVideo Encoder
For the greyed out part of options, it is normal. “AVI size” is only displayed; to change it you have to set Menu->View->Screen Size in the main MMD window, “Output WAVE” is only active when you load a sound file, and “3D-AVI” requires Nvidia hardware to work. As for crashing, is it the same for AVI Raw option? Also make sure you have all supporting programs installed properly, as per troubleshooting article.
Thanks KB! I was actually wanting to contact you about the problem!
So far I haven’t said anything that’d solve it, yet. :P
I have all the supporting programs, but it still doesn’t work.
May I have some details of your system.
What are the specefications of your system? (what kind of hardware)
Is this it??
https://goo.gl/EnpDwV
Hmm interesting I never seen systems with an AMD E1-2500. I looked it up and I think it is your system not being able to handle the load, causing MMD to not respond. I see that it is an HP laptop, may I have the model number so I can look it up. But from what I looked up about your processor, it seems that this series CPU’s are being used in low end laptops. It has enough power for everyday usage (social media, web browsing, video playback etc.) I have said in the post that a powerful system is recommended, I tested Ut Video with my laptop which is a mid range laptop from 2009.
I will verify if this is true by doing a render on a few of my systems. I will try my slowest system that is able to run MMD (intel Core 2 Quad with intergrated graphics) I may even have a system that is similar to yours.
The model number is 400-334
ouch… I am sorry but I think your crashes may be related to the system I looked it up online… I know that PC
In my country there about 300 euros, I don`t like it. Price to performance wise. (thats me ranting sorry)
But I think your error is hardware related. the Internal Graphics are not cabable of handling MMD very well. And I don`t expect you to be able to render at high resolutions at it. (if render at all)
It may even be memory but I was able to get a sucesfull render on 4GM of memory…
I did find this review of a similar HP system: https://youtu.be/akVnl4HIHPY Maybe you find it interesting…
I can`t think of anything that may be the solution to your problem sorry. What you can try is put all your MMD files onto a USB stick and use a computer from a friend. and see if it will work there. To see if it is a problem with your PC or MMD itself. That`s all I can think off as of right now.
Thanks you, i will try to make a HD video with your amazing tutorial.
I’ve been using this codec quite a lot but yesterday it gave me an error saying “Cannot connect pVideoOut to CompressorIn” and now I have no choice but to go back to using Aviraw for video renders. Restarting didn’t help either… Help?
Weird I have never got that error before.
Can you explain to me the exact steps you take until you get this error, so I can replicate the error. This will help me to find a solution
Another note:
Have you updated your GPU drivers recently? Updates may break stuff from time to time.
I am looking into the problem.
i’m still got crash :\
so MMD crashed for you? Make sure to use the 64-bit version of MMD with this codec the installer will install the 64 bit version of the codec when you have a 64 bit system (if you have a 64 bit machine and windows most systems these days are)
If you use that: Try to lower the screen size in MMD to 1280×720 it may resolve the crash of your system not being able to handle higher resolutions.
Try to set your system locale to Japanese (go to Controll panel then Region, click on the administrative tab, click on Change system locale and select japanese. Reboot and try it again) I also had issues with this, and this seemed to solve it for me.
Another thing. For the transcoding step. A subscriber on my Youtube pointed me to this program: https://handbrake.fr/ Its a free and open source video converter. It does the job better than DVDVideoSoft. So I am using this one now instead. Use the same settings as described in the article (there at different places but they shouldn`t be hard to find)
Use x264vfw instead and you’ll get files around 600 megas.
I tried that to render in that codec but it crashed or the quality drop was too bad.
I may look into that codec again. If I succeed I will post it here
~parkeerwacht
One note:
Try other settings in step 3 and 4
like screen size: 2560×1440
and in transcoding set the resulution to 1920×1080 try it, your end result will be sharper than if you set the screen size to 1920×1080
there many variants of settings you can use just find what works best for you